
Crochet Flower - Tutorial

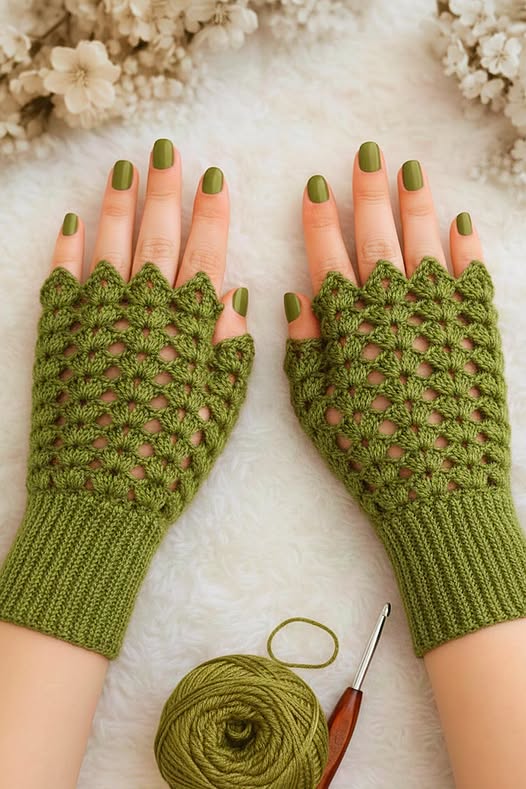
Creating a Fingerless Crochet Glove – Pattern is one of the most rewarding projects for both beginners and seasoned crafters looking to combine style with functionality. These accessories have become a staple in modern wardrobes, offering the perfect balance of warmth for your palms and wrists while leaving your fingers free to type, text, or sip a warm cup of coffee. If you have been searching for a versatile Fingerless Crochet Glove – Pattern, you are in the right place to start a journey that blends traditional craftsmanship with contemporary fashion needs.
The beauty of a Fingerless Crochet Glove – Pattern lies in its simplicity and the endless possibilities for customization through different yarn types, stitch textures, and color palettes. Many enthusiasts prefer these over traditional mittens because they provide better tactile feedback, making them ideal for autumn walks or chilly office environments. By following a structured crochet tutorial, you can transform a simple skein of yarn into a pair of sophisticated hand warmers that reflect your personal style and attention to detail.
When you dive into the world of crochet patterns, understanding the foundational elements is key to achieving a professional finish. This article will guide you through the essential materials, the step-by-step process of constructing the glove, and the advanced crochet techniques required to master the Fingerless Crochet Glove – Pattern. Whether you are making these as a thoughtful handmade gift or as a cozy addition to your own collection, the following sections will provide all the insight you need to succeed in your next DIY crochet project.
To begin your journey with the Fingerless Crochet Glove – Pattern, selecting the right crochet hook size is the first crucial step for success. Most patterns for hand warmers recommend a G/4.0mm or H/5.0mm hook, depending on the weight of the yarn you choose to ensure the fabric is dense enough to provide warmth but flexible enough for movement. Using the correct hook ensures your gauge is accurate, preventing the gloves from being too tight or overly loose.
The choice of yarn weight significantly impacts the final look and feel of your Fingerless Crochet Glove – Pattern. For a classic, durable pair, many crafters opt for worsted weight yarn or DK weight yarn made from wool blends or high-quality acrylic. These materials offer excellent stitch definition, allowing the intricate details of your handiwork to stand out while providing the necessary insulation for cold weather.
In addition to hooks and yarn, you will need a few basic crochet notions to complete the project professionally. A sharp pair of craft scissors and a tapestry needle (or yarn needle) are indispensable for weaving in ends and seaming the sides of your gloves. These tools ensure that your Fingerless Crochet Glove – Pattern looks as neat on the inside as it does on the outside, preventing unravelling over time.
Don’t forget the importance of stitch markers, especially when working in continuous rounds. When following a Fingerless Crochet Glove – Pattern, marking the first stitch of each row helps you keep track of your progress and ensures the thumb hole placement is symmetrical on both hands. This small step saves a significant amount of time and reduces the need for “frogging” or ripping out your hard work.
Measuring your progress is vital, so keep a flexible measuring tape nearby. Since hand sizes vary, a good Fingerless Crochet Glove – Pattern will often provide measurements in inches or centimeters rather than just row counts. This allows you to customize the length of the wrist cuff or the height of the palm section to fit your hand—or the hand of your recipient—perfectly.
Finally, consider the aesthetic elements like buttons or contrasting yarn colors for the edging. While a basic Fingerless Crochet Glove – Pattern focuses on the structure, adding these small details can elevate a simple design into a unique fashion statement. Preparing all your materials beforehand creates a smooth crocheting experience, allowing you to focus entirely on the rhythm of your stitches and the joy of creation.
The foundation of any successful Fingerless Crochet Glove – Pattern is mastering the basic crochet stitches. Most patterns utilize the Single Crochet (sc) for a tight, warm fabric or the Half Double Crochet (hdc) for a bit more height and a softer drape. Understanding how these stitches interact is essential for creating a glove that is both sturdy enough for daily use and comfortable enough for long-term wear.
Gauge is perhaps the most overlooked aspect of following a Fingerless Crochet Glove – Pattern, but it is vital for sizing. Before starting the actual glove, always crochet a gauge swatch (usually a 4×4 inch square) to see if your tension matches the designer’s recommendations. If your swatch is too small, switch to a larger hook; if it is too large, move to a smaller hook to ensure your gloves fit correctly.
To create the ribbed effect often seen on the cuffs of a Fingerless Crochet Glove – Pattern, you will likely use the Back Loop Only (BLO) technique. By inserting your hook only into the back loop of the previous row’s stitch, you create a stretchy, accordion-like texture that mimics knitted ribbing. This elasticity is crucial for ensuring the glove stays securely on your wrist without being uncomfortably restrictive.
Advanced textures in a Fingerless Crochet Glove – Pattern can be achieved through Post Stitches or Bobble Stitches. These techniques add depth and “squishiness” to the fabric, making the gloves feel more luxurious and providing extra warmth through added thickness. Learning to work Front Post Double Crochet (fpdc) stitches can give your project a professional, braided appearance that is highly sought after in modern crochet.
Consistency in tension is what separates a beginner project from a masterpiece. When working through your Fingerless Crochet Glove – Pattern, try to keep your grip on the yarn and hook steady throughout the entire process. If you find your tension changing when you are tired, it is often better to take a break so that the second glove matches the first one in size and shape exactly.
Finally, understanding how to increase and decrease is necessary for shaping the thumb gusset if your Fingerless Crochet Glove – Pattern includes one. An increase (inc) involves placing two stitches into a single space, while a decrease (dec) joins two stitches into one. These subtle shifts in stitch count allow the glove to contour to the natural shape of the human hand, providing a “tailor-made” feel to your finished accessory.
The first phase of the Fingerless Crochet Glove – Pattern usually begins with the ribbed cuff. This is typically worked in rows and then joined to form a circle, or worked vertically to the desired wrist circumference. Starting with the cuff ensures a snug fit around the arm, which prevents cold air from entering the glove and provides a solid anchor for the rest of the hand construction.
Once the cuff is complete, you will transition to the palm section of the Fingerless Crochet Glove – Pattern. This part is often worked in continuous rounds or joined rounds, depending on whether you prefer a visible seam or a seamless look. During this stage, you will focus on building the height of the glove from the wrist up toward the base of the thumb, maintaining a consistent stitch count for a smooth finish.
The most critical part of the Fingerless Crochet Glove – Pattern is the thumb hole creation. This is usually done by “chaining over” a certain number of stitches to create an opening, or by working a thumb gusset that gradually expands the width of the glove. Correct placement of this opening is essential for comfort, ensuring that your thumb can move freely without the fabric pulling or bunching awkwardly between your fingers.
After the thumb opening is established, the Fingerless Crochet Glove – Pattern continues upward to cover the knuckles. This upper section provides the “fingerless” look, ending just below the first joint of the fingers. You can customize this height based on your preference; some people like the gloves to end at the mid-palm, while others prefer them to reach higher for maximum warmth while still allowing finger dexterity.
Finishing the edges of your Fingerless Crochet Glove – Pattern with a slip stitch (sl st) or a crab stitch (reverse single crochet) adds a polished touch. These finishing rows help the edges maintain their shape and prevent the top of the glove from stretching out with repeated use. It is these small finishing techniques that contribute to the longevity and professional appearance of your handmade items.
The final step in the construction process is the assembly and weaving. If your Fingerless Crochet Glove – Pattern was worked flat, you will need to use a mattress stitch to sew the sides together, leaving the hole for the thumb. Once the seams are closed, use your tapestry needle to hide any remaining yarn tails inside the stitches, ensuring the inside of the glove is smooth and comfortable against the skin.
Adaptability is a major advantage of the Fingerless Crochet Glove – Pattern. To adjust the pattern for children’s sizes, you can simply use a thinner yarn and a smaller hook, or reduce the number of initial chains in the cuff. Because the hand’s proportions remain relatively similar across ages, scaling down the overall dimensions while following the same logic will result in a perfectly sized pair for smaller hands.
For men’s sizes or larger hands, you may need to add more rows to the palm area and increase the circumference of the cuff. A good Fingerless Crochet Glove – Pattern is easily modified by adding a few extra stitches to the starting foundation. When making these adjustments, it is helpful to take periodic measurements of the hand you are crocheting for to ensure the fit and comfort are optimal before you get too far along.
Colorwork is another fantastic way to customize your Fingerless Crochet Glove – Pattern. You can use variegated yarn for a natural, multi-colored look without changing balls, or implement striping techniques by switching colors every few rows. This allows you to coordinate your gloves with specific outfits or create bold, high-contrast designs that showcase your creative flair and mastery of crochet color theory.
Texture variations can also breathe new life into a standard Fingerless Crochet Glove – Pattern. By substituting the main body stitches with Waffle Stitches or Alpine Stitches, you can create a thicker, more rugged-looking glove that is perfect for outdoor activities. These textural changes not only look impressive but also trap more air within the fibers, significantly increasing the thermal properties of the gloves.
Adding functional embellishments like a flip-top mitten cover can turn your Fingerless Crochet Glove – Pattern into a “convertible” glove. This involves crocheting a separate “hood” that can be buttoned back when not in use and pulled over the fingers when the temperature drops. This hybrid design is incredibly popular for commuters who need access to their phone screens but want total warmth during their walk.
Finally, consider the fiber content based on the intended use of the gloves. For someone with sensitive skin, a soft merino wool or a high-quality cotton/acrylic blend is best for a Fingerless Crochet Glove – Pattern. If the gloves are intended for heavy outdoor work, a rugged, machine-washable superwash wool will provide the durability needed to withstand friction and frequent cleaning while maintaining the integrity of the stitches.
How long does it take to crochet a fingerless glove?
For most intermediate crafters, a single glove from a Fingerless Crochet Glove – Pattern can be completed in about 2 to 4 hours. A full pair usually takes a dedicated afternoon or a few evenings of casual work.
What is the best yarn for fingerless gloves?
A worsted weight wool blend is often considered the best choice. It provides the necessary warmth, has enough stretch to fit the hand comfortably, and offers great stitch definition for the Fingerless Crochet Glove – Pattern.
Can a beginner make these gloves?
Yes! Many Fingerless Crochet Glove – Pattern designs are specifically written for beginners. If you know how to chain, single crochet, and double crochet, you have the skills needed to create a beautiful and functional pair of hand warmers.
How do I wash my crochet gloves?
It depends on the yarn fiber. If you used acrylic or superwash wool, you can often machine wash them on a gentle cycle. However, for most handmade items, hand washing in cool water with a mild detergent and laying them flat to dry is recommended to preserve the shape.
Are fingerless gloves actually warm?
Surprisingly, yes. By keeping the wrists and palms warm, your overall blood circulation to the hands stays warmer. While your fingertips are exposed, the core of the hand remains insulated, which is often enough for moderately cold weather.
How do I make the thumb hole bigger?
If you find the thumb hole in the Fingerless Crochet Glove – Pattern is too tight, you can simply add 1 or 2 extra chains when creating the thumb space, or work an extra row of increases in the gusset section before splitting for the thumb.
In this guide, we have explored the comprehensive journey of creating a Fingerless Crochet Glove – Pattern, from selecting the finest crochet materials to mastering the essential stitches and construction techniques. We’ve discussed how to achieve the perfect gauge, how to build the glove step-by-step from cuff to fingers, and the various ways you can customize the size and style to fit any hand.
Crochet is a skill that rewards patience and creativity, and a pair of fingerless gloves is the perfect project to showcase your progress.


