
Crochet Flower - Tutorial

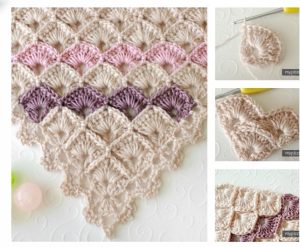
Mastering the Crochet Scale Stitch – Pattern, often famously referred to as the Crocodile Stitch, is a transformative milestone for any fiber artist looking to add extraordinary texture and visual depth to their work. This unique technique creates a series of overlapping scales that mimic the natural armor of reptiles or the delicate feathers of a bird, making it a standout choice for high-fashion accessories and whimsical home decor alike. When you first encounter a Crochet Scale Stitch – Pattern, you might be intimidated by its complex 3D appearance, but beneath the surface lies a rhythmic logic that becomes incredibly meditative once you find your flow.
The brilliance of the Crochet Scale Stitch – Pattern is its versatility across various projects, from cozy winter scarves and mermaid-tail blankets to intricate purses and even holiday decorations like evergreen trees. Unlike flat stitches, this particular textured crochet stitch consumes more yarn, but the result is a thick, plush fabric that offers superior warmth and a tactile experience unlike any other. By integrating a Crochet Scale Stitch – Pattern into your repertoire, you are not just following a set of instructions; you are learning how to manipulate vertical posts to create architectural interest in your hand-hooked fabric.
In this comprehensive guide, we will break down the essential components of the Crochet Scale Stitch – Pattern, ensuring you have the knowledge to execute it with precision and confidence. We will cover the foundational rows, the secret to maintaining consistent tension, and how to choose the right materials to make your scales “pop.” Whether you are an intermediate crocheter looking for a new challenge or a curious beginner ready to level up, the following sections will provide a deep dive into the mechanics and artistry of this legendary crochet technique.
Before you dive into the stitches, selecting the right yarn fiber is the first step to ensuring your Crochet Scale Stitch – Pattern looks professional and holds its shape. While you can use almost any yarn, a mercerized cotton or a crisp acrylic works best because these fibers provide the structural integrity needed to keep the scales from sagging. If the yarn is too soft or fuzzy, the distinct “v-shape” of the scales might get lost in the halo of the fibers, diminishing the overall impact of the design.
The choice of crochet hook size is equally vital when working through a Crochet Scale Stitch – Pattern. Because this stitch involves working around the posts of double crochet stitches, it can naturally become quite tight. Many experts recommend using a hook that is one size larger than what is suggested on the yarn label to ensure the scales have a bit of “bounce.” A hook with a smooth, ergonomic handle is also a plus, as the repetitive movement around vertical posts can be more taxing on the wrist than standard horizontal rows.
Understanding the “Two-Row Repeat” is the mathematical heart of the Crochet Scale Stitch – Pattern. This pattern is unique because it relies on a foundation row of V-stitches (two double crochets separated by a space) followed by the actual scale row where you work your stitches around those posts. You cannot have the beautiful scales without the structural “skeleton” underneath. Mastering the transition between these two distinct phases is what allows the Crochet Scale Stitch – Pattern to grow seamlessly and symmetrically.
Stitch markers are your best friend when navigating a complex Crochet Scale Stitch – Pattern, especially if you are working on a large-scale project like a shawl. Since the scales are worked vertically and then horizontally across the row, it can be easy to lose track of which V-stitch post you are currently working on. Placing a marker at the beginning of each repeat helps you maintain the alternating scale layout, which is essential for that classic overlapping look where the scales of the current row sit perfectly between the scales of the row below.
Measuring your yarn consumption is a practical necessity when planning a project with the Crochet Scale Stitch – Pattern. This stitch is notorious for being a “yarn eater,” meaning it uses significantly more yardage than a standard double crochet fabric. Always ensure you have bought enough yarn from the same dye lot to complete your project. There is nothing more frustrating than running out of yarn halfway through a row of scales and finding that the new skein has a slightly different shade that ruins the visual continuity of your work.
Finally, preparing your workspace with a clear printed pattern or digital chart will save you from common mistakes. The Crochet Scale Stitch – Pattern is highly visual, and many crafters find that a diagram is much easier to follow than long strings of text. By visualizing how the hook enters the post from the top down and then moves from the bottom up on the adjacent post, you can internalize the “U-shaped” path of the yarn, making the process much more intuitive and enjoyable as you progress.
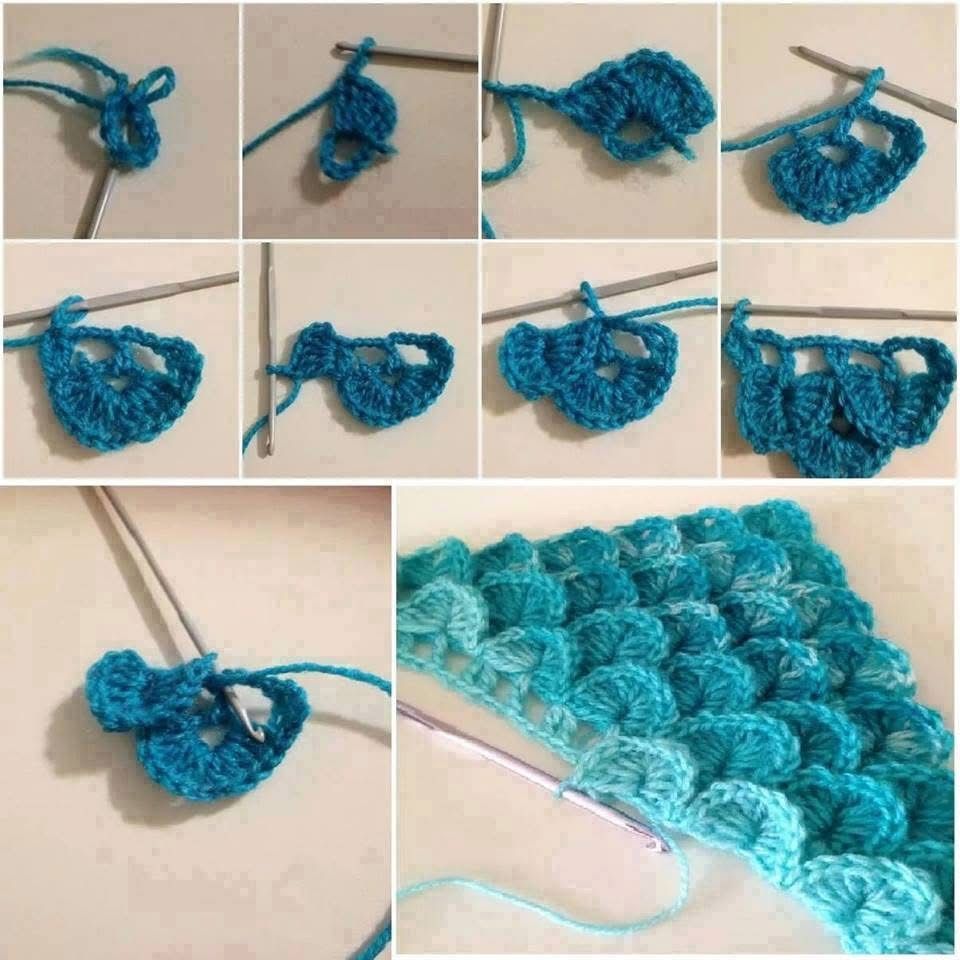
The actual magic of the Crochet Scale Stitch – Pattern happens during the second row of the repeat, where you transform simple posts into 3D scales. To begin a scale, you will work five (or sometimes four, depending on the pattern) double crochet (dc) stitches down the first post of a V-stitch. The key here is to rotate your work slightly so the post is horizontal, making it easier to insert your hook. This downward movement creates the first half of the scale’s distinctive pointed shape.
After reaching the bottom of the first post, you will often make a small chain stitch or a picot to create a sharp point at the base of the scale. Then, you must rotate your work again to work five more double crochets up the second post of the same V-stitch. This upward movement completes the “V” or “U” shape of the individual scale. When you finish this sequence in a Crochet Scale Stitch – Pattern, you will see a beautiful, flapping scale that is only attached at the top, allowing for movement and texture.
Consistency in tension is what separates an amateur scale from a professional one. If you pull your yarn too tight during the upward climb, the scale will curl inward; if you are too loose, it will look floppy and lose its definition. In a Crochet Scale Stitch – Pattern, the goal is to have all scales look identical in size and volume. Practicing on a small swatch before starting your main project will help you find the “goldilocks” tension that keeps the scales lying flat and overlapping correctly.
The “Intermediate Space” between scales is another area where many beginners get tripped up in a Crochet Scale Stitch – Pattern. Typically, you will skip one V-stitch foundation to create the alternating effect in the next row. Understanding when to work into a post and when to skip is what creates the “staggered” appearance of the scales. If you accidentally work into every V-stitch, the scales will be too crowded, causing the fabric to ruffle uncontrollably and lose its scale-like aesthetic.
Finishing a row in a Crochet Scale Stitch – Pattern usually involves a slip stitch to anchor the final scale to the foundation. This prevents the edges of your work from curling or looking unfinished. As you move from one row of scales to the next foundation row, you must pay close attention to where you place your new V-stitches. They should be centered over the “point” of the scales from two rows below, which maintains the structural integrity and the diamond-shaped alignment of the pattern.
Blocking your work is the final technical step that brings a Crochet Scale Stitch – Pattern to life. Because the scales are 3D and heavy, they can sometimes pull the fabric out of shape while you are working. Using steam blocking or wet blocking allows the fibers to relax and the scales to settle into their final positions. This step is particularly important for garments like capes or skirts, as it ensures the scales drape beautifully against the body rather than standing out at awkward, stiff angles.
One of the most exciting ways to customize a Crochet Scale Stitch – Pattern is through the use of variegated or self-striping yarn. Because each scale is worked individually, long-print yarns can create a stunning “gradient” effect where each row of scales is a different color. This is particularly popular for mermaid tail designs, as it mimics the iridescent shifting colors of a fish’s scales. The color changes happen naturally, allowing you to focus on the stitch rhythm without constantly weaving in new ends.
Adding beads to your Crochet Scale Stitch – Pattern can elevate the project into the realm of high-end jewelry or formal accessories. By sliding a bead onto your yarn before you start or using a small crochet hook to pull a bead onto the center “point” stitch of each scale, you add weight and sparkle. Beaded crochet scales look incredible on evening bags or boho-style necklaces, turning a standard pattern into a sophisticated piece of wearable art that catches the light with every movement.
You can also modify the “Fullness” of your Crochet Scale Stitch – Pattern by changing the number of stitches worked into each post. For a delicate, lacy look, you might use only three double crochets per side. For a chunky, heavy-duty texture, some patterns call for seven or eight stitches. This flexibility allows you to adapt the Crochet Scale Stitch – Pattern for everything from a light summer shawl made of silk thread to a rugged, heavy floor rug made of t-shirt yarn or twine.
Another creative twist is the Ombré Technique, where you manually change yarn colors every few rows. By starting with a deep navy at the bottom and gradually moving to a pale sky blue at the top, you create a sense of depth and dimension that highlights the overlapping nature of the Crochet Scale Stitch – Pattern. This manual color control allows for a more “intentional” artistic look than self-striping yarn and is a favorite for creating “dragon scale” fingerless gloves or themed cosplay items.
Combining the Crochet Scale Stitch – Pattern with other textures like the Puff Stitch or the Popcorn Stitch can result in a truly unique “mixed media” crochet project. You might use the scales for the border of a blanket and a simpler stitch for the center, or alternate rows of scales with rows of lacy filigree. These combinations prevent the project from becoming too heavy or “yarn-hungry” while still allowing the dramatic scales to act as the focal point of the entire design.
Finally, consider the directional use of the scales. While most people work the Crochet Scale Stitch – Pattern from the bottom up so the scales point downward, you can also work them sideways or use them as a “fringe” on the edge of a garment. Understanding that the scales are essentially “flaps” attached to a grid gives you the freedom to use them as decorative elements on pockets, hat brims, or even as 3D leaves on a crocheted floral arrangement, expanding the boundaries of traditional crochet.
The most common issue when learning the Crochet Scale Stitch – Pattern is a “leaning” or slanted fabric. This usually happens if the foundation V-stitches are not perfectly aligned or if the stitches on one side of the scale are tighter than the other. To fix this, always count your stitches on both sides of the “U” to ensure they are identical. A balanced scale is the key to a straight edge, especially if you are making a rectangular scarf where any deviation in width becomes immediately obvious.
If you find that your Crochet Scale Stitch – Pattern is becoming incredibly heavy or stiff, you may need to increase the number of foundation rows between the scale rows. Some modern variations of the pattern insert two or three rows of simple mesh or double crochet between the scales. This “spaced-out” version uses less yarn, drapes more like traditional fabric, and makes the project finish much faster while still retaining that iconic scalloped texture that everyone loves.
For those struggling with the “gap” that sometimes appears at the top of the scale, try working your slip stitches more tightly. In a Crochet Scale Stitch – Pattern, the top of the scale needs to be securely anchored to the foundation so it doesn’t “flop” forward too much. If the gap persists, check your hook placement; ensure you are catching both loops of the foundation stitch to provide a solid base. A secure anchor ensures the scales stay layered rather than looking like a jumbled mess.
Managing yarn tangles is another challenge, especially when using multiple colors for your Crochet Scale Stitch – Pattern. Because you are constantly rotating your work to access the posts, your yarn can quickly become twisted. Developing a habit of rotating your work clockwise for the first half of the scale and counter-clockwise for the second half can help “untwist” the yarn as you go. This small adjustment in your crochet ergonomics can save you hours of frustration and knots.
When it comes to resizing a Crochet Scale Stitch – Pattern, remember the “multiple” required for the foundation row. Most patterns require a multiple of 6 + 1 or 4 + 1 stitches. If you try to start a project without calculating the correct foundation chain, your scales won’t align at the edges, leaving you with half-scales or awkward gaps. Always do the math before you start to ensure your project has a professional, symmetrical border on both the left and right sides.
Lastly, be mindful of the “wrong side” of the fabric. The Crochet Scale Stitch – Pattern is not reversible; the back of the work looks like a simple grid or mesh. If you are making a scarf or a blanket where both sides will be visible, you may want to add a fabric lining or work two panels and sew them back-to-back. Understanding the one-sided nature of this stitch is crucial for choosing the right projects where the beautiful “dragon-hide” front can be the undisputed star of the show.
Is the Crochet Scale Stitch – Pattern suitable for beginners?
It is generally considered an intermediate stitch. While it only uses basic stitches like the double crochet, the way you have to rotate the work and navigate vertical posts requires a bit of coordination. If you are a beginner, try a few “post stitch” tutorials first to get used to the movement.
How much extra yarn should I buy for this pattern?
A good rule of thumb is to buy 30% to 50% more yarn than you would for a standard double crochet project of the same size. The overlapping layers effectively double the thickness of the fabric, which naturally requires a significant amount of extra yardage.
Can I use variegated yarn with this stitch?
Yes! In fact, the Crochet Scale Stitch – Pattern is one of the best stitches for variegated yarn. The way the scales break up the color pooling creates a “reptilian” or “mermaid” look that is highly sought after and looks much more complex than it actually is.
My scales are curling upwards, how do I fix this?
Curling usually means your tension is too tight on the second half of the scale (the upward climb). Try to consciously loosen your grip or move to a hook size 0.5mm larger. You can also try adding a chain-1 at the very bottom “point” of the scale to give the stitches more room to spread out.
Is this stitch good for baby blankets?
While beautiful, the Crochet Scale Stitch – Pattern creates a heavy and “holey” fabric. Babies’ fingers can sometimes get caught in the foundation mesh behind the scales. If you use it for a baby blanket, consider using a tight mesh foundation or adding a soft flannel lining to the back for safety.
How do I decrease in this pattern for a triangular shawl?
Decreasing in a Crochet Scale Stitch – Pattern involves skipping the scales at the beginning and end of the rows in a specific sequence. This gradually narrows the width while maintaining the staggered look. Most shawl patterns will provide a specific “decrease chart” to help you maintain the symmetry.
Mastering the Crochet Scale Stitch – Pattern is a journey that takes you from basic horizontal rows into the exciting world of 3D textile architecture. Throughout this article, we have explored the essential materials and hooks needed to get started, the technical precision required for the “U-shaped” scale rows, and the endless ways you can customize your work through colorwork and embellishments.
We also touched on the importance of the foundation “skeleton” and how to troubleshoot common issues like curling or yarn-hungry projects. This stitch is more than just a technique; it is a way to bring fantasy and high-texture drama to your handmade creations.


