
Patchwork Bird Tutorial

Creating a Patchwork Cat Quilt – Pattern is a delightful journey into the world of creative textile art, blending the traditional charm of quilting with the playful spirit of our feline companions. For many crafters, the process of assembling a quilt that features feline silhouettes or cat-themed blocks is not just about making a blanket; it is about storytelling through fabric. A Patchwork Cat Quilt – Pattern serves as a perfect project for those who want to honor their pets while exploring the intricate beauty of geometric patchwork and colorful fabric coordination.
The versatility of a Patchwork Cat Quilt – Pattern allows quilters of all skill levels to find a design that fits their expertise, whether they prefer minimalist modern outlines or traditional, detailed blocks. By using various quilting techniques, you can transform simple squares and triangles into recognizable cat shapes that carry a sense of personality and warmth. This specific type of project is highly sought after in the DIY crafting community because it allows for high levels of personalization, making each finished quilt a unique piece of art that reflects the maker’s personal style and love for cats.
In this comprehensive guide, we will explore the essential elements of a successful Patchwork Cat Quilt – Pattern, covering everything from material selection to the final finishing touches. We will dive into the technical aspects of piecing fabrics, managing complex seam intersections, and how to choose a color palette that makes your feline designs truly stand out. Whether you are looking to create a cozy throw for your living room or a meaningful gift for a fellow cat lover, the following sections will provide the inspiration and technical knowledge needed to master your next Patchwork Cat Quilt – Pattern.
The success of your Patchwork Cat Quilt – Pattern begins with the selection of high-quality 100% cotton quilting fabric. Cotton is the preferred choice because it is durable, easy to iron, and holds its shape during the cutting and sewing process, which is vital for maintaining the sharp angles of a cat’s ears or whiskers. When choosing your fabrics, look for a mix of solid colors and small-scale prints to ensure that the cat shapes are clearly visible against the background and don’t get lost in a busy design.
In addition to the top fabric, the quilt batting is a crucial component that determines the weight and warmth of your Patchwork Cat Quilt – Pattern. For a project that will be used frequently by both humans and pets, a cotton or cotton-poly blend batting is ideal as it provides a flat, traditional look and is easy to machine wash. The “loft” or thickness of the batting should be considered; a lower loft helps the intricate patchwork details lay flat, whereas a higher loft provides a fluffier, more textured feel to the finished quilt.
Precision tools are essential for the accuracy required in a Patchwork Cat Quilt – Pattern. You will need a high-quality rotary cutter, a self-healing cutting mat, and a variety of acrylic rulers to ensure every square and triangle is cut to the exact dimensions. Since cat patterns often involve small, angled pieces, having a ruler with 45-degree markings is incredibly helpful for maintaining the symmetry of the cat blocks. Accurate cutting at the beginning of the project prevents many headaches during the assembly phase.
The thread you choose for your Patchwork Cat Quilt – Pattern should be strong enough to withstand years of use but thin enough to allow for flat, crisp seams. A 50-weight cotton thread in a neutral color like light grey or tan is usually the best option for piecing the blocks together. If you plan to add decorative top-stitching or “quilting in the ditch,” you might choose a thread that matches your cat fabrics to create a seamless look or a contrasting thread to make the feline silhouettes pop.
Don’t forget the importance of fabric markers and pins. When working on a complex Patchwork Cat Quilt – Pattern, marking the sewing lines on the back of the fabric can help you achieve perfect points on the cat’s ears. Fine quilting pins or fabric clips are also necessary to hold the layers together, especially when you are matching seams at the intersections. These small notions ensure that your “patchwork puzzle” fits together perfectly, resulting in a professional-grade finish that you can be proud of.
Finally, consider the backing fabric for your Patchwork Cat Quilt – Pattern. Since cats often enjoy laying on quilts, choosing a soft flannel or a high-quality “minky” fabric for the back can make the quilt even more inviting for your feline friends. Keep in mind that these fabrics can be more slippery to quilt, so if you are a beginner, sticking with a wide-back quilting cotton is often the safest and most manageable choice for your first large-scale cat-themed project.
The heart of the Patchwork Cat Quilt – Pattern lies in the construction of the individual cat blocks. Most patterns utilize Half-Square Triangles (HSTs) to create the pointed ears and the sloping shapes of a cat’s body. Mastering the HST technique is vital, as it allows you to create diagonal lines while still working with a square grid. By sewing two squares together diagonally and cutting them apart, you create the foundational shapes that give your Patchwork Cat Quilt – Pattern its recognizable feline character.
Another essential technique for this pattern is the “Stitch and Flip” method, often used to round off the corners of a square to create a cat’s head or paws. This involves placing a small square on the corner of a larger one, sewing diagonally, and flipping the fabric to create an angled corner. This method is incredibly effective for a Patchwork Cat Quilt – Pattern because it minimizes the need for difficult templates or “Y-seams,” making the construction process much more approachable for intermediate quilters.
Symmetry is key when following a Patchwork Cat Quilt – Pattern. To ensure your cat blocks don’t look lopsided, it is important to use a consistent quarter-inch seam allowance throughout the entire project. Even a tiny variation in the seam can cause the ears to look uneven or the body of the cat to appear distorted. Many quilters use a specialized 1/4″ quilting foot on their sewing machine to help maintain this precision, which is the secret to a perfectly aligned quilt top.
Pressing your seams is a non-negotiable step in the Patchwork Cat Quilt – Pattern. For the best results, you should press your seams to the “dark side” to prevent the seam allowance from showing through lighter background fabrics. In areas where many seams meet—such as the center of a cat’s face—you might choose to press seams open to reduce bulk. A flat quilt top is much easier to manage during the final quilting stage and ensures that the cat shapes remain the focal point of the design.
For those who want to add more detail to their Patchwork Cat Quilt – Pattern, “fussy cutting” is a fantastic technique to employ. This involves cutting your fabric so that a specific motif, like a ball of yarn or a tiny mouse, is centered within a specific part of the block. Fussy cutting adds a layer of creative storytelling to your quilt, making it more interactive and fun for the viewer. It takes a bit more fabric and planning, but the personalized results are well worth the extra effort.
As you assemble the rows of your Patchwork Cat Quilt – Pattern, “nesting your seams” will help you achieve perfectly matched corners. This involves pressing the seams of one row in the opposite direction of the row below it so that they “lock” together when pinned. This technique is particularly important for geometric cat patterns where the alignment of the ears and head is crucial. Taking the time to nest your seams correctly results in a crisp, clean look that defines high-quality handmade quilts.
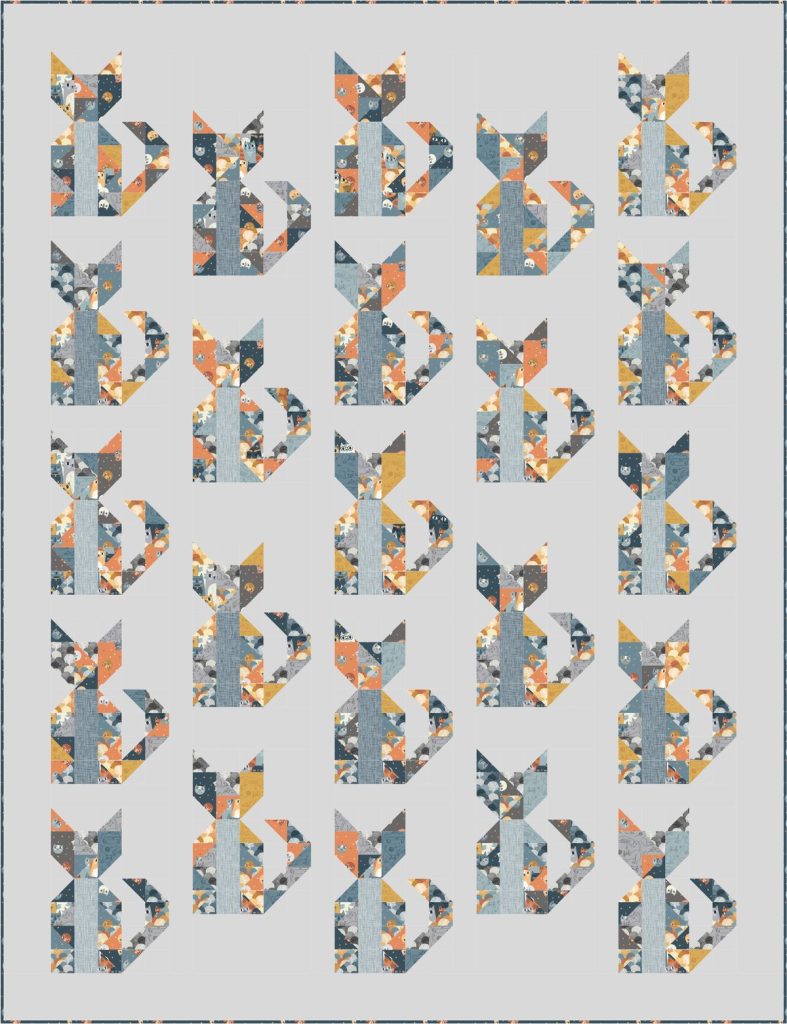
The layout of your Patchwork Cat Quilt – Pattern significantly impacts the final aesthetic. You can choose a “Uniform Grid” where every cat is identical, or a “Sampler Style” where each block features a cat in a different pose—sitting, stretching, or sleeping. A staggered layout can also be used to give the impression of cats wandering across the quilt. Planning your layout on a “design wall” or a flat floor space allows you to see how the colors and shapes interact before you commit to sewing the rows together.
Color coordination is where you can truly express your personality in a Patchwork Cat Quilt – Pattern. Some quilters prefer a realistic approach, using shades of grey, orange, and black to represent specific breeds like tabbies or calicos. Others opt for a whimsical color palette, using bright pinks, purples, and teals to create a modern, pop-art version of the cat theme. Using a color wheel can help you find complementary colors that make the cat blocks stand out vividly against your chosen background fabric.
The “Negative Space” or background of your Patchwork Cat Quilt – Pattern is just as important as the cats themselves. Using a solid white or cream background creates a clean, minimalist look that emphasizes the geometric shapes of the cats. Alternatively, using a dark background like navy blue or charcoal can make the cats look like they are silhouettes in the moonlight. Dark backgrounds are also practical for quilts that will be used by real cats, as they tend to hide pet hair and small stains more effectively.
Sashing and borders act as the frame for your Patchwork Cat Quilt – Pattern. Sashing is the strips of fabric sewn between the blocks, which can help separate the cat shapes and give the design “breathing room.” You can use a contrasting sashing to create a window-pane effect or a matching sashing to make the cats appear as if they are floating. Adding a final wide border provides a space for intricate free-motion quilting, where you can sew decorative motifs like paw prints or fish bones.
Texture can be introduced into your Patchwork Cat Quilt – Pattern through the use of different fabric types. Incorporating small pieces of velvet or corduroy for the cat’s ears or tails can provide a tactile element that makes the quilt more engaging. However, keep in mind that mixing different fabric weights can make the quilting process more challenging. If you decide to use “specialty fabrics,” ensure they are all pre-washed to prevent uneven shrinking when the finished quilt is laundered for the first time.
When planning the colors for a Patchwork Cat Quilt – Pattern, consider the “value” of the fabrics—how light or dark they are. A successful quilt usually has a good balance of light, medium, and dark values to create depth. If all your fabrics are the same value, the cat silhouettes may blend into the background and lose their impact. Testing your fabric choices by taking a black-and-white photo of them can help you see if there is enough contrast to make the pattern “read” clearly from a distance.
One common challenge in a Patchwork Cat Quilt – Pattern is “wavy borders,” which occur when the border fabric is stretched while being sewn. To avoid this, always measure the center of your quilt and cut your border strips to that exact measurement rather than just sewing a long strip and cutting off the excess. This ensures the quilt stays square and flat, making it much easier to hang on a wall or spread across a bed without unsightly ripples or puckers along the edges.
Another issue many quilters face is “losing their points” on the cat’s ears. This happens when the seam allowance is too deep, cutting off the tip of the triangle. To prevent this in your Patchwork Cat Quilt – Pattern, always aim to sew just a thread’s width to the outside of the intersection of your seams. This leaves a tiny bit of room so that when the fabric is folded back, the point sits perfectly on the edge. It’s a professional quilting secret that makes a huge difference in the final look.
If your Patchwork Cat Quilt – Pattern feels too stiff after assembly, it might be due to excessive starching or a very dense quilting design. While starch is great for accuracy during cutting, you should wash the quilt once it is finished to restore its softness. Choosing a larger quilting motif or “straight-line quilting” can also help the fabric maintain a soft drape. A quilt should be cozy and pliable, especially if it’s intended for snuggling on the sofa with your favorite pet.
Durability is essential for a Patchwork Cat Quilt – Pattern, especially if it will be handled by animals. Ensure all your “thread tails” are securely buried and that your binding is double-stitched. The binding is the fabric that wraps around the raw edges of the quilt sandwich, and it takes the most wear and tear. Using a “French fold” binding—which is two layers of fabric thick—is the best way to ensure the edges of your cat-themed masterpiece don’t fray over time.
To care for your finished Patchwork Cat Quilt – Pattern, always use a gentle, fragrance-free detergent and wash on a cold cycle. If you used bright colors like reds or oranges for the cats, adding a “color catcher” sheet to the wash can prevent the dyes from bleeding into the lighter background fabrics. Air drying is the gentlest method, but you can also use a low-heat dryer setting. Proper care will ensure that the colors remain vibrant and the stitches remain intact for many years to come.
Finally, if you find that your real cats are “overly fond” of the quilt and leave behind too much hair, a soft rubber brush or a lint roller can be used to keep the surface clean. Avoid using harsh chemicals or bleach on your Patchwork Cat Quilt – Pattern, as these can weaken the cotton fibers and cause the colors to fade. By following these maintenance tips, you can enjoy your beautiful handmade creation as a functional and stylish part of your home while honoring the feline friends that inspired its design.
Is the Patchwork Cat Quilt – Pattern suitable for a beginner?
Yes, but it depends on the specific design. Many cat patterns are designed specifically for beginners using simple squares and Half-Square Triangles. If you can sew a straight line and maintain a consistent seam allowance, you can successfully create a beautiful cat quilt.
How much fabric do I need for a lap-sized cat quilt?
For a standard lap quilt (approx. 50″ x 60″), you will typically need about 3 to 4 yards of background fabric and a variety of “fat quarters” or 1/4-yard cuts for the cats. Always check your specific Patchwork Cat Quilt – Pattern instructions for exact yardage requirements before purchasing.
What is the best way to quilt the cat blocks?
“Echo quilting” is a popular choice, where you sew lines that follow the outline of the cat about a quarter-inch away. Alternatively, “Stipple quilting” creates a texture that looks like clouds or fur, providing a nice contrast to the geometric patchwork lines of the cat silhouettes.
Can I use this pattern to make a memorial quilt for my pet?
Absolutely. Using clothing from a loved one or fabrics that remind you of a specific pet is a wonderful way to use the Patchwork Cat Quilt – Pattern as a memorial. This adds a deep layer of emotional value to the project, turning it into a cherished keepsake.
Do I have to use a sewing machine?
While a machine is much faster, a Patchwork Cat Quilt – Pattern can be entirely hand-sewn using a technique called “English Paper Piecing” or traditional hand-piecing. This is a very portable and relaxing way to quilt, although it takes significantly longer to finish.
How do I stop my quilt from slipping when I’m sewing the layers?
Using curved safety pins to “baste” the layers together every 4 to 6 inches is the most common method. You can also use a temporary spray adhesive designed for fabric, which keeps the “quilt sandwich” perfectly flat while you work on the final decorative stitching.
In this article, we have explored the intricate and rewarding process of creating a Patchwork Cat Quilt – Pattern. We discussed the importance of selecting high-quality cotton fabrics, the technical precision required for Half-Square Triangles, and how to choose a color palette that makes your feline designs shine.
We also covered essential layout strategies, troubleshooting common quilting issues like wavy borders, and the best practices for the long-term care of your finished project. This pattern is more than just a sewing project; it is a way to celebrate creativity and the bond we share with our pets through the timeless art of quilting.


