
Patchwork Bird Tutorial

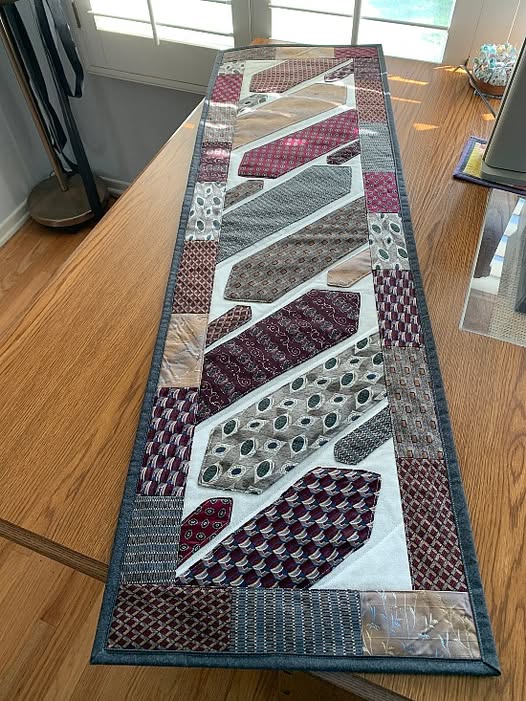
The Necktie Quilt Table Runner – Pattern is a sophisticated and sentimental project that allows quilters to transform a collection of vintage or unused neckties into a stunning piece of home decor. For many, this specific Necktie Quilt Table Runner – Pattern serves as a “memory quilt” project, utilizing the luxurious silks and intricate jacquard weaves of a loved one’s necktie collection to create a functional heirloom. Because neckties often feature high-quality materials and unique patterns that you won’t find at a standard fabric store, the resulting table runner becomes an immediate conversation piece that adds a touch of elegance to any dining room setting.
Working on a Necktie Quilt Table Runner – Pattern requires a slightly different approach than traditional cotton quilting due to the varied textures and delicate nature of tie fabrics. Neckties are often cut on the “bias,” meaning the fabric has a lot of stretch, which can be challenging for beginners if not handled correctly. However, with the right stabilization techniques and a structured Necktie Quilt Table Runner – Pattern, you can harness the beauty of silk, polyester, and wool ties to create a durable and flat surface. This project is not only a fantastic way to practice upcycling but also a creative exercise in color theory and geometric arrangement.
In this comprehensive guide, we will explore every detail of mastering the Necktie Quilt Table Runner – Pattern, from the initial deconstruction of the ties to the final quilting stitches. We will discuss the essential tools needed to handle slippery fabrics, the most popular layout designs like the “Dresden Plate” or “Sunburst,” and how to finish your runner with professional borders and backing. By the end of this article, you will have the confidence to tackle your own Necktie Quilt Table Runner – Pattern, turning a drawer full of forgotten accessories into a masterpiece of textile art that honors the past while decorating the present.
The success of your Necktie Quilt Table Runner – Pattern begins with the careful preparation of your source material. Unlike standard quilting cotton, neckties are made of diverse fibers including silk, acetate, and polyester, often featuring a heavy interfacing inside. To use them in a Necktie Quilt Table Runner – Pattern, you must first carefully deconstruct each tie by removing the stitching at the back and taking out the inner lining. This process gives you a surprisingly large amount of high-quality fabric, but it also leaves you with raw edges that are prone to fraying and stretching.
Because tie fabric is almost always cut on the bias, it is extremely “wiggly” and difficult to sew accurately in a Necktie Quilt Table Runner – Pattern without help. The secret weapon for any successful project involving neckties is lightweight fusible interfacing. By ironing a thin layer of stabilizer to the back of the deconstructed tie fabric, you effectively turn it into a stable material that behaves more like traditional cotton. This ensures that the geometric shapes in your Necktie Quilt Table Runner – Pattern stay crisp and don’t distort when you pass them through your sewing machine.
Once the fabric is stabilized, you should categorize your ties by color and pattern density before cutting into your Necktie Quilt Table Runner – Pattern. Ties often feature “foulard” prints, stripes, or paisley designs that can look cluttered if not organized intentionally. A professional tip for a beautiful Necktie Quilt Table Runner – Pattern is to group ties into “warm” and “cool” tones or to alternate between busy patterns and solid-colored silks. This creates a visual rhythm that prevents the table runner from looking overwhelming and allows the eye to appreciate the individual beauty of each tie.
Cleaning is another vital step before starting your Necktie Quilt Table Runner – Pattern. Since neckties are often vintage or have been worn frequently, they may have hidden stains or odors. However, you must be cautious: silk ties should never be tossed in a washing machine as the colors may bleed and the texture can be ruined. Instead, use a gentle fabric refresher spray or consider professional dry cleaning before you begin the stabilization process for your Necktie Quilt Table Runner – Pattern. Clean fabric not only looks better but also ensures that the fusible interfacing adheres perfectly.
Cutting the stabilized fabric for your Necktie Quilt Table Runner – Pattern requires a very sharp rotary cutter and a non-slip ruler. Because silk is slippery, even with interfacing, a dull blade can cause the fabric to bunch or pull, leading to inaccurate pieces. When following a Necktie Quilt Table Runner – Pattern, try to cut your pieces with the grain of the fabric whenever possible to add another layer of stability. Precision at this stage is what allows the points of your quilt blocks to meet perfectly, resulting in a high-end, professional finish for your table runner.
Finally, consider the “fussy cutting” technique for your Necktie Quilt Table Runner – Pattern. Many ties have a central motif or a particularly beautiful section of embroidery near the tip. By using a clear acrylic template, you can center these specific designs within your quilt blocks. Fussy cutting adds a layer of intentionality to the Necktie Quilt Table Runner – Pattern, making it clear that the project was crafted with a deep appreciation for the original designs of the ties. This attention to detail is what elevates a simple upcycling project into a true piece of luxury home decor.
The most iconic layout for a Necktie Quilt Table Runner – Pattern is the “Dresden Plate” or “Sunburst” design, which utilizes the natural wedge shape of the tie’s end. In this layout, several tie ends are arranged in a circular or semi-circular pattern, mimicking the petals of a flower. This classic approach to the Necktie Quilt Table Runner – Pattern is popular because it preserves the original pointed shape of the tie, making it immediately obvious that the runner was made from reclaimed neckwear. It creates a stunning focal point for the center of a dining table.
If you prefer a more modern aesthetic, you can follow a Necktie Quilt Table Runner – Pattern that uses a “Log Cabin” or “Braided” layout. In these designs, the ties are cut into uniform strips and sewn together in a repeating geometric sequence. This method is excellent for utilizing the entire length of the tie, not just the ends. A braided Necktie Quilt Table Runner – Pattern creates a sense of movement across the table, with the diagonal lines of the ties providing a dynamic, textured look that works well in contemporary interior design settings.
When sewing the pieces of your Necktie Quilt Table Runner – Pattern together, it is essential to use a walking foot on your sewing machine. Even with interfacing, the varying thicknesses of silk, polyester, and jacquard can cause the layers to shift as they move through the machine. A walking foot ensures that the top and bottom layers of your Necktie Quilt Table Runner – Pattern move at the same speed, preventing “puckering” and ensuring that your long seams remain straight. This tool is a lifesaver when working with specialty fabrics.
Thread choice is another critical factor in a Necktie Quilt Table Runner – Pattern. While standard cotton thread is fine for construction, a fine silk or polyester thread in a neutral color like grey or tan will blend seamlessly into the various tie fabrics. Because neckties have a natural sheen, a matte cotton thread can sometimes look too stark against the fabric. Choosing a thread with a slight luster helps the seams disappear into the Necktie Quilt Table Runner – Pattern, giving the finished top a more polished and high-end appearance.
Pressing as you go is non-negotiable for a professional Necktie Quilt Table Runner – Pattern. However, you must be extremely careful with the iron’s temperature. Silk and synthetic ties can scorch or melt under high heat, and steam can sometimes cause water spots on delicate fabrics. Use a pressing cloth between the iron and your Necktie Quilt Table Runner – Pattern to protect the surface. Pressing the seams flat ensures that the table runner lies perfectly on the table and makes the final quilting process much easier.
Once the main blocks are constructed, adding “borders” to your Necktie Quilt Table Runner – Pattern can help unify the design. A solid-colored border in a high-quality cotton or a dark silk can act as a frame, drawing the eye toward the colorful tie patterns in the center. The border also provides a “buffer zone” for the binding, ensuring that the intricate tie designs aren’t cut off at the very edge of the Necktie Quilt Table Runner – Pattern. Borders give the project a finished, deliberate look that ties all the elements together.
The quilting stage is where you add structural integrity and texture to your Necktie Quilt Table Runner – Pattern. Because the tie fabrics themselves are so decorative, many quilters choose “Stitch in the Ditch” or simple “Echo Quilting” to avoid distracting from the patterns. However, if you are using a lot of solid-colored silks in your Necktie Quilt Table Runner – Pattern, you can use this opportunity to add beautiful free-motion designs like feathers or swirls. This adds a layer of luxury and depth to the final product.
Selecting the right batting (the middle layer) is important for how the Necktie Quilt Table Runner – Pattern sits on the table. A thin, 100% cotton batting or a low-loft bamboo blend is ideal. You want the table runner to be relatively flat so that glasses and plates can sit on it without wobbling. Avoid high-loft polyester batting for a Necktie Quilt Table Runner – Pattern, as it can make the surface too puffy and unstable for practical use during a dinner party.
The “backing” of your Necktie Quilt Table Runner – Pattern should be a fabric that provides a bit of grip to prevent the runner from sliding off a polished wooden table. A high-quality quilting cotton or a brushed flannel works beautifully for this purpose. When you “baste” the three layers (top, batting, and back) of your Necktie Quilt Table Runner – Pattern together, use curved safety pins or a temporary spray adhesive. This prevents the slippery silk top from shifting during the quilting process.
Binding is the final “edge” of your Necktie Quilt Table Runner – Pattern. While you can make binding out of leftover tie fabric, it is often better to use a sturdy quilting cotton for the edges. Tie fabric is often too delicate and thin to handle the constant friction that the edges of a table runner endure. A double-fold bias binding in a dark, coordinating color provides a durable frame for your Necktie Quilt Table Runner – Pattern and ensures that the edges don’t fray or wear out over time.
For an extra touch of “memory” in your Necktie Quilt Table Runner – Pattern, you can incorporate the original tie labels onto the back of the runner. Sewing the labels from the designer or the brand onto the backing fabric adds a “boutique” feel and preserves the history of the ties used. If the Necktie Quilt Table Runner – Pattern is a memorial piece, you can even embroider the name of the original owner and the date on a small fabric patch and attach it to the back corner.
After the quilting and binding are complete, a final, gentle press will give your Necktie Quilt Table Runner – Pattern its finished shape. Be sure to check for any loose threads and “bury” them inside the batting layer for a clean look. The finished Necktie Quilt Table Runner – Pattern should feel substantial yet flexible. By following these professional finishing steps, you ensure that your table runner isn’t just a craft project, but a high-quality piece of functional art that can be displayed with pride.
Because of the delicate fabrics involved in a Necktie Quilt Table Runner – Pattern, you must treat it differently than your regular kitchen linens. It should never be put in a washing machine or dryer. Instead, if a spill occurs during a meal, “spot clean” the area immediately with a damp cloth and a very mild soap. For general maintenance, a light dusting or a gentle shake outside is usually sufficient to keep your Necktie Quilt Table Runner – Pattern looking fresh and vibrant.
If your Necktie Quilt Table Runner – Pattern is made mostly of silk, it is wise to keep it out of direct, prolonged sunlight. UV rays can cause silk fibers to become brittle and colors to fade over time. When not in use on your dining table, store the runner rolled around a cardboard tube rather than folded. Folding a Necktie Quilt Table Runner – Pattern can create permanent creases in the silk and potentially crack the stabilizer inside, while rolling preserves the smooth, flat appearance of the fabric.
Styling your Necktie Quilt Table Runner – Pattern can change the entire mood of your room. For a formal dinner, pair it with simple white china and crystal glassware to let the intricate patterns of the ties shine. For a more casual, eclectic look, you can layer the Necktie Quilt Table Runner – Pattern over a solid-colored tablecloth. The rich textures of the ties—from smooth satins to ribbed repps—provide a tactile experience that adds warmth and personality to your tabletop.
A Necktie Quilt Table Runner – Pattern also makes an incredible, one-of-a-kind gift for Father’s Day, retirements, or weddings. If you have access to a family’s old ties, creating a runner for a relative is a deeply emotional gesture. Because the Necktie Quilt Table Runner – Pattern is smaller than a full-sized quilt, it is a project that can be completed relatively quickly while still offering the same level of sentimental value and “wow” factor as a larger heirloom.
If you find that your Necktie Quilt Table Runner – Pattern has become slightly wrinkled from storage, use a “silk setting” on your iron and a pressing cloth. Never slide the iron across the surface, as this can stretch the seams; instead, use a “lift and press” motion. This keeps the blocks of your Necktie Quilt Table Runner – Pattern perfectly aligned. A well-maintained table runner will retain its luster and structure, allowing it to be passed down through generations as a cherished family treasure.
Finally, don’t be afraid to experiment with the “Theme” of your ties. You can create a holiday-themed Necktie Quilt Table Runner – Pattern by using only ties in shades of red and green, or a “corporate” style runner using classic stripes and blues. The versatility of the Necktie Quilt Table Runner – Pattern means you can adapt it to any season or decor style. It is a rewarding project that combines the precision of quilting with the creative freedom of upcycling, resulting in a unique accessory that celebrates history and craftsmanship.
How many ties do I need for a Necktie Quilt Table Runner – Pattern?
For a standard table runner (approx. 14″ x 48″), you will typically need between 15 and 25 ties, depending on the complexity of your layout. If you are only using the wide ends of the ties, you will need more; if you are using the entire length of the tie in a “braided” pattern, you can get away with fewer.
Can I make this pattern if I am a beginner?
Yes, but you must use fusible interfacing. Without it, the silk is too difficult to handle. If you are new to quilting, choose a simple “Rectangular Strip” layout for your Necktie Quilt Table Runner – Pattern rather than complex curves or Dresden points.
Can I wash my necktie table runner?
It is strongly recommended to dry clean only. Silk and many tie interfacings do not react well to water. If the ties are 100% polyester, you might be able to hand wash gently, but to be safe and preserve the Necktie Quilt Table Runner – Pattern, spot cleaning is best.
What is the best stabilizer for neckties?
A lightweight, non-woven fusible interfacing (like Pellon 906F) is the best choice. It provides enough stability to stop the bias stretch without making the Necktie Quilt Table Runner – Pattern too stiff or heavy.
How do I stop the silk from “bleeding” onto the borders?
Test each tie for colorfastness before sewing. Rub a damp white cloth on an inconspicuous part of the tie. If color comes off, you may want to avoid using that tie or use a color catcher if you must wash it. Most high-quality silks used in a Necktie Quilt Table Runner – Pattern are stable if kept dry.
Can I use wool or knit ties in this pattern?
Yes! However, wool and knit ties are much thicker than silk. If you mix them in the same Necktie Quilt Table Runner – Pattern, you will have uneven seams. Try to group similar “weights” of ties together to ensure the surface of the runner stays as flat as possible.
Creating a Necktie Quilt Table Runner – Pattern is a unique and gratifying project that bridges the gap between traditional craft and modern upcycling. Throughout this article, we have explored the vital steps of stabilizing delicate silks, choosing dynamic layouts like the Dresden Plate, and finishing the project with professional quilting and binding.
We’ve also learned how to care for these delicate heirlooms to ensure they last for years. The beauty of this pattern lies in its ability to take a collection of personal items—each with its own history—and weave them into a single, cohesive piece of art that brightens a home.


