
Patchwork Bird Tutorial

The Twisted Log Cabin Quilt Block – Pattern offers a mesmerizing optical illusion that transforms one of the most traditional quilt designs into a dynamic, swirling masterpiece of textile art. While the standard log cabin is known for its orderly, square-on-square appearance, the “twisted” variation introduces subtle angles that create a sense of movement and circular flow across the surface of the fabric. By following a Twisted Log Cabin Quilt Block – Pattern, quilters can achieve a complex, curved look using only straight-line sewing, making it a favorite for those who want to create high-impact visual effects without the difficulty of sewing actual curves or inset seams.
The beauty of the Twisted Log Cabin Quilt Block – Pattern lies in its geometric simplicity and the clever way it utilizes “foundation paper piecing” or specific trimming techniques to shift the orientation of the “logs.” Historically, the log cabin symbol represented the heart of the home, with a red center square signifying the hearth; in this modern quilt pattern, that same center becomes the eye of a vibrant storm. Whether you are aiming for a contemporary, monochromatic aesthetic or a colorful, “scrappy” rainbow design, the Twisted Log Cabin Quilt Block – Pattern provides a flexible framework that adapts to any artistic vision, resulting in a quilt that looks much more difficult to construct than it actually is.
In this comprehensive guide, we will break down the essential steps to mastering the Twisted Log Cabin Quilt Block – Pattern, ensuring that your finished project is as structurally sound as it is visually stunning. We will explore the best fabric choices to enhance the “twist,” the technical precision required for the foundation, and the professional finishing touches that make your quilt pop. By the end of this article, you will have the confidence and insight needed to tackle this Twisted Log Cabin Quilt Block – Pattern, creating a unique heirloom that showcases your dedication to craftsmanship and the timeless evolution of the quilting tradition.
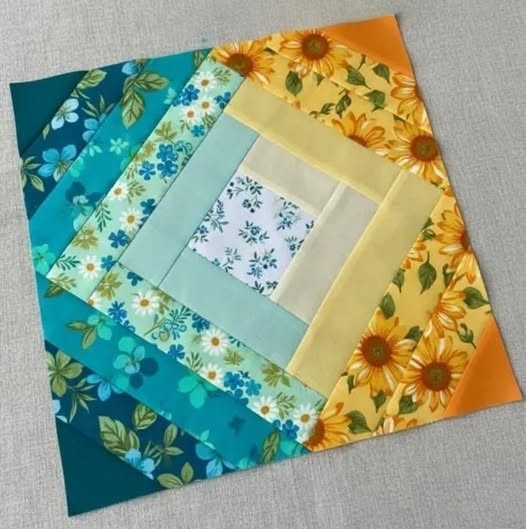
Selecting the right fabrics is the most critical stage of preparing your Twisted Log Cabin Quilt Block – Pattern, as the color placement is what creates the “swirl” effect. To achieve maximum visual impact, we highly recommend using a “light-to-dark” gradient within each block. Traditionally, the Twisted Log Cabin Quilt Block – Pattern is divided diagonally, with one half of the block using light, neutral tones and the other half using bold, saturated colors. This contrast is what defines the “logs” and makes the spiral motion of the pattern visible to the eye from a distance.
When choosing your materials for the Twisted Log Cabin Quilt Block – Pattern, opt for 100% premium quilting cotton to ensure the stability of the bias edges. Since the “twist” often involves cutting or sewing on an angle, a high-quality cotton fabric will resist stretching better than polyester or loose-weave fabrics. If you are a fan of modern aesthetics, consider using solid-colored fabrics or “near-solids” like batiks; these allow the geometric lines of the Twisted Log Cabin Quilt Block – Pattern to remain crisp and clear without the distraction of busy floral or novelty prints.
The center square of your Twisted Log Cabin Quilt Block – Pattern is often called the “focal point” or the “hearth.” For a dramatic effect, use a single, striking color—like a bright red or a metallic gold—that appears in every block across the quilt. This creates a rhythmic anchor that ties the entire pattern together, even if you use different colors for the outer logs. In a high-quality quilt design, this consistency helps the viewer’s eye navigate the complex overlapping lines of the twisted construction.
“Value” is a term often used by professional quilters, and it is essential for the Twisted Log Cabin Quilt Block – Pattern. Value refers to how light or dark a fabric is, regardless of its color. When planning your quilt pattern, lay your fabrics out and take a grayscale photo with your phone; if the fabrics look too similar in gray tones, the “twist” might get lost. A successful Twisted Log Cabin Quilt Block – Pattern requires a wide range of values to create the depth and shadow necessary for the 3D optical illusion to work properly.
Don’t be afraid to experiment with “low-volume” prints for the light side of your Twisted Log Cabin Quilt Block – Pattern. These are fabrics with white or cream backgrounds and very delicate, subtle patterns that read as a solid from afar. Using low-volume prints instead of plain white adds a layer of “shabby chic” charm and texture to the Twisted Log Cabin Quilt Block – Pattern, making the quilt feel more organic and less clinical, which is perfect for a cozy home environment.
Finally, calculate your yardage carefully before you begin your Twisted Log Cabin Quilt Block – Pattern. Because this design uses many narrow strips, you will have a significant amount of “seam allowance” bulk. It is always better to buy a quarter-yard more than the pattern specifies to account for any trimming errors. Having a little extra fabric also allows you to make a few “test logs” to ensure your colors are blending exactly the way you envisioned in your Twisted Log Cabin Quilt Block – Pattern layout.
The most popular way to achieve a perfect Twisted Log Cabin Quilt Block – Pattern is through a technique called Foundation Paper Piecing (FPP). This involves sewing your fabric directly onto a paper template that has the “twisted” lines printed on it. FPP is the “gold standard” for this pattern because it guarantees that every angle is mathematically perfect, even when you are dealing with very thin strips of fabric. For a Twisted Log Cabin Quilt Block – Pattern, the paper acts as a stabilizer, preventing the fabric from distorting as you add more layers.
If you choose the FPP method for your Twisted Log Cabin Quilt Block – Pattern, you will need to shorten your sewing machine’s stitch length. A shorter stitch (around 1.5mm) perforates the paper more effectively, making it much easier to tear away once the block is finished. This technical detail is vital; if your stitches are too long, you risk pulling out your seams when you remove the paper from your Twisted Log Cabin Quilt Block – Pattern, which would ruin the structural integrity of your high-quality quilt top.
Alternatively, some quilters prefer the “Trim-Down” method to create a Twisted Log Cabin Quilt Block – Pattern. This involves sewing standard logs around a center square and then using a specialized 60-degree or “twisted” ruler to cut the block down to size at a specific angle. While this method is faster for some, it generates more fabric waste than paper piecing. When using this technique for your Twisted Log Cabin Quilt Block – Pattern, accuracy in cutting is paramount, as a single slip of the ruler can change the degree of the twist.
Pressing is perhaps the most overlooked technical step in the Twisted Log Cabin Quilt Block – Pattern. You must press your seams after every single log is added. For a paper-pieced pattern, many experts recommend “finger pressing” or using a seam roller rather than a hot iron until the very end to avoid scorching the paper or stretching the fabric. In a Twisted Log Cabin Quilt Block – Pattern, flat seams are the difference between a quilt that looks professional and one that is lumpy and difficult to quilt.
If your machine has a “needle down” function, use it while sewing your Twisted Log Cabin Quilt Block – Pattern. This ensures that the fabric stays exactly in place when you stop to adjust your next strip. Precision is the soul of the twisted design; if your strips start to shift by even a few millimeters, the cumulative error over 10 or 12 logs will cause the block to become warped. Staying focused on the “quarter-inch seam” is the secret to a high-quality Twisted Log Cabin Quilt Block – Pattern result.
Lastly, consider the “directionality” of your twist. When following a Twisted Log Cabin Quilt Block – Pattern, you can choose to make all your spirals turn clockwise, or you can alternate them for a “kaleidoscope” effect. Before you sew your blocks into rows, lay them out on a large surface to see how the “twisted” lines interact. This is the moment where the Twisted Log Cabin Quilt Block – Pattern truly comes to life, as the individual blocks merge to create secondary patterns like stars or swirling circles.
One of the most exciting aspects of the Twisted Log Cabin Quilt Block – Pattern is its versatility in layout. By rotating the blocks 90 degrees, you can change the entire look of the quilt. For example, a “Barn Raising” layout creates a giant central diamond, while a “Straight Furrows” layout creates diagonal waves of color. The Twisted Log Cabin Quilt Block – Pattern adds an extra layer of complexity to these traditional settings because the “twist” makes the lines appear curved rather than stepped.
You can also play with the “width” of the logs in your Twisted Log Cabin Quilt Block – Pattern. Some modern designers use “wonky” or “improvisational” widths, where the strips aren’t uniform. This creates a “Crazy Quilt” version of the Twisted Log Cabin Quilt Block – Pattern that feels very artistic and avant-garde. However, for beginners, we recommend sticking to a standardized pattern where the logs are all the same width, as this makes it much easier to keep track of the assembly order and ensure a square finish.
Incorporating “fussy cutting” is another way to elevate your Twisted Log Cabin Quilt Block – Pattern. Fussy cutting is the practice of cutting a specific image from a fabric—like a flower or a bird—and centering it in the middle of your block. In a Twisted Log Cabin Quilt Block – Pattern, a fussy-cut center square acts like a jewel in the middle of a swirling setting. It adds a “storybook” quality to the quilt design and makes the finished project feel highly personalized and unique.
Border choices can also change the impact of the Twisted Log Cabin Quilt Block – Pattern. A “floating” border, where you add a wide strip of background fabric before your final outer border, gives the twisted blocks room to breathe. Conversely, a “pieced border” that continues the log cabin theme out to the very edge can make the Twisted Log Cabin Quilt Block – Pattern feel expansive and infinite. Your border should complement the energy of the twist without competing with it for the viewer’s attention.
For those who want to try something truly advanced, you can combine the Twisted Log Cabin Quilt Block – Pattern with “curved piecing” or “applique.” Imagine a twisted log cabin block with a circular applique in the center, or one where the outer edges are scalloped. These hybrid patterns are often seen in award-winning exhibition quilts. While they require a high level of skill, the foundation of the Twisted Log Cabin Quilt Block – Pattern remains the same, providing a sturdy base for your most ambitious creative experiments.
Finally, consider the “scale” of your blocks. A Twisted Log Cabin Quilt Block – Pattern made with 12-inch blocks will look very different from one made with 4-inch “miniature” blocks. Larger blocks show off the fabric prints better, while smaller blocks emphasize the complexity of the “twisted” lines. If you are making a bed-sized quilt, larger blocks will help you finish the project faster, while a wall hanging is the perfect opportunity to try a high-detail, small-scale Twisted Log Cabin Quilt Block – Pattern.
Once your Twisted Log Cabin Quilt Block – Pattern top is complete, the quilting (the stitching that holds the three layers together) should be chosen to enhance the “twist.” A “swirl” or “spiral” quilting motif is the most popular choice, as it follows the natural motion of the piecing. If you are quilting on a domestic machine, “echo quilting”—where you sew a line a quarter-inch away from each seam—can make the Twisted Log Cabin Quilt Block – Pattern look three-dimensional, like a topographic map.
Thread choice is a subtle but important part of finishing your Twisted Log Cabin Quilt Block – Pattern. Because the design has so much movement, you may want to use a variegated thread that changes color every few inches. This adds an extra layer of sparkle to the quilt pattern. Alternatively, a high-quality “monofilament” or invisible thread is a great choice if you want the piecing of the Twisted Log Cabin Quilt Block – Pattern to be the only thing the viewer sees, without the distraction of visible quilting lines.
Binding is the final “frame” for your Twisted Log Cabin Quilt Block – Pattern. A striped binding cut on the bias can add a playful, kinetic energy to the edges of the quilt, echoing the angles found inside the blocks. If you want a cleaner, more modern look, use the same fabric as the outer logs for your binding. This “infinity” finish makes the Twisted Log Cabin Quilt Block – Pattern feel like it extends forever beyond the edges of the fabric, which is a very high-end design choice.
Don’t forget to add a custom quilt label to the back of your Twisted Log Cabin Quilt Block – Pattern. Include your name, the date the quilt was finished, and perhaps the name of the pattern and the recipient. A label turns a beautiful object into a documented piece of history. In the world of handcrafted textiles, the story of the maker is just as important as the design itself, and a well-labeled Twisted Log Cabin Quilt Block – Pattern will be cherished by future generations.
Caring for your finished Twisted Log Cabin Quilt Block – Pattern is vital for its longevity. Always wash your quilts in cold water on a gentle cycle and use “color catchers” to prevent any dark logs from bleeding into the light neutrals. Avoid hanging your quilt in direct sunlight, as UV rays can fade the vibrant colors that make the Twisted Log Cabin Quilt Block – Pattern so striking. Proper storage in a breathable cotton bag will protect your masterpiece from dust and pests.
Ultimately, completing a Twisted Log Cabin Quilt Block – Pattern is a significant achievement in any quilter’s journey. It proves that you have mastered the balance of technical precision and artistic color placement. Every time you see that “twist” catching the light, you will be reminded of the hours of mindful stitching and the creative joy that went into your work. The Twisted Log Cabin Quilt Block – Pattern is more than just a blanket; it is a celebration of the limitless possibilities of fabric and the enduring magic of geometric art.
1. Is the Twisted Log Cabin Quilt Block – Pattern too hard for a beginner?
If you use the Foundation Paper Piecing (FPP) method, a beginner with a little patience can definitely succeed! FPP takes away the stress of cutting perfect angles and allows you to “sew on the line.” However, a basic understanding of how to use a sewing machine and a rotary cutter is recommended before starting a Twisted Log Cabin Quilt Block – Pattern.
2. How many fabrics do I need for this pattern?
A classic Twisted Log Cabin Quilt Block – Pattern looks best with at least 6 colors: 3 lights and 3 darks, plus a center square color. Using more fabrics (a “scrappy” look) can make the twist look even more complex and interesting. Many quilters use “Jelly Rolls” (pre-cut 2.5-inch strips) to save time when working on this quilt pattern.
3. Why do the blocks need to be “trimmed” so much?
In a Twisted Log Cabin Quilt Block – Pattern, the “twist” is created by rotating the center square slightly. This means the logs are sewn on at an angle, which naturally creates an irregular shape. Trimming the block back to a perfect square at the end is a necessary step to ensure the blocks can be sewn together easily into a cohesive pattern.
4. Can I make this quilt without paper piecing?
Yes, you can use the “Trim-Down” method with a specialized ruler. However, this method is often more difficult for those who struggle with “bias” edges (edges cut on the diagonal). For the most accurate and high-quality Twisted Log Cabin Quilt Block – Pattern, paper piecing is generally the most reliable technique for both beginners and experts.
5. What is the best size for the center square?
In most Twisted Log Cabin Quilt Block – Patterns, the center square is between 2 and 3 inches. A smaller center square creates a “tighter” twist with more logs, while a larger center square results in a “looser” twist. Your pattern instructions will provide the specific measurements needed to achieve the intended visual effect.
6. Does the “twist” make the quilt less durable?
Not at all! As long as you use high-quality cotton and maintain a consistent seam allowance, the Twisted Log Cabin Quilt Block – Pattern is just as durable as any other quilt. In fact, if you use paper piecing, the extra layers of fabric in the overlaps can actually make the quilt feel a bit more substantial and warm.
In this guide, we have explored the mesmerizing world of the Twisted Log Cabin Quilt Block – Pattern, a design that masterfully blends traditional heritage with modern geometric illusion. We covered the essential principles of color value and fabric selection that bring the “swirl” to life, the technical advantages of Foundation Paper Piecing for absolute precision, and the creative ways you can manipulate the layout to create secondary patterns.
We also discussed the professional finishing touches, from spiral quilting motifs to bias binding, and the care routines that ensure your Twisted Log Cabin Quilt Block – Pattern remains a vibrant family treasure for years to come. Whether you are a fan of traditional “logs” or modern “twists,” this pattern offers an endlessly rewarding experience that turns a simple stack of fabric into a dynamic work of art.


