
Patchwork Bird Tutorial

DIY Pattern Weights – Pattern is an essential project for every sewing enthusiast who wants to transition from the tedious frustration of using pins to the fluid efficiency of professional cutting. For years, home sewists have relied on traditional pins to secure tissue paper to fabric, but this often leads to distorted edges, tiny snags in delicate fibers, and the annoying “lifting” of the fabric during the cutting process. By following a DIY Pattern Weights – Pattern, you can create custom tools that hold your templates firmly against the fabric, allowing your rotary cutter or shears to glide smoothly without moving the material underneath.
The beauty of a DIY Pattern Weights – Pattern lies in its simplicity and the immediate improvement it brings to your sewing room workflow. These weights are small, heavy beanbags or solid objects designed to sit on top of your paper patterns, exerting enough pressure to keep everything flat. Because they are handmade sewing tools, you can customize them to match your studio’s aesthetic, using scrap fabrics that coordinate with your favorite projects. Furthermore, using a DIY Pattern Weights – Pattern saves significant time during the preparation phase, as you simply place the weights and start cutting, rather than pinning every two inches around a complex curve.
In this comprehensive guide, we will explore the various styles of weights you can create, from simple fabric pyramids to weighted washers and decorative stones. We will delve into the best filling materials for maximum density, the ideal fabrics for durability, and the step-by-step logic behind a successful DIY Pattern Weights – Pattern. Whether you are working on a delicate silk blouse or a heavy denim jacket, having a set of high-quality pattern weights will elevate your precision and protect your fabrics from the damage often caused by dull pins. Let’s dive into how you can transform your cutting experience with this practical and fun sewing pattern.
The soul of a successful DIY Pattern Weights – Pattern is the “heaviness” or density of the internal filling. Since the primary goal is to provide downward pressure without taking up too much space on the pattern, you need materials that are compact yet heavy. Common choices for a sewing weight pattern include steel BBs, small metal washers, aquarium gravel, or even clean playground sand. If you want a more eco-friendly approach, dried lentils or rice are popular, though they provide less weight per square inch than metal-based fillings.
Fabric choice is equally important when you decide to DIY Pattern Weights – Pattern. Since these tools will be handled frequently and moved across various fabrics, you need something sturdy but smooth. A high-quality 100% cotton quilting fabric is the most common choice because it is easy to sew and comes in endless prints. However, for a more professional feel, some sewists use canvas or even scrap leather. Ensure the fabric has a tight weave so that fine fillings like sand or small pellets don’t leak through the seams over time.
In addition to the main fabric, many DIY Pattern Weights – Pattern designs incorporate a “non-slip” base. This is a brilliant technical addition that prevents the weight from sliding on slippery fabrics like satin or rayon. You can achieve this by sewing a piece of faux suede or a small scrap of shelf liner to the bottom of your weight. When following your DIY Pattern Weights – Pattern, adding this high-grip layer ensures that even a light weight can hold a pattern piece securely during a vigorous cutting session.
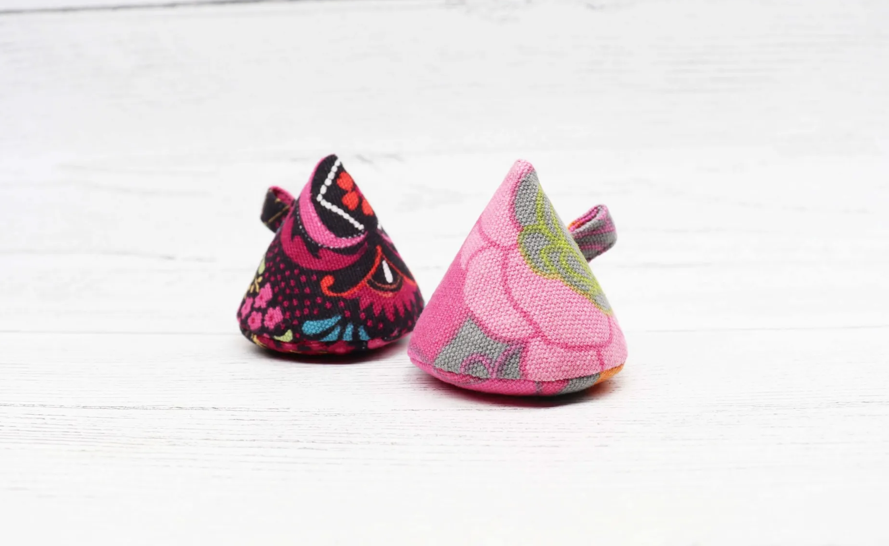
Size matters when it comes to the effectiveness of your DIY Pattern Weights – Pattern. Most sewists find that a set of mixed sizes works best. Smaller, triangular weights (about 2 inches wide) are perfect for tight corners and necklines, while larger, heavier weights are ideal for long straight seams on skirts or coats. When you prepare to DIY Pattern Weights – Pattern, cutting several sizes of fabric squares will allow you to create a versatile toolkit that handles any garment shape with ease and professional precision.
Thread strength should not be overlooked in your DIY Pattern Weights – Pattern project. Because these weights are heavy and may be dropped, you need a high-quality polyester thread that can withstand the tension of the filling pressing against the seams. A standard cotton thread might snap under the weight of metal BBs or heavy gravel. Using a slightly smaller stitch length on your sewing machine will also provide extra security, ensuring that your pattern weights remain intact for years of heavy use in the sewing room.
Finally, consider the aesthetics of your DIY Pattern Weights – Pattern. This is a fantastic “scrap-buster” project that allows you to use up those precious 5-inch charms or leftover strips from your favorite quilt. Using vibrant colors or contrasting patterns makes the weights easy to spot on your cutting table. A well-coordinated set of pattern weights not only functions perfectly but also adds a touch of personality and joy to your creative workspace, making the “boring” task of cutting fabric feel much more like an artistic endeavor.
The most popular shape for a DIY Pattern Weights – Pattern is the pyramid (or tetrahedron). This shape is ingenious because it provides a pointed top that is easy to grab with your fingers while maintaining a wide, flat base for stability. To sew a pyramid weight, you start with a simple rectangle of fabric. By folding the rectangle and rotating the final seam 90 degrees before closing, you create a 3D shape that is structurally sound. This specific sewing technique is a favorite among beginners because it looks complex but is very simple to execute.
If you prefer a more minimalist look, a square or “pincushion” style DIY Pattern Weights – Pattern is a great alternative. This involves sewing two squares of fabric together and leaving a small gap for the filling. Square weights are excellent because they can be stacked easily when not in use. When you follow this pattern design, make sure to clip your corners before turning the fabric right-side out; this ensures that your pattern weights have crisp, sharp edges that don’t look bulky or rounded on the cutting table.
Closing the weight is the most critical step in the DIY Pattern Weights – Pattern. Since you cannot easily sew over heavy metal BBs or gravel with a machine, the final inch of the seam must be closed by hand. Using a ladder stitch (also known as an invisible stitch) is the best way to achieve a professional finish. This technique hides the thread inside the folds of the fabric, making the closing seam virtually disappear. A high-quality DIY Pattern Weights – Pattern isn’t complete until the hand-finishing is done with care and precision.
For those who want an even faster DIY Pattern Weights – Pattern, the “washer” method is incredibly efficient. This involves taking heavy hardware washers from a home improvement store and covering them with fabric “yo-yos” or simply wrapping them in decorative ribbon. This version of the pattern requires very little sewing and provides a very flat profile. Flat weights are particularly useful when you need to place a ruler or a cutting guide directly over the pattern, as they don’t interfere with the height of your tools.
Reinforcing the seams is a professional tip for any DIY Pattern Weights – Pattern. If you are using very heavy fillings like lead shot or steel bearings, consider “double-stitching” your seams. Run a second line of stitching exactly over the first one, or use a zigzag stitch within the seam allowance. This prevents the weight from bursting if it is accidentally dropped. In a long-lasting sewing pattern, durability is just as important as appearance, especially for tools that undergo daily wear and tear.
Lastly, consider the “funnel” technique when filling your DIY Pattern Weights – Pattern. Using a small kitchen funnel or a rolled-up piece of paper makes it much easier to get sand or small pellets into the fabric pouch without making a mess. Fill the weight about 3/4 of the way full; this allows the filling to shift slightly so the weight can “settle” onto the pattern paper. A perfectly filled pattern weight should feel substantial and “slumpy” rather than over-stuffed and bouncy, ensuring it stays exactly where you place it.
Once you have completed your DIY Pattern Weights – Pattern project, you need a way to store them. Since these are heavy, keeping them in a dedicated bowl or a magnetic tray near your cutting table is ideal. Some sewists even sew a “matching basket” using the same fabric as their pattern weights, creating a beautiful, cohesive kit. Having a specific home for your weights prevents them from rolling off the table and keeps your workspace organized and ready for the next creative spark.
A standard sewing kit usually requires at least 6 to 10 weights to be truly effective. When you DIY Pattern Weights – Pattern, try to make a “full set” in one sitting. For a large pattern piece, like a skirt back, you will want a weight at each corner and one or two along the longest curves. By creating a bulk set of handmade weights, you ensure that you never have to reach for pins midway through a project. Consistency in your tools leads to consistency in your cutting, which ultimately leads to better-fitting garments.
Think about “weight-coding” your set as part of your DIY Pattern Weights – Pattern strategy. You could use different fabric colors to represent different weights—for example, blue for light sand-filled weights and red for heavy metal-filled ones. This allows you to quickly grab the right tool for the job. Light weights are perfect for delicate tissues and silks, while the “heavy-duty” versions of your DIY Pattern Weights – Pattern are necessary for holding down thick wool or multi-layered paper templates.
If you travel to sewing classes or retreats, consider making a “travel-sized” version of the DIY Pattern Weights – Pattern. Smaller weights take up less room in your sewing bag but still provide enough pressure for most projects. You can even sew a small drawstring bag to keep them contained. Portable pattern weights are a lifesaver when you are working on shared tables where pins might get lost or mixed up with other students’ supplies, ensuring your project remains uniquely yours.
Maintenance of your DIY Pattern Weights – Pattern tools is minimal but important. If you used organic fillings like rice or beans, keep the weights in a dry place to prevent moisture from causing the filling to swell or spoil. If the fabric covers get dusty or stained, you can gently wipe them with a damp cloth. Because the filling is usually not washable, protecting the exterior of your pattern weights will ensure they remain a beautiful and functional part of your sewing room for many years.
Finally, the DIY Pattern Weights – Pattern makes an incredible gift for sewing friends. Since every sewist needs them but few take the time to make a matching set, a bundle of handmade pattern weights tied with a pretty ribbon is a thoughtful and practical gesture. It’s a project that showcases your sewing skills while providing the recipient with a tool that will genuinely improve their crafting experience. Sharing the joy of a well-made sewing pattern is one of the best parts of being a member of the maker community.
The primary reason to switch to a DIY Pattern Weights – Pattern is the preservation of your fabric. Traditional pins create tiny holes, and if a pin is slightly blunt or rusty, it can pull threads or leave permanent marks on delicate fabrics like leather, vinyl, or silk. Weights provide “non-invasive” stability. By using a DIY Pattern Weights – Pattern, you treat your luxury fabrics with the respect they deserve, ensuring that the finished garment looks pristine and professional without any “pin-prick” damage.
Precision is the second major benefit of the DIY Pattern Weights – Pattern. When you pin a pattern, the act of pushing the pin through the layers slightly lifts the fabric, which can cause the cutting line to shift by a millimeter or two. While this seems small, it adds up over multiple seams. A pattern weight keeps the fabric and paper perfectly flat against the cutting mat. This “zero-lift” environment is essential for high-quality tailoring and dressmaking, where accuracy is the difference between a good fit and a great one.
Efficiency is a significant factor for those who sew for business or produce a high volume of projects. Pinning a single garment can take 15 to 20 minutes, whereas placing weights from your DIY Pattern Weights – Pattern set takes less than 60 seconds. This allows you to spend more time at the sewing machine and less time hunched over the cutting table. For the modern maker, the DIY Pattern Weights – Pattern is a tool that respects your time and streamlines the most labor-intensive part of the construction process.
Using weights in conjunction with a rotary cutter is a match made in heaven. While pins often get in the way of the rotary blade—potentially nicking the blade and ruining it—weights sit safely away from the cutting edge. By following a DIY Pattern Weights – Pattern, you create a safer cutting environment where your tools aren’t constantly clashing. This combination of weights and rotary blades is the standard in professional design studios, and bringing this technique into your home via a DIY pattern is a major step up in skill.
Ergonomics also favor the DIY Pattern Weights – Pattern. For sewists who struggle with arthritis or hand fatigue, the repetitive motion of pinning can be painful. Moving a smooth, weighted object is much easier on the joints. Pattern weights are designed to be picked up and set down with minimal effort. Choosing to DIY Pattern Weights – Pattern means you are investing in your own physical comfort, allowing you to enjoy your hobby for longer periods without the strain associated with traditional pinning methods.
Ultimately, the DIY Pattern Weights – Pattern represents a shift toward a more mindful and professional approach to the craft. It encourages you to slow down and place your weights with intention, ensuring every piece is cut exactly as the designer intended. Whether you are a hobbyist or a professional, the transition to using weights is a “lightbulb moment” that changes your sewing forever. The simple act of following a DIY Pattern Weights – Pattern is the first step toward a faster, more accurate, and more enjoyable creative journey in the world of fashion and textiles.
1. How much should each DIY pattern weight actually weigh?
Ideally, a good DIY Pattern Weights – Pattern should result in weights that are between 2 and 4 ounces (50-100 grams) for small pieces, and up to 8 ounces (225 grams) for larger ones. If they are too light, the fabric will shift; if they are too heavy, they become difficult to move around. Metal fillings like BBs or washers are the best way to achieve a heavy weight in a small fabric pouch.
2. Can I wash my DIY Pattern Weights?
Generally, no. Most fillings used in a DIY Pattern Weights – Pattern (like sand, rice, or metal) do not react well to water. Sand can leak, rice can mold, and metal can rust. If your weights get dirty, it is best to spot-clean the fabric cover with a slightly damp cloth. If the cover is very soiled, it’s usually easier to sew a new “slipcover” for your pattern weights.
3. What is the best filling for a DIY Pattern Weights – Pattern?
For the most professional feel, polished steel BBs or lead shot are the winners because they provide the most weight in the smallest volume. However, for a budget-friendly and accessible option, aquarium gravel or clean pea shingle from a garden center works wonderfully. These materials are heavy, dry, and don’t have the “spoiling” risks associated with food items like rice or beans.
4. How many weights do I need to make?
For a small project like a baby garment or a bag, 4 to 6 weights are sufficient. For adult clothing, we recommend a set of 10 to 12. When you start your DIY Pattern Weights – Pattern project, it’s best to make a dozen at once. This ensures you have enough to hold down a large pattern piece, like a coat back or a pair of trousers, without needing to supplement with pins.
5. Are pattern weights better than pins for all fabrics?
Weights are superior for almost everything, especially delicate or “self-healing” fabrics. However, for extremely small or intricate pieces where there is no flat surface for a weight to sit, pins might still be necessary. That said, once you try a DIY Pattern Weights – Pattern, you will likely find that you reach for pins less than 10% of the time, as weights handle 90% of cutting tasks with greater ease.
6. Can I use household objects as pattern weights?
Absolutely! Before people decide to DIY Pattern Weights – Pattern, they often use soup cans, large washers, or smooth stones. However, the benefit of a handmade pattern weight is that it is designed specifically for fabric. Objects from around the house might have sharp edges, rust, or labels that could snag or stain your expensive material. A fabric-covered weight is the safest choice for your textiles.
In this guide, we have explored the transformative power of the DIY Pattern Weights – Pattern, a simple yet essential tool that every sewist should have in their arsenal. We discussed the importance of choosing dense, high-quality fillings and durable fabrics to create tools that last, as well as the technical steps to sewing pyramid and square designs with professional finishes.
We also touched on the organizational benefits of having a coordinated set and the ergonomic advantages of switching from pins to weights for improved accuracy and fabric safety. Whether you are a beginner or a seasoned pro, following a DIY Pattern Weights – Pattern is a rewarding way to customize your workspace and streamline your cutting process. By creating these handmade sewing tools, you are investing in the precision of your craft and the longevity of your favorite fabrics.


