
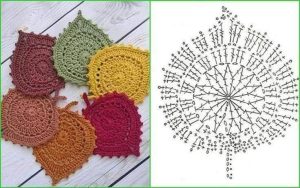
Crochet Flower - Tutorial

Circle To Square Granny Square Crocret – Pattern is a fascinating technique that bridges the gap between fluid geometry and structured textile design, offering crocheters a unique way to add visual interest to their projects. This specific style of crochet pattern is widely celebrated for its ability to transform a soft, rounded center into a crisp, four-cornered block, creating a “sunburst” or “mandala” effect that looks far more complex than it actually is. When you choose to follow a Circle To Square Granny Square Crocret – Pattern, you are engaging in a rhythmic process that rewards patience and precision, resulting in a versatile motif that can be used for everything from bohemian blankets to contemporary fashion accessories.
The versatility of the Circle To Square Granny Square Crocret – Pattern lies in its geometric transition, which provides a perfect canvas for color experimentation and texture play. By starting with a circular “sun” or “flower” and then “squaring it off” with strategically placed taller stitches, you create a dynamic contrast that draws the eye toward the center of the block. For many fiber artists, the Circle To Square Granny Square Crocret – Pattern is a preferred choice for “stash-busting” projects, as even the smallest remnants of yarn can be used to create the vibrant circular centers that make these squares so iconic and full of personality.
In this comprehensive guide, we will explore the technical mastery required to execute the Circle To Square Granny Square Crocret – Pattern with professional results. We will delve into the best yarn choices for achieving crisp corners, the importance of stitch height in the transition phase, and how to join your finished blocks into a seamless heirloom. Whether you are a beginner looking to move beyond the basic granny square or an advanced maker seeking a fresh twist on a classic, the Circle To Square Granny Square Crocret – Pattern offers an endless world of creative possibilities that celebrate the intersection of circles and squares in the art of handcrafted crochet.
Choosing the right yarn is the first step toward a successful Circle To Square Granny Square Crocret – Pattern. For a project that requires such distinct geometric shapes, we highly recommend using a mercerized cotton or a high-twist wool blend. These fibers provide the necessary stitch definition to ensure that the transition from a round circle to a sharp square is clearly visible. If you use a yarn that is too “fuzzy” or “hairy,” the delicate mathematics of the crochet pattern may get lost in the texture, making your circles look more like irregular blobs than perfect spheres.
Color placement is the most powerful tool you have when working on a Circle To Square Granny Square Crocret – Pattern. To emphasize the “circle within a square” effect, choose a high-contrast color for the first few rounds. A bright, warm color like yellow or orange for the center can mimic a sunburst, while a neutral “squaring” color like cream or charcoal will make that center pop. When you crochet this pattern, remember that the “corners” are where the most dramatic color shift should occur to highlight the change in geometry.
The weight of the yarn—often called the yarn ply—will determine the final size of your block. Most Circle To Square Granny Square Crocret – Pattern designs are optimized for worsted weight (Level 4) or DK weight (Level 3) yarn. If you are making a large blanket, using a thicker yarn will help you finish the project faster, but a lighter yarn will provide a more delicate, “lace-like” quality to the circular motifs. Consistency is key; always ensure every color you use in the pattern is of the exact same weight.
Your crochet hook size should be matched to your specific tension to prevent the centers from “cupping.” If your circle starts to look like a bowl instead of a flat disc, your tension is likely too tight or your hook is too small. For a Circle To Square Granny Square Crocret – Pattern, many designers suggest moving up a half-size for the circular rounds and returning to the recommended size for the “squaring” rounds. This helps the center remain relaxed and flat as the block expands.
Variegated yarns can add a “psychedelic” or “kaleidoscope” effect to your Circle To Square Granny Square Crocret – Pattern. When using multi-colored yarn, the “circle” rounds can create unexpected spirals that look stunning when framed by a solid-color square border. However, be careful not to use a yarn with very short color changes, as it can make the crochet stitches look cluttered. Long-gradient “cake” yarns are usually the better choice for maintaining the visual integrity of the circular motif.
Lastly, consider the “stretch” of your materials. If you are making a Circle To Square Granny Square Crocret – Pattern for a bag or a garment, you want a fiber that won’t sag over time. Cotton is excellent for structure, while acrylic is better for blankets that need to be soft and “drapery.” Understanding the relationship between the pattern geometry and the fiber’s physical properties will ensure that your circles stay circular and your squares stay square for the life of the finished item.
The journey of a Circle To Square Granny Square Crocret – Pattern almost always begins with a Magic Ring. This technique is superior to the “chain-4-and-join” method because it allows you to pull the center hole completely closed. Once the ring is formed, you will work a series of double crochets or “puff stitches” to create the initial round. The goal is to create a flat, even circle that serves as the foundation for the rest of the crochet pattern, ensuring there is no buckling or waving in the fabric.
As you move through the second and third rounds of the Circle To Square Granny Square Crocret – Pattern, you will typically use “increase” stitches to keep the circle expanding. Common stitches used in this phase include the half-double crochet and the puff stitch, which add bulk and roundness. Accuracy is paramount here; if you miss an increase, the circle will pull inward, and if you add too many, the edges will ripple. Following the stitch count in your pattern is the only way to guarantee a smooth transition.
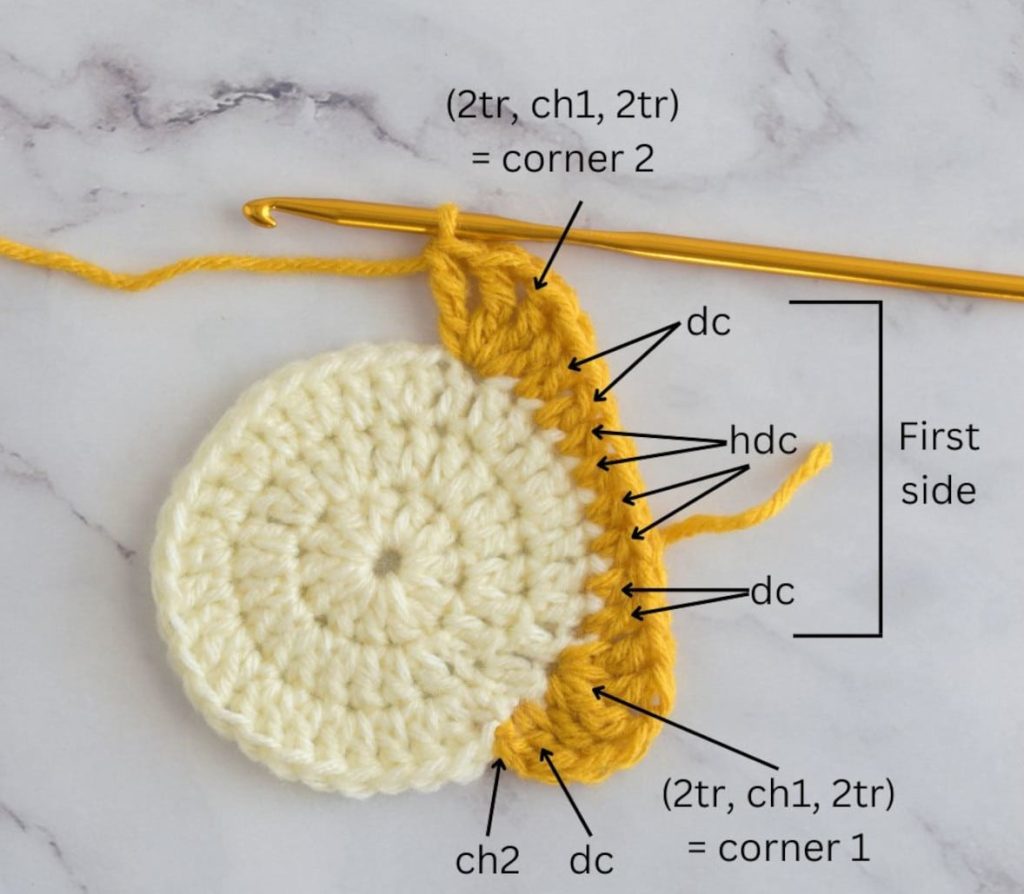
The “Magic Round” is where the transformation happens. To turn the circle into a square within the Circle To Square Granny Square Crocret – Pattern, you must vary the height of your stitches. In the four areas where you want the “corners” to be, you will use taller stitches like triple crochets (trebles). On the “sides” of the square, you will use shorter stitches like single or half-double crochets. This height difference is what levels out the round edge of the circle into a straight line.
Managing the “corners” requires a specific cluster of stitches, usually consisting of two tall stitches, a few chains, and another two tall stitches in the same space. This creates the sharp, 90-degree angle needed for the Circle To Square Granny Square Crocret – Pattern. When you work these corners, make sure your chains aren’t too loose, as this can create large, unsightly holes. A high-quality square should have corners that look crisp and professional, providing the structural base for joining later on.
One common mistake in the Circle To Square Granny Square Crocret – Pattern is not accounting for the “gap” between rounds. Using a “standing stitch” to join new colors instead of a traditional slip-stitch and chain-3 can make your crochet squares look much more seamless. This technique prevents the visible “seam” that often runs through granny squares, ensuring that the circular center looks perfectly symmetrical from every angle, which is the hallmark of a masterfully executed handcrafted pattern.
Finally, “squaring up” your work often involves a final round of simple double crochets or the “classic granny” cluster. This last round stabilizes the Circle To Square Granny Square Crocret – Pattern and ensures that all your blocks are the exact same size. If one square is slightly smaller than the others, you can often “fix” it in this final round by using a slightly looser tension. Consistency across multiple blocks is what makes the final assembly of your crochet project look balanced and professional.
Once you have a collection of motifs from your Circle To Square Granny Square Crocret – Pattern, the way you join them will define the finished look. The “Invisible Join” or “Mattress Stitch” is highly recommended for these squares because it allows the circular centers to be the main focus without a bulky seam distracting the eye. If you want a more decorative look, a “Join-As-You-Go” (JAYG) method can add a lace-like frame around each square, enhancing the bohemian vibe of the crochet design.
Layout planning is essential for a Circle To Square Granny Square Crocret – Pattern because the circular centers create a strong secondary pattern when placed side-by-side. If you use the same color for the “squaring” round of every block, the circles will appear to “float” on a solid background. If you alternate background colors, you can create a “checkerboard” effect that highlights the geometric contrast of the pattern. Using a design wall or a large floor space to arrange your blocks before joining is a vital step for a high-quality result.
Blocking is the “secret weapon” of professional crocheters. Because the Circle To Square Granny Square Crocret – Pattern involves different stitch heights, the blocks might look a bit “wonky” right off the hook. By pinning them to a blocking board and lightly steaming them, you set the fibers and ensure that every circle is perfectly round and every square is perfectly square. This step makes the joining process infinitely easier and results in a blanket or garment that hangs beautifully and looks boutique-bought.
For a modern twist, you can vary the size of the circles within your Circle To Square Granny Square Crocret – Pattern. Some makers choose to make very large circles for the center of a blanket and surround them with smaller, traditional squares. This play on scale makes the crochet pattern feel contemporary and architectural. As long as the final “outer” stitch count of your squares matches, you can combine different styles of blocks into one cohesive, artistic textile.
Consider the “negative space” created by the corners of the Circle To Square Granny Square Crocret – Pattern. Where four squares meet, a new geometric shape is formed. Some advanced patterns use this space to add a small embroidery detail or a tiny “button” of crochet, further integrating the individual blocks into a single, unified piece of art. This level of detail is what makes a hand-crocheted heirloom stand out from mass-produced items and showcases the maker’s dedication to the craft.
The final border of your Circle To Square Granny Square Crocret – Pattern project acts as the frame for your “gallery” of circles. A simple, wide border in the same color as the “squaring” round can provide a clean, modern finish. Alternatively, a “pom-pom” or “scalloped” border can play off the roundness of the centers, creating a whimsical and feminine look. The border is your final chance to harmonize the circles and squares, bringing the entire crochet project to a satisfying and beautiful conclusion.
A Circle To Square Granny Square Crocret – Pattern is often a long-term project representing many hours of labor, so proper care is essential. If you used high-quality acrylic, the item is likely machine-washable, but always use a delicate cycle and a laundry bag to prevent the corners from snagging. For wool or cotton, hand-washing in cool water with a gentle “no-rinse” wool wash is the best way to ensure the crochet stitches remain crisp and the colors don’t bleed.
Drying is the most critical stage of maintenance for a Circle To Square Granny Square Crocret – Pattern. Never hang a heavy crochet blanket to dry, as gravity will stretch the circular centers into ovals and ruin the square proportions. Instead, lay the item flat on a clean surface—ideally on top of dry towels—and reshape it while it’s damp. This “air-drying” process preserves the blocking you did during the construction phase and keeps the geometric motifs looking sharp.
Over time, you may notice some “pilling” on the surface of your Circle To Square Granny Square Crocret – Pattern, especially if you used a soft, loosely spun yarn. This is a natural part of a yarn’s life cycle. You can gently refresh the look of your project by using a fabric shaver or a specialized wool comb. Keeping your squares free of fuzz ensures that the “circle to square” transition remains the focal point, maintaining the high-definition look of the original pattern.
If a thread ever pops out or a join comes loose in your Circle To Square Granny Square Crocret – Pattern, don’t panic. Crochet is incredibly easy to repair. Keep a small amount of “leftover” yarn from the project in a safe place so you have matching fiber for any future mending. A quick few stitches with a tapestry needle can secure a loose tail and prevent a small snag from becoming a large hole, preserving the structural integrity of your handmade masterpiece.
Storage of your Circle To Square Granny Square Crocret – Pattern items should be done with care. Avoid hanging garments made from these blocks on hangers; instead, fold them and store them in a drawer. For blankets, a breathable cotton storage bag is better than a plastic bin, as it allows air to circulate and prevents the development of “musty” smells. Adding a cedar block or a lavender sachet can also protect your crochet work from moths and other pests.
Ultimately, a Circle To Square Granny Square Crocret – Pattern is more than just a craft project; it is a legacy item. By choosing high-quality materials and following professional construction and care techniques, you are creating a piece of art that can be passed down through generations. The warmth of the yarn and the love in every stitch make the Circle To Square Granny Square Crocret – Pattern a timeless gift that continues to provide comfort and beauty long after the last yarn tail is woven in.
1. Is the Circle To Square Granny Square Crocret – Pattern harder than a regular granny square?
It is slightly more advanced because it requires knowledge of stitch height variation and increases. However, once you understand the logic of “squaring the circle” (using taller stitches at the corners), it becomes just as repetitive and meditative as the traditional crochet pattern. Most intermediate beginners can master it within a single afternoon of practice.
2. Why is my “circle” looking more like a hexagon or a ruffle?
If your circle is ruffling, you have too many stitches; if it’s cupping like a bowl, you have too few. In a Circle To Square Granny Square Crocret – Pattern, the math must be precise. Usually, you increase by 12 or 16 stitches per round (depending on the stitch type) to keep the circle perfectly flat. Always double-check your stitch count at the end of every round.
3. Can I use this pattern to make a round blanket?
Yes! You can simply follow the “circle” portion of the Circle To Square Granny Square Crocret – Pattern and continue increasing until the blanket reaches your desired size. The “squaring” technique is only necessary if you want a rectangular or square finished shape. Many makers use the circular part of the pattern to create matching coasters or cushions.
4. What is the best way to hide the yarn tails in this pattern?
Since this pattern often involves frequent color changes, you will have many tails. We recommend “weaving as you go” by crocheting over the tails for a few inches and then using a tapestry needle to weave them back in the opposite direction. This “double-lock” method ensures that the circles of your Circle To Square Granny Square Crocret – Pattern won’t come apart in the wash.
5. How do I make the “corners” more pronounced?
To get a very “pointy” corner in your Circle To Square Granny Square Crocret – Pattern, use a taller stitch (like a double-treble) at the very center of the corner and increase the number of chain stitches in the corner space. For example, using “ch 3” instead of “ch 2” in the corners will give the block a sharper, more defined square silhouette.
6. Can I mix different brands of yarn in one square?
As long as the weight (thickness) and fiber content are similar, you can mix brands. However, be aware that some “worsted weight” yarns are slightly thicker than others. If you mix a thick worsted with a thin one, your Circle To Square Granny Square Crocret – Pattern will look lopsided. It is always best to stick to the same yarn line for the “squaring” color to maintain a uniform look.
In this article, we have explored the intricate and rewarding process of the Circle To Square Granny Square Crocret – Pattern, a design that masterfully combines circular fluidity with square structure. We discussed the importance of material selection—prioritizing stitch definition and color contrast—and the technical “magic” of using stitch height variations to transform a round center into a four-cornered block. We also covered professional finishing techniques like blocking and the “invisible join,” along with long-term care routines to preserve your handcrafted heirloom.
Whether you are creating a vibrant, scrappy throw or a sophisticated monochromatic garment, the Circle To Square Granny Square Crocret – Pattern offers a perfect balance of challenge and relaxation for any fiber artist. The result is a timeless, geometric masterpiece that showcases the versatility and beauty of modern crochet.


