
Crochet Flower - Tutorial

Crocheted square – Pattern is the quintessential foundation of the fiber arts world, serving as the starting point for millions of creative projects across the globe. This versatile design, often recognized as the “granny square,” allows artisans to transform small amounts of yarn into expansive, beautiful works of art like blankets, cardigans, and home decor. When you begin to work on a Crocheted square – Pattern, you are not just following a sequence of stitches; you are engaging with a historical craft that has been passed down through generations, evolving from a humble scrap-saving technique into a high-fashion statement used by luxury designers today.
The beauty of the Crocheted square – Pattern lies in its geometric simplicity and its incredible modularity. Because each square is a self-contained unit, it offers the ultimate “on-the-go” hobby, allowing you to finish a small piece during a commute or while relaxing at a cafe. This crochet pattern is exceptionally forgiving for beginners, as it introduces fundamental concepts such as working in the round, creating corners, and changing colors, all within a manageable 4 to 6-inch frame. For more advanced makers, the Crocheted square – Pattern becomes a playground for texture, where complex cables, popcorn stitches, and intricate lace can be tested on a small scale.
In this comprehensive guide, we will explore the essential elements required to master the Crocheted square – Pattern, from selecting the perfect yarn to achieving perfectly straight edges. We will discuss the various styles of squares available—from the classic airy design to the solid, modern variation—and provide professional tips on how to join them for a seamless finish. By the end of this article, you will have a deep understanding of how to interpret a Crocheted square – Pattern and the confidence to embark on your own large-scale projects, creating handmade heirlooms that will be cherished for years to come.
Choosing the right yarn is the most important decision you will make when starting a Crocheted square – Pattern. For most home decor projects, a premium acrylic yarn or a cotton-acrylic blend is the gold standard because it offers a balance of softness and durability. Acrylic is particularly popular for a Crocheted square – Pattern because it is machine washable and comes in an infinite array of colors, which is essential if you are planning a vibrant, multi-colored blanket. Cotton, on the other hand, provides a crisp stitch definition that makes the geometric details of the pattern stand out.
The weight of your yarn will directly impact the size and “drape” of your Crocheted square – Pattern. Most patterns are written for worsted weight (Category 4) yarn, which is easy to handle and works up quickly. If you choose a lighter DK weight yarn, your crocheted square will be smaller and more delicate, perfect for baby clothing. Conversely, using a “bulky” yarn will result in a thick, squishy square that is ideal for heavy winter throws. Always ensure that all the yarns you use in a single project are the same weight to maintain consistency across your Pattern.
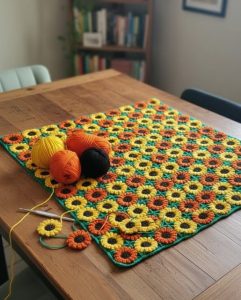
Color theory is where your Crocheted square – Pattern truly begins to take on its own personality. You can opt for a “monochromatic” look using different shades of a single color, or go for a “scrappy” look by utilizing leftover yarn from previous projects. One popular trend in the Crocheted square – Pattern community is the “sunburst” effect, where the center of the square is a bright color like yellow, surrounded by petals of a different hue. This creates a rhythmic, floral appearance that adds a touch of nature to your textile work.
The crochet hook you select must complement your yarn choice to ensure your Crocheted square – Pattern isn’t too stiff or too loose. If you are a “tight” crocheter, you may want to move up half a millimeter in hook size to give the fabric more movement. For a standard worsted weight yarn, a 5.0mm (H) hook is usually the recommended starting point. An ergonomic hook with a soft grip is highly recommended if you plan on making dozens of squares, as it helps prevent hand fatigue and keeps your tension even throughout the Pattern.
Don’t overlook the importance of your notions kit when preparing to work on a Crocheted square – Pattern. You will need a pair of sharp embroidery scissors and a high-quality tapestry needle for weaving in the yarn tails. Since a Crocheted square – Pattern with multiple color changes creates many ends, having a needle with a large eye makes the finishing process much faster. Many quilters and crocheters also use stitch markers to identify the corners of the square, ensuring that they never lose their place during complex rounds.
Finally, consider the environmental impact of your choices when you Crocheted square – Pattern. Many crafters are now moving toward recycled cotton yarns or sustainable wools to reduce their ecological footprint. These eco-friendly options often have unique textures that add an organic, rustic feel to the Pattern. By choosing sustainable materials, you are not only creating a beautiful handmade item but also supporting ethical production practices within the global craft industry, making your crocheted square even more meaningful.
The foundation of a classic Crocheted square – Pattern usually begins with a Magic Ring (or Magic Circle). This technique is preferred by experts because it allows you to pull the starting tail and close the center hole completely. If you find the magic ring too difficult, you can start with a chain-4 join, but this will leave a small decorative hole in the center. Starting your Pattern with a clean, tight center is the secret to a professional-looking block that doesn’t sag or stretch over time.
Once the center is established, the Crocheted square – Pattern progresses in rounds. The “classic granny” style uses clusters of three double crochet stitches separated by chains. The “corners” are the most critical part of the Pattern, as they transform the circle into a square. A corner is typically made by working two clusters into the same space, separated by two or three chains. Mastering this corner turn is the primary skill required to successfully execute a Crocheted square – Pattern.
To prevent your Crocheted square – Pattern from “slanting” or twisting, many professional crocheters recommend turning your work after every round. While you can crochet in a continuous circle, turning the square ensures that the tension remains balanced on both the front and back of the fabric. This technique results in a perfectly symmetrical crocheted square that lies flat without the need for excessive stretching. It is a simple adjustment to the Pattern that makes a massive difference in the final quality of the project.
Changing colors in a Crocheted square – Pattern is an opportunity to showcase your artistic flair. Instead of simply tying a knot, use the “invisible join” or a “standing stitch” to start a new color. This makes the transition between rounds look seamless and prevents the bulky lumps that can occur with traditional knots. In a high-end Crocheted square – Pattern, the goal is for the viewer to be unable to tell where one color ends and another begins, creating a fluid and professional finish.
Counting your stitches is a habit that will save you hours of frustration when following a Crocheted square – Pattern. It is very easy to accidentally skip a chain space or add an extra stitch on one side. If your square has 12 stitches on one side and 13 on the other, the entire blanket will eventually become crooked. Take a moment at the end of every round of your Pattern to verify that each side has the same number of clusters; this discipline is what separates hobbyists from master crafters.
The final round of your Crocheted square – Pattern is often a row of single crochet or “half-double crochet” stitches. This serves as a “stabilizing row” that gives the square a clean, solid edge for joining. If your Pattern is for a blanket, this solid edge makes it much easier to align the squares perfectly. Think of this final row as the “frame” for your miniature artwork, providing the structural support needed for the Crocheted square – Pattern to withstand the weight of being joined into a larger textile.
After you have completed several blocks of your Crocheted square – Pattern, the next phase is the assembly. One of the most popular methods is the “Join-As-You-Go” (JAYG) technique, where you connect the current square to the previous ones during the final round of the Pattern. This is a favorite for those who dislike sewing, as it eliminates the need for a tapestry needle and makes the blanket grow organically. JAYG creates a beautiful, lace-like mesh between the squares of your Crocheted square – Pattern.
If you prefer a more structured and flat look, the Mattress Stitch is the best choice for joining your Crocheted square – Pattern blocks. This involves sewing the edges together using a tapestry needle, creating a seam that is virtually invisible from the front. This method is ideal for garments like sweaters or vests made from a crocheted square, as it provides a tailored, professional finish that mimics the seams of high-quality knitwear. It ensures the Pattern remains the star of the show without bulky ridges.
Blocking is a non-negotiable step for any serious project involving a Crocheted square – Pattern. Blocking involves pinning your finished squares to a foam board and lightly steaming them with an iron or misting them with water. This “relaxes” the yarn fibers and sets the square into its final, perfect shape. For a Crocheted square – Pattern, blocking ensures that every block is exactly the same size, making the joining process much smoother and resulting in a blanket with straight edges and sharp corners.
The border you choose for your Crocheted square – Pattern project acts as the “unifying” element. A simple ribbed border can add a modern, clean look, while a scalloped or “shell” edge can give the project a vintage, feminine feel. The border should complement the colors used in the squares of your Pattern and provide enough weight to help the blanket hang beautifully. Many makers use the same “neutral” color for the border that was used for the outer round of each crocheted square.
Weaving in ends is often the least favorite part of the Crocheted square – Pattern, but it is vital for durability. A well-finished square should have all yarn tails woven in at least three different directions to prevent them from popping out after a trip through the washing machine. When you follow a Crocheted square – Pattern with many color changes, try to weave in the ends every 5 to 10 squares. This “micro-finishing” prevents you from being overwhelmed by a mountain of loose threads at the end of the project.
Finally, adding a personalized label to your finished Crocheted square – Pattern project is a beautiful way to mark it as a handcrafted heirloom. You can sew on a small leather tag or a woven fabric label that includes the year and your name. In the world of handmade textiles, these small details are what turn a simple hobby project into a storied gift. Your Crocheted square – Pattern is a reflection of your time and talent, and it deserves to be signed like any other work of art.
While the traditional granny square is legendary, the Crocheted square – Pattern has been reinvented for the 21st century in many exciting ways. The “Solid Granny Square” is a popular variation that eliminates the holes, creating a thick, warm fabric that is perfect for winter coats and solid-colored pillows. This version of the Pattern is highly valued for its modern, “pixel-art” aesthetic, where squares of different colors are arranged to create complex images like portraits or landscapes.
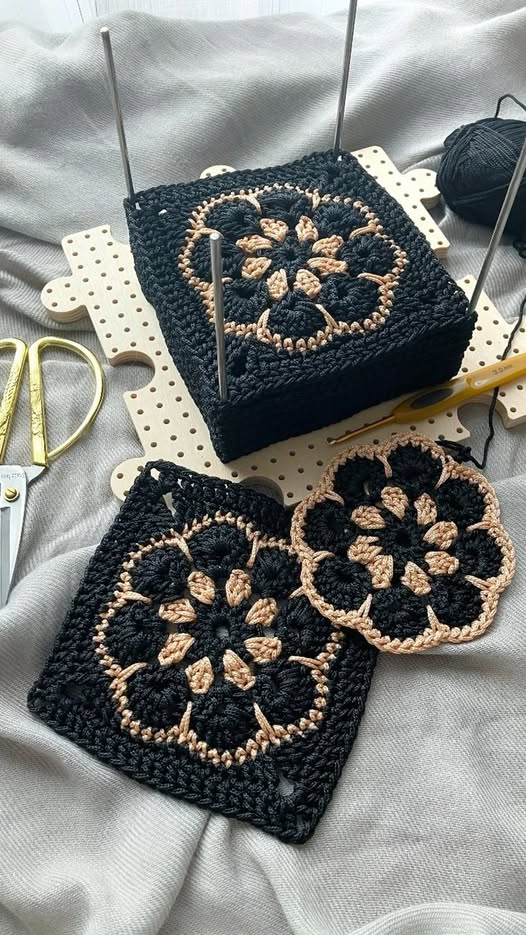
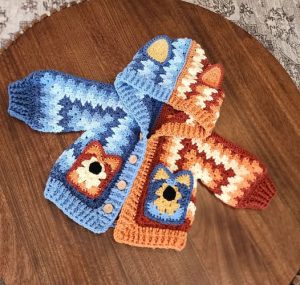
Another stunning variation is the “African Flower” Crocheted square – Pattern. This design starts with a beautiful six-petaled flower in the center before being “squared off” in the outer rounds. It is an intricate, highly decorative version of the Pattern that is often used to make stuffed animals (amigurumi) or high-end boho-chic bags. The transition from a flower to a square is a rewarding technical challenge that showcases the versatility of the Crocheted square – Pattern for those who enjoy a bit of complexity.
In recent years, the Crocheted square – Pattern has exploded onto the fashion runways of Paris and Milan. Designers are using oversized squares to create “patchwork” cardigans and even full-length dresses. By varying the size of the squares in your Pattern, you can create interesting architectural shapes in clothing. For example, a single large crocheted square can serve as the back of a sweater, while smaller squares form the sleeves, creating a garment that is both trendy and deeply traditional.
Negative space is also being used creatively in modern Crocheted square – Pattern designs. Some makers are creating “fillet” squares where the pattern is created by the gaps in the stitches rather than the stitches themselves. This creates a lace-like effect that is perfect for summer wraps or window curtains. The Pattern remains the same square shape, but the visual weight is shifted, proving that the crocheted square is a flexible canvas for any style of interior design or fashion.
“Temperature Blankets” are a massive trend in the Crocheted square – Pattern community. In this project, you crochet one square (or one round of a square) every day for a year, with the color determined by the outdoor temperature. Over 365 days, your Pattern becomes a colorful record of a year in your life. It is a fantastic way to commit to a daily creative practice and results in a giant, meaningful Crocheted square – Pattern blanket that tells a unique geographical and temporal story.
Ultimately, the Crocheted square – Pattern is a symbol of the maker movement’s endurance. It is a project that can be as simple or as complex as you want it to be. Whether you are following a vintage 1970s Pattern or a sleek, digital design from a modern influencer, the core mechanics of the crocheted square remain a constant source of joy and relaxation. It is a timeless craft that proves that with just a hook and some yarn, you can build an entire world of comfort and color, one square at a time.
1. Is the Crocheted square – Pattern suitable for absolute beginners?
Yes, absolutely! The Crocheted square – Pattern is one of the best ways to learn crochet. It teaches you the most common stitches (chain, slip stitch, and double crochet) and how to work in a circle. Because the squares are small, you can see your progress quickly, which is very encouraging for someone just starting their crochet journey.
2. How do I stop my crocheted squares from curling at the edges?
Curling usually happens if your tension is too tight or if you don’t have enough stitches in the corners. If you are following a Crocheted square – Pattern and it still curls, try using a larger hook or adding an extra chain in each corner space. Also, remember that blocking your finished squares will almost always solve minor curling issues by relaxing the fibers into a flat position.
3. How much yarn do I need for a full blanket using this Pattern?
For a standard “throw” size blanket (approx. 50″ x 60″), you will typically need about 10 to 12 skeins of worsted weight yarn (approx. 2,000 to 2,500 yards). This depends on how “holy” or solid your Crocheted square – Pattern is. We always suggest making one “sample square” and weighing it to calculate exactly how much yarn you’ll need for the whole project.
4. Can I mix different brands of yarn in one Crocheted square – Pattern?
You can, but you must be very careful. Even if two yarns are labeled as “worsted weight,” one might be slightly thicker than the other. This will cause your crocheted squares to be different sizes, making them difficult to join. For a professional, high-quality finish, it is best to stick to the same brand and line for the entire Pattern.
5. What is the best way to hide the yarn “tails” when changing colors?
The most secure way is to use a tapestry needle to weave the tail in three different directions through the stitches. Some people like to “crochet over” their tails as they go, but this is less secure and the tails might pop out later. For a durable Crocheted square – Pattern, taking the time to weave them in properly with a needle is worth the extra effort.
6. Why is my “square” looking more like a circle?
If your Crocheted square – Pattern looks round, you might be missing the “corner” clusters. Ensure that in each of the four corners, you are putting two sets of stitches into the same space. These “increases” are what create the 90-degree angles. Double-check your Pattern count at the end of every round to make sure you have exactly four corners.
In this guide, we have explored the timeless and versatile world of the Crocheted square – Pattern, a design that continues to be the heart and soul of the crochet community. We discussed the importance of selecting the right fibers—from durable acrylics to crisp cottons—and how hook size and color theory play a vital role in the success of your project. We also broke down the technical secrets of the magic ring, corner increases, and the importance of turning your work to ensure a perfectly flat, symmetrical result.
Furthermore, we covered professional finishing techniques like blocking, the Mattress Stitch join, and weaving in ends to create an heirloom-quality piece. Whether you are crafting a traditional granny blanket or a modern fashion statement, the Crocheted square – Pattern provides a rewarding, modular experience that combines technical skill with artistic freedom.


