
Square-in-a-Square Quilt Block - Tutorial

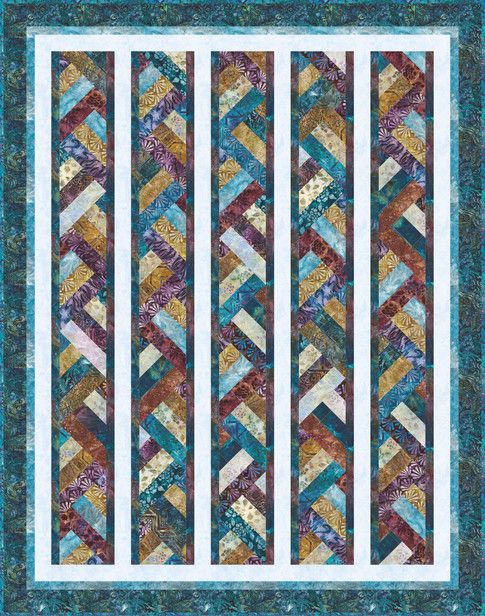
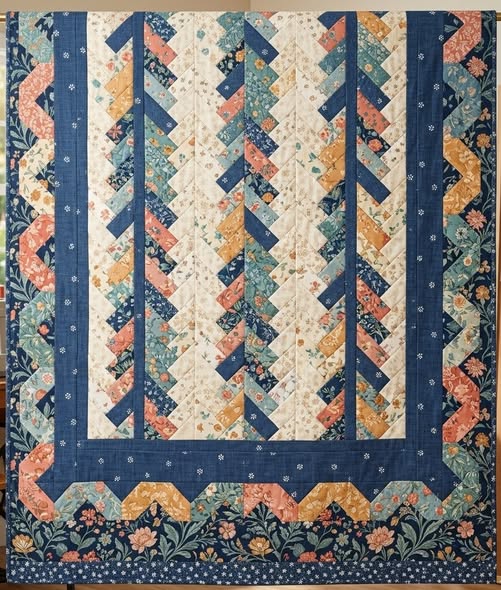
Patchwork with French braid – Pattern is a sophisticated and visually striking technique that brings a sense of dynamic movement and woven elegance to the world of traditional quilting. This specific style, often characterized by its interlocking strips that resemble a classic hair braid, allows quilters to play with color gradients and fabric contrasts in a way that few other designs can match. When you master the Patchwork with French braid – Pattern, you transition from simple block-building to creating a continuous flow of textile art, making it a favorite for bed runners, table runners, and striking quilt borders.
The allure of the Patchwork with French braid – Pattern lies in its deceptive complexity; while the finished result looks like an intricate weave, the assembly process is actually quite logical and rhythmic. By following a structured Patchwork with French braid – Pattern, you can effectively utilize your fabric stash, as this technique is perfect for “jelly rolls” or long scraps that might otherwise be overlooked. Many artisans find that the process of selecting fabrics for a French braid project is a meditative exercise in color theory, as the success of the design depends heavily on how light and dark values transition from one strip to the next.
In this comprehensive guide, we will explore every technical and creative facet of the Patchwork with French braid – Pattern, ensuring you have the confidence to tackle this project from your very first cut to the final binding. We will discuss the essential tools required for precision, the step-by-step logic of the diagonal assembly, and how to troubleshoot common issues like “wavy” edges or misaligned points. By focusing on the Patchwork with French braid – Pattern as our primary framework, we will show you how to transform basic fabric strips into a masterpiece of movement and light that will be cherished for generations.
At the very core of the Patchwork with French braid – Pattern is the concept of alternating diagonal strips around a central starting square. The “pattern” begins with a small “keystone” or anchor block, from which strips are added in a specific sequence—left, then right, then left again. Understanding this alternating rhythm is essential for the Patchwork with French braid – Pattern, as it ensures the braid “grows” upward in a symmetrical fashion, creating those iconic V-shaped chevrons that define the look.
The term “French braid” in quilting refers to the way the strips overlap at the center seam, mimicking the appearance of a physical braid. In a professional Patchwork with French braid – Pattern, the width of the strips and the length of the cuts are mathematically calculated to ensure that the braid maintains a consistent width as it progresses. If your cuts are inconsistent, the braid will begin to “lean” or drift, which is why following a dedicated pattern is so important for maintaining geometric integrity.
One of the most critical components of the Patchwork with French braid – Pattern is the “stop-and-start” point of each strip. Unlike traditional square blocks where you sew from edge to edge, the French braid technique requires you to align each new strip with the edge of the previous unit. This creates a staggered effect that, once trimmed, reveals a perfectly straight column of woven fabric. Most quilting patterns for this style will emphasize the importance of a consistent quarter-inch seam allowance to keep the intersections clean.
Color placement is what truly breathes life into the Patchwork with French braid – Pattern. To achieve a “glowing” effect, quilters often use a “color wash” technique, where colors transition from light at the center to dark at the edges, or vice versa. The pattern serves as a roadmap for these transitions, helping you visualize how twenty or thirty different fabrics will look once they are integrated into the braided structure. This makes the Patchwork with French braid – Pattern a fantastic project for those who love ombre effects.
Another structural detail found in a quality Patchwork with French braid – Pattern is the use of “stay-stitching” or stabilizing the edges. Because the braid is constructed on a diagonal, many of the fabric edges are on the “bias,” which means they are prone to stretching. A good quilting guide will provide tips on how to handle these delicate edges to prevent the quilt top from becoming distorted. This attention to detail ensures that your French braid patchwork remains flat and square during the quilting process.
Finally, the Patchwork with French braid – Pattern often incorporates “sashing” or solid borders between braided columns to give the eyes a place to rest. The pattern will specify the width of these dividers, which act like the “frames” of a window, highlighting the movement within the braid itself. By mastering the foundational logic of the Patchwork with French braid – Pattern, you gain the ability to create complex-looking quilts that are actually built through a series of simple, repetitive steps.
To achieve success with the Patchwork with French braid – Pattern, you must start with high-quality quilting cotton that has a minimal amount of stretch. Because this technique relies on the crispness of the diagonal lines, using “limp” or loosely woven fabrics can result in a braid that looks sloppy. When you select fabrics for your Patchwork with French braid – Pattern, look for “tone-on-tone” prints or solids that allow the woven structure to be the star of the show without being overshadowed by busy patterns.
A rotary cutter and a long acrylic ruler are non-negotiable tools for the Patchwork with French braid – Pattern. Precision is the name of the game here; every strip must be the exact same width to ensure the “V” shapes align perfectly down the center of the column. Most French braid patterns suggest cutting strips that are 2.5 inches wide, which is the standard width of a “jelly roll” strip. Using these pre-cut fabrics can significantly speed up the process of completing your Patchwork with French braid – Pattern.
An iron with a strong steam setting is another essential for any Patchwork with French braid – Pattern project. In quilting, we often say that “pressing is just as important as sewing,” and this is especially true for the French braid. Each strip must be pressed away from the center keystone to ensure the seams “nest” together and the braid stays flat. A well-pressed patchwork top is much easier to quilt and results in a more professional-looking finished product.
You will also need a “quarter-inch foot” for your sewing machine to maintain a perfect seam allowance throughout the Patchwork with French braid – Pattern. If your seams vary even by a thread’s width, the error will compound as the braid grows, leading to a curved or “banana” shaped column. Many quilting tutorials recommend using a piece of painter’s tape on the machine bed as a guide to ensure every strip of the Patchwork with French braid – Pattern is sewn with mathematical accuracy.
High-quality 50-weight cotton thread is the best choice for the Patchwork with French braid – Pattern. This thin but strong thread allows the seams to lay flat without adding unnecessary bulk to the intersections. Since the French braid involves many overlapping layers of fabric, using a thicker thread can cause the quilt top to become “bumpy.” Choosing a neutral thread color like light grey or tan will help the stitches disappear into the patchwork design.
Lastly, consider using a “design wall” or a large flat surface to lay out your strips before you begin sewing the Patchwork with French braid – Pattern. This allows you to audition your color transitions and make sure the flow of the braid is exactly what you envisioned. Seeing the French braid pattern laid out in its entirety before the first stitch is taken is the best way to avoid “color jumps” or mistakes in the alternating sequence.
The first physical step in the Patchwork with French braid – Pattern is cutting your “keystone” square and your first set of strips. Usually, the keystone is a 2.5-inch square that sits at the very bottom or top of the column. According to the Patchwork with French braid – Pattern, you will sew your first strip to the right side of the square, press it open, and then sew the second strip to the top edge created by the square and the first strip. This creates the first “turn” of the braid.
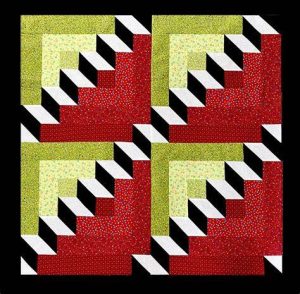
As you continue with the Patchwork with French braid – Pattern, you will always be sewing a new strip to the side that was just “completed.” It is helpful to think of it as a “log cabin” block that has been tilted on its side. The pattern requires you to consistently alternate sides; if you sew two strips to the left in a row, the braid will lose its symmetry. Keeping a “left-right” rhythm is the key to a successful Patchwork with French braid – Pattern execution.
Trimming is a vital phase that occurs once your column has reached the desired length in the Patchwork with French braid – Pattern. At this point, the sides of your column will look like a “zigzag” or a series of steps. You must use your long ruler to trim these steps into a perfectly straight line. The pattern will tell you exactly where to align your ruler—usually a quarter-inch away from the innermost corners—to ensure you don’t “cut off” the points of your braid.
Aligning multiple columns is the next challenge in the Patchwork with French braid – Pattern. If you are making a full quilt, you will need to sew several of these braided columns together. To ensure the “V” shapes line up across the quilt, you must pin the columns at the seam intersections. A professional Patchwork with French braid – Pattern will provide “registration marks” or tips on how to nest the seams so that the finished quilt looks like a giant, continuous weave.
The “ends” of the braid also require special attention in the Patchwork with French braid – Pattern. Since the braid grows at an angle, the top and bottom of your column will be jagged. You will need to add “fill-in” triangles or trim the ends square to finish the quilt top. A detailed quilting pattern will provide templates for these corner triangles, ensuring that the “braid” looks like it begins and ends purposefully rather than just stopping abruptly.
Finally, once the columns are joined, you will add your borders as instructed by the Patchwork with French braid – Pattern. Borders help stabilize the bias edges of the braid and provide a frame for the movement within the patchwork. After a final, thorough pressing of the entire top, your French braid quilt is ready for the batting, backing, and the actual quilting stitches that will hold it all together for years to come.
Once you have mastered the standard Patchwork with French braid – Pattern, you can begin to experiment with “braid width” and “strip length.” For a more modern, “shattered” look, you can use strips of varying widths within the same braid. While this makes the Patchwork with French braid – Pattern slightly more difficult to align, the result is a contemporary piece of art that looks like it belongs in a gallery. This “improv” style of braiding is a great way to push your creative boundaries.
Incorporating “fussy-cut” motifs into the Patchwork with French braid – Pattern is another way to add a layer of detail. You might choose a fabric with tiny birds or flowers and ensure that one motif appears in the center of every third strip. This requires more fabric and careful planning, but it turns a geometric pattern into a narrative piece. Following a fussy-cutting guide in conjunction with your braid pattern ensures that your images aren’t cut off by the seams.
Texture can be introduced into the Patchwork with French braid – Pattern by using different fabric types, such as linen, silk, or even velvet. Mixing textures adds a tactile dimension to the quilt that is incredibly appealing. When using mixed media, the Patchwork with French braid – Pattern is essential for keeping track of how different fabric weights might react to the diagonal tension, helping you avoid puckering or “bubbling” in the finished top.
For a dramatic visual effect, try the “split braid” variation of the Patchwork with French braid – Pattern. This involves making two identical braid columns and then “flipping” one of them upside down before joining them. This creates a “diamond” or “kaleidoscope” effect in the center of the quilt. A versatile patchwork pattern will often include instructions for this layout, as it is one of the most popular ways to showcase the French braid technique.
Seasonal themes are a fantastic way to utilize the Patchwork with French braid – Pattern for home decor. You can create a “Harvest Braid” using deep oranges, reds, and browns, or a “Spring Braid” with pastels and floral prints. Because the pattern is so focused on color flow, it is easy to adapt to any holiday or room color scheme by simply swapping out your fabric bundles while keeping the braided structure the same.
Finally, consider using the Patchwork with French braid – Pattern to make smaller items like tote bags, throw pillows, or even clothing. A single braided column makes a stunning strap for a bag or a decorative panel on the back of a denim jacket. By scaling the Patchwork with French braid – Pattern down, you can incorporate this elegant weave into every aspect of your creative life, proving that the French braid is one of the most versatile designs in the fiber arts.
1. Is the Patchwork with French braid – Pattern hard for beginners?
It is considered an “intermediate” project because of the diagonal seams and bias edges. However, if a beginner is comfortable with a quarter-inch seam and follows the alternating sequence carefully, they can certainly achieve beautiful results.
2. How much fabric do I need for a standard lap-sized French braid quilt?
Usually, you will need about 20 to 30 different fabric strips (or one “jelly roll”) plus about 2 yards of background/sashing fabric. The Patchwork with French braid – Pattern you choose will provide a specific “yardage chart” based on your desired final size.
3. Do I need a special ruler for this pattern?
While a standard 6″ x 24″ acrylic ruler works, some companies sell a “French Braid Ruler” that has the angles pre-marked. This can make the trimming process faster, but it is not strictly necessary to complete the patchwork pattern.
4. How do I prevent the braid from curving?
Curving is usually caused by inconsistent seam allowances or pulling on the fabric as you sew. Using a “walking foot” and being careful not to stretch the bias edges are the best ways to keep your French braid columns straight.
5. Can I make a French braid quilt without a center “keystone”?
Yes, some versions of the Patchwork with French braid – Pattern start with two strips sewn together at a 90-degree angle. However, using a keystone square is generally easier for beginners to align and provides a stable starting point.
6. What is the best way to quilt a French braid top?
“Straight-line quilting” that follows the diagonal lines of the braid looks fantastic and reinforces the woven look. Alternatively, a “swirling” free-motion design can provide a lovely contrast to the sharp geometric lines of the patchwork braid.
In summary, the Patchwork with French braid – Pattern is a mesmerizing technique that combines the precision of geometry with the fluid beauty of color gradients. Throughout this article, we have explored the structural logic of the “left-right” alternating sequence, the essential tools like rotary cutters and cotton thread needed for success, and the step-by-step methods for assembling and trimming your columns.
We also looked at how customization—from “fussy-cutting” to “split-braid” layouts—can turn a traditional pattern into a modern work of art. Whether you are building a small table runner or a sprawling heirloom quilt, the Patchwork with French braid – Pattern offers a rewarding and rhythmic sewing experience that celebrates the art of the weave.


