
Patchwork Bird Tutorial

Patchwork Quilt – Pattern is more than just a set of instructions for a sewing project; it is a gateway into a rich tradition of storytelling through fabric, color, and precise craftsmanship. For centuries, makers have used this art form to combine disparate pieces of cloth into a cohesive, warm, and meaningful masterpiece that serves both a functional and an emotional purpose in the home. Whether you are a beginner looking to understand the basics of a “nine-patch” block or a seasoned quilter tackling an intricate “star” design, mastering the Patchwork Quilt – Pattern allows you to preserve the past while creating something entirely new and personalized for future generations.
The beauty of engaging with a Patchwork Quilt – Pattern lies in the rhythmic balance between the creative selection of fabrics and the technical discipline of assembly. Unlike other forms of textile art, quilting requires a mathematical mind to ensure that every corner meets perfectly and every seam is pressed with care. By choosing a specific Patchwork Quilt – Pattern, you are following a roadmap that has been refined by generations of artisans, yet you still maintain the freedom to inject your own personality through unique color palettes and modern fabric choices. This blend of structure and spontaneity is what makes patchwork quilting one of the most rewarding hobbies in the world today.
In this comprehensive guide, we will explore the essential elements that contribute to a successful Patchwork Quilt – Pattern, from the initial selection of high-quality quilting cottons to the final, meditative stitches of the binding. We will break down the terminology often found in these designs, such as “seam allowance” and “fussy cutting,” ensuring that you have the confidence to navigate even the most complex instructions. By the end of this article, you will see how a simple Patchwork Quilt – Pattern can be transformed into a stunning work of art that provides comfort, warmth, and a lasting legacy of your creative journey.
At the very heart of every Patchwork Quilt – Pattern is the concept of the “block,” which serves as the fundamental building unit of the entire design. A block is a smaller square or rectangle that is pieced together from various fabric shapes, such as squares, triangles, or diamonds, according to the specific dimensions outlined in the pattern. Most quilters start with a “grid-based” design, where blocks are repeated in rows and columns, creating a sense of order and visual rhythm that is both pleasing to the eye and easier for beginners to manage.
The mathematical logic of a Patchwork Quilt – Pattern often revolves around the “quarter-inch seam allowance,” which is the universal standard in the quilting world. This narrow margin ensures that the pieces fit together like a puzzle without losing their intended shape or size. If a quilter deviates from this measurement even slightly, the cumulative error across multiple blocks can cause the final quilt top to look distorted. Therefore, following the Patchwork Quilt – Pattern requires a high level of precision and constant checking of one’s work against the provided diagrams.
Fabric “value” and “contrast” are technical terms often emphasized within a Patchwork Quilt – Pattern to ensure the design remains visible once the pieces are sewn together. Value refers to the lightness or darkness of a fabric, and without enough contrast between the pieces, the intricate shapes of the quilt pattern can get lost in a muddy or “flat” appearance. A well-designed Patchwork Quilt – Pattern will often include a coloring sheet or a grayscale guide to help you plan your fabric placement so that the geometric stars or secondary designs truly pop.
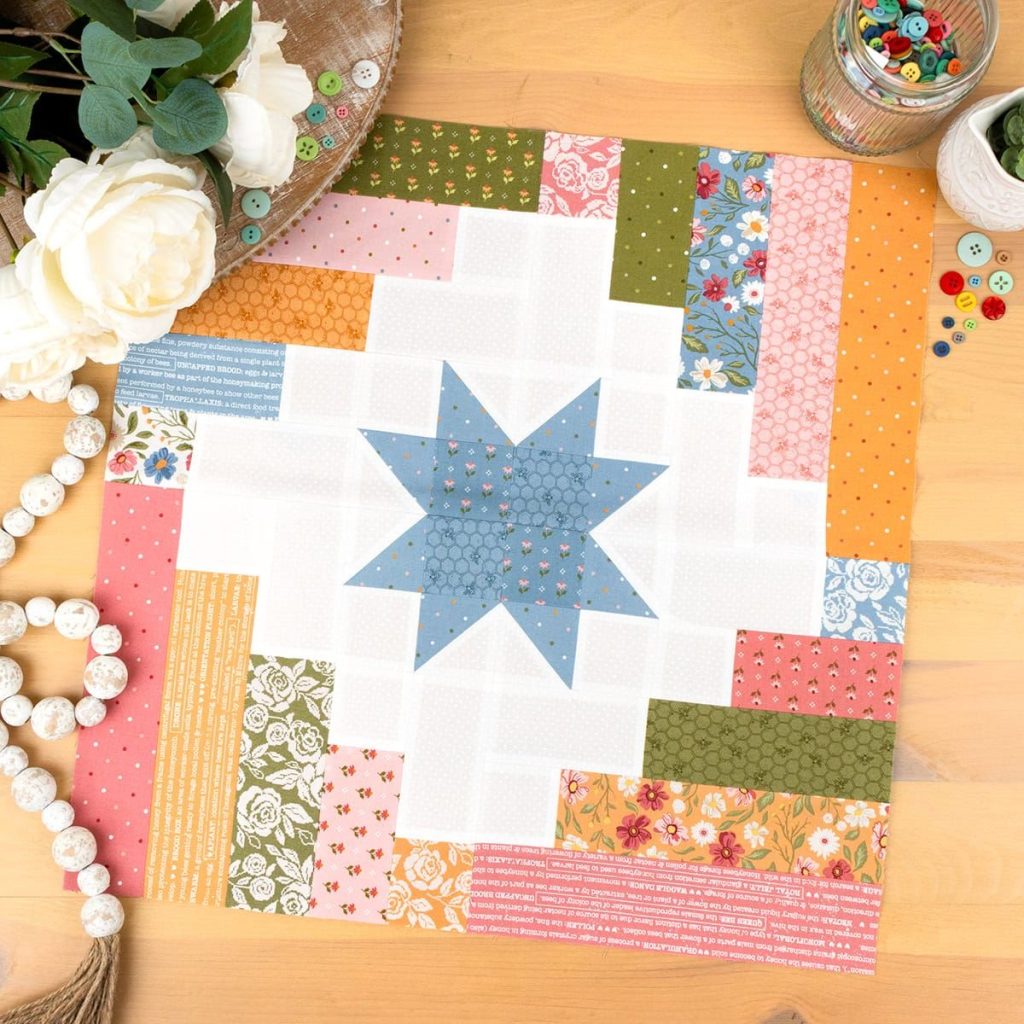
Another fascinating aspect of the Patchwork Quilt – Pattern is the “secondary design,” which is a pattern that emerges only when several blocks are joined together. For example, a “Churn Dash” block might create a diamond or a cross shape in the “negative space” between the units. Understanding how your chosen Patchwork Quilt – Pattern behaves en masse allows you to strategically place your fabrics to highlight these hidden shapes. This “big picture” thinking is what elevates a simple project into a sophisticated and complex piece of textile architecture.
“Sashing” and “Cornerstones” are additional elements often included in a Patchwork Quilt – Pattern to provide visual breathing room between the blocks. Sashing consists of fabric strips that frame each block, while cornerstones are small squares that join the sashing strips at the intersections. These features not only help to increase the final size of the quilt without requiring more complex piecing but also allow the quilt pattern to look more organized and professional. Choosing a neutral color for sashing is a common way to let the colorful patchwork take center stage.
Finally, every Patchwork Quilt – Pattern must account for “directional prints,” which are fabrics that have a specific up-and-down orientation. If a pattern requires you to rotate squares or cut triangles at an angle, you must be careful to ensure that the little birds or flowers on your fabric don’t end up upside down. A professional Patchwork Quilt – Pattern will often provide tips on how to cut your fabric to maintain the orientation of these prints, ensuring that the final result looks intentional and expertly crafted.
The first step in executing any Patchwork Quilt – Pattern is selecting the right yarn or fabric, with 100% quilting cotton being the gold standard for its durability and ease of handling. This fabric has a stable weave that doesn’t stretch or fray excessively, making it the perfect medium for the small, precise pieces required by a Patchwork Quilt – Pattern. While it might be tempting to use scraps from old clothing, the inconsistent weights of various fabrics can make the assembly process much more difficult and may cause the quilt to pucker or wear unevenly over time.
A high-quality rotary cutter and an acrylic ruler are the most important tools in your quilting arsenal for following a Patchwork Quilt – Pattern. Unlike traditional scissors, a rotary cutter allows you to cut multiple layers of fabric with surgical precision, ensuring that every square and triangle matches the measurements specified in the pattern. When working on a Patchwork Quilt – Pattern, being off by even a fraction of an inch can lead to mismatched corners, so investing in sharp blades and non-slip rulers is a necessity for anyone serious about the craft.
The “cutting mat” is the silent partner of the rotary cutter, providing a self-healing surface that protects your table and keeps your fabric from sliding. Most mats feature a grid system that complements the measurements in your Patchwork Quilt – Pattern, allowing you to double-check your cuts as you go. For complex designs that involve “half-square triangles” or “flying geese,” using the lines on the mat alongside your quilt pattern diagrams ensures that your geometric shapes are perfectly “squared up” before they are sewn into the final block.
Thread selection is another vital component of the Patchwork Quilt – Pattern process, with many professionals preferring a 50-weight cotton thread for piecing. This thread is thin enough to sit flat within the seam allowance, preventing “bulk” at the intersections where several pieces of fabric meet. When you are following a Patchwork Quilt – Pattern with many small components, using a thick or poor-quality thread can actually change the dimensions of your block. Choosing a neutral color like dove gray or beige allows the thread to blend into almost any fabric choice seamlessly.
An iron and a steady supply of steam are perhaps the most underrated tools for a successful Patchwork Quilt – Pattern. In quilting, there is a saying: “Pressing is not ironing.” You must press the iron straight down onto the seams rather than sliding it back and forth, which can stretch the fabric out of shape. A well-pressed patchwork block lies flat, making it much easier to join to the next block in the pattern. This attention to “pressing to the dark side” ensures that your seam allowances don’t show through the lighter fabrics of your quilt top.
Lastly, “fussy cutting” is a technique often mentioned in a Patchwork Quilt – Pattern that requires a steady hand and a clear acrylic template. This involves centering a specific motif from the fabric—like a single large rose or a specific character—within the cut shape. While this uses more fabric than traditional cutting, it adds a “custom” and high-end look to your Patchwork Quilt – Pattern. Using specialized rulers designed for fussy cutting helps you see exactly how the motif will look once it is sewn, ensuring that your quilt is a one-of-a-kind masterpiece.
The assembly of a Patchwork Quilt – Pattern usually begins with “chain piecing,” a time-saving technique where you sew pairs of fabric together one after another without cutting the thread in between. This creates a long “chain” of fabric units that can be clipped apart later. Chain piecing is highly recommended in almost every Patchwork Quilt – Pattern because it maintains a consistent seam allowance and uses significantly less thread, making the production of dozens of blocks much more efficient and organized.
Once your individual units are sewn, the Patchwork Quilt – Pattern will guide you through “nesting seams.” This technique involves pressing the seam allowances of two joining pieces in opposite directions so they “lock” together at the intersection. This ensures that your corners are sharp and that there is no extra bulk at the points where four or more pieces meet. Mastering the art of nesting is what gives a Patchwork Quilt – Pattern its professional, high-definition look, preventing the “lumpy” corners that often plague beginner projects.
“Basting” is the next major phase of the Patchwork Quilt – Pattern, where you create a “quilt sandwich” consisting of the finished top, the batting (the warm middle layer), and the backing fabric. You must secure these three layers together using either safety pins or a temporary spray adhesive. If you don’t baste your layers correctly, they can shift during the final quilting process, leading to “puckers” on the back of the quilt that are nearly impossible to remove without starting over. The pattern will usually suggest a specific basting method based on the size of the quilt.
The actual “quilting” of the Patchwork Quilt – Pattern can be done by hand or by machine, and it serves both a functional and decorative purpose. Functional quilting holds the three layers together so the batting doesn’t bunch up over time, while decorative quilting adds texture and movement to the design. You can follow the “lines” of the patchwork—a method known as “stitching in the ditch”—or you can create elaborate “free-motion” designs that complement the geometric shapes of the Patchwork Quilt – Pattern.
Binding is the final “frame” that finishes the edges of your Patchwork Quilt – Pattern. This involves sewing a long strip of folded fabric around the perimeter, enclosing the raw edges of the quilt sandwich. Most Patchwork Quilt – Pattern instructions will teach you how to “miter” the corners for a crisp, 90-degree angle. Whether you finish the binding by hand for a “hidden” stitch or by machine for a “durable” edge, this final step provides the structural integrity that allows the quilt to be used and washed for decades.
The final step in any Patchwork Quilt – Pattern is the “label.” Every quilter should sew a small fabric label onto the back of their work, including their name, the date, and the name of the pattern used. This transforms the quilt from a simple household object into a documented historical artifact. Following a Patchwork Quilt – Pattern to completion is a significant achievement, and adding a label ensures that your hard work and creative choices are remembered by everyone who wraps themselves in the quilt’s warmth.
Once you have mastered the basic Patchwork Quilt – Pattern, you can begin to experiment with “improv quilting,” where you use the pattern’s logic but vary the sizes and shapes of the pieces. This “controlled chaos” approach allows you to create a modern, abstract version of a traditional Patchwork Quilt – Pattern, making the project feel more like a painting than a mechanical assembly. Improv quilting is a great way to use up those odd-shaped scraps that are too small for a standard pattern but too beautiful to throw away.
“Appliqué” is another technique that can be added to a Patchwork Quilt – Pattern to introduce organic shapes like flowers, leaves, or even script letters. Instead of piecing the fabric together, you sew a shape directly onto the surface of a finished block. Many quilters use this to soften the hard geometric lines of a patchwork design, creating a beautiful contrast between the structured grid of the blocks and the fluid curves of the appliqué. This hybrid approach makes your Patchwork Quilt – Pattern feel even more customized and artistic.
Embellishment with embroidery or beadwork is a wonderful way to add a “signature” touch to your Patchwork Quilt – Pattern. You can use a simple “running stitch” to highlight certain seams or add intricate “French knots” to the center of stars. While this adds significant time to the project, it elevates the quilt pattern into the realm of “art quilting,” where the textile becomes a canvas for multi-media expression. These tiny details are often what turn a nice quilt into an award-winning heirloom.
Choosing an “unconventional” backing fabric can also breathe new life into a standard Patchwork Quilt – Pattern. Instead of using basic cotton, consider using a soft flannel for extra warmth or a wide-back minky fabric for a luxurious, plush feel. Just keep in mind that these fabrics behave differently under the needle, so you may need to adjust your machine’s tension or use a “walking foot” to ensure that the backing moves at the same speed as the patchwork top.
“Echo quilting” is an advanced stitching technique that can be used to emphasize the shapes within your Patchwork Quilt – Pattern. This involves stitching lines that follow the outline of the patchwork shapes at consistent intervals, creating a “ripple” effect across the surface of the quilt. This not only reinforces the patchwork design but also adds a sophisticated depth and texture that can only be achieved through careful, intentional stitching that respects the original pattern geometry.
Finally, you can adapt a Patchwork Quilt – Pattern to create different sizes, from “mini quilts” for wall art to “California King” covers for the master bedroom. By simply increasing or decreasing the number of blocks in the grid, the pattern becomes infinitely scalable. This flexibility is what makes the Patchwork Quilt – Pattern such a valuable tool in any maker’s library; one set of instructions can be used over and over again to create a lifetime of unique, cozy, and culturally significant textile treasures.
1. Is a Patchwork Quilt – Pattern hard for beginners?
Not necessarily! There are many “beginner-friendly” patterns that focus on simple squares and rectangles. The key is to choose a Patchwork Quilt – Pattern that matches your current skill level and to take your time with the cutting and sewing stages to ensure accuracy.
2. How much fabric do I need for a standard quilt?
The amount of fabric depends entirely on the size of the quilt and the complexity of the Patchwork Quilt – Pattern. Most patterns will include a “materials list” that calculates the yardage for you, but a typical lap quilt usually requires between 5 to 8 yards of fabric in total.
3. Why are my corners not lining up correctly?
The most common culprit for mismatched corners is an inconsistent seam allowance. Ensure you are using a “scant quarter-inch” seam and that you are pressing your blocks according to the Patchwork Quilt – Pattern instructions. Even a tiny error can add up quickly across a whole row!
4. Can I use different types of fabric in the same quilt?
While you can mix fabrics, it is generally recommended to stick to similar weights, such as all cotton or all flannel. If you mix a stretchy knit with a stable cotton in your Patchwork Quilt – Pattern, the different rates of “give” can cause the quilt to pucker and distort over time.
5. How do I wash a handmade patchwork quilt?
Most quilts made with a Patchwork Quilt – Pattern can be washed in cold water on a gentle cycle with a mild detergent. To prevent colors from bleeding, many quilters use “color catchers” in the wash. Always air dry or tumble dry on very low heat to preserve the fibers.
6. What is the difference between “piecing” and “quilting”?
“Piecing” is the act of sewing the small bits of fabric together to create the top (the patchwork part), while “quilting” refers to the stitching that holds the top, batting, and backing together. Both are essential steps in completing a Patchwork Quilt – Pattern.
In conclusion, embarking on a Patchwork Quilt – Pattern project is a journey into a world where math meets art and utility meets sentiment. Throughout this guide, we have explored the foundational geometry of quilt blocks, the essential role of precision tools like rotary cutters and acrylic rulers, and the technical steps of chain piecing, nesting seams, and binding.
We also discussed how you can customize a standard pattern through color contrast, appliqué, and creative quilting stitches to make a piece that is uniquely yours. Whether you are following a traditional design passed down through your family or a modern Patchwork Quilt – Pattern found online, the result is the same: a durable, beautiful, and warm textile that tells a story of patience, skill, and love.


