
Patchwork Bird Tutorial

The Shooting Star Quilt Block – Pattern is one of the most beloved designs in the world of traditional quilting, offering a sense of movement and celestial beauty to any fabric project. Whether you are a seasoned quilter or a beginner looking for your first celestial challenge, understanding how to construct this specific block is essential. This pattern relies on geometric precision to create the illusion of a star streaking across the night sky, often utilizing a mix of vibrant colors and contrasting backgrounds to make the “trail” of the star pop.
When you decide to work on a Shooting Star Quilt Block – Pattern, you are engaging with a piece of history that has been reimagined for modern aesthetics. The versatility of the design allows for endless customization, from choosing monochromatic palettes for a minimalist look to using bold, primary colors for a nursery quilt. The core of this project lies in mastering the half-square triangles and the square-in-a-square techniques, which are the fundamental building blocks of this specific star variation.
Navigating the world of quilting patterns can feel overwhelming, but the Shooting Star Quilt Block – Pattern stands out because of its striking visual impact and relatively straightforward assembly process. By focusing on accurate cutting and consistent seam allowances, you can ensure that your star points are sharp and your “tails” are perfectly aligned. In this comprehensive guide, we will dive deep into the materials, techniques, and creative tips needed to master this iconic pattern and elevate your textile art to new heights.
The Shooting Star Quilt Block – Pattern is essentially a variation of the classic star quilt, characterized by an asymmetrical design that suggests motion. Unlike static stars, this pattern features elongated points or “trails” that extend from one side of the central star. To begin, you must select high-quality quilting cotton, as this fabric provides the stability needed for the many diagonal seams involved.
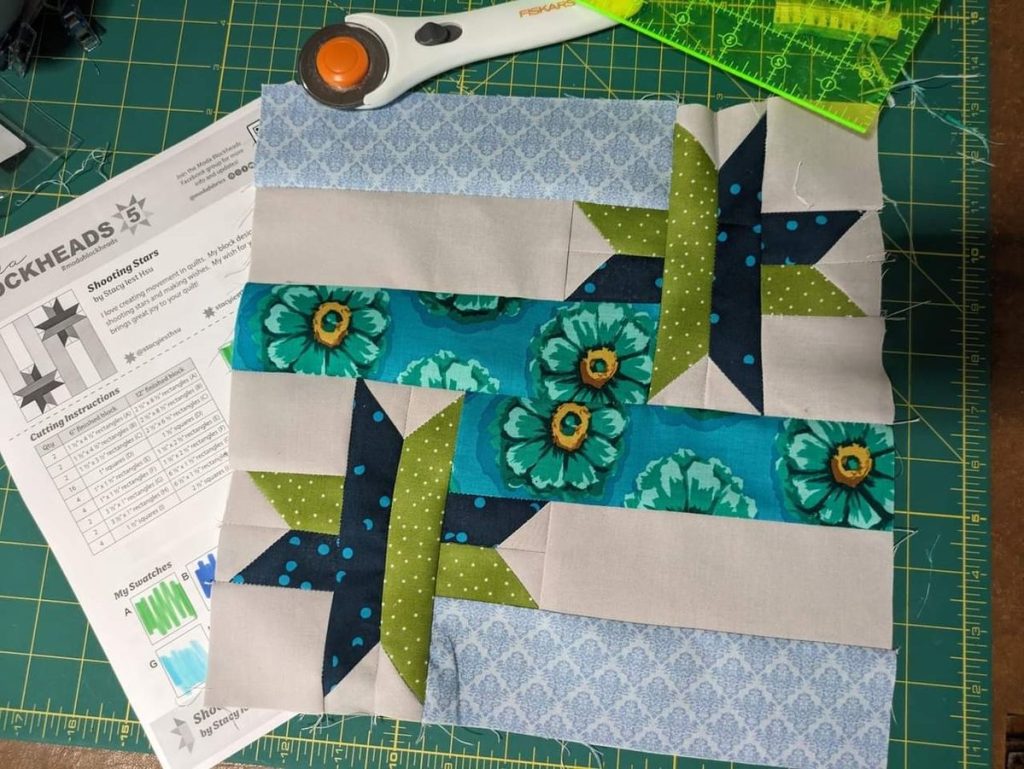
Choosing your color palette is the most critical creative step in the Shooting Star Quilt Block – Pattern. For a traditional look, many quilters use a dark blue or black “night sky” background paired with bright yellow or white for the star itself. However, modern interpretations often use low-volume fabrics for the background to create a softer, contemporary feel that highlights the star’s geometry.
Precise measurement is the backbone of any successful Shooting Star Quilt Block – Pattern. You will need a rotating cutting mat, a sharp rotary cutter, and a clear acrylic ruler to ensure every piece is uniform. Even a fraction of an inch off can cause the points of your star to get “chopped off” when you sew the blocks together, which is a common frustration for many.
The primary component of this design is the half-square triangle (HST). Most versions of the Shooting Star Quilt Block – Pattern use these to create the star’s points and the streaking tail. Mastering the “two-at-a-time” HST method can save you significant time and improve the accuracy of your blocks, ensuring that the diagonal lines remain straight and crisp.
Another essential element is the fussy cutting technique, which you might use if your fabric has a specific motif you want centered in the middle of the star. While not strictly necessary for every Shooting Star Quilt Block – Pattern, it adds a layer of professional detail that makes the finished quilt look like a piece of custom art. Always account for seam allowances when planning your cuts.
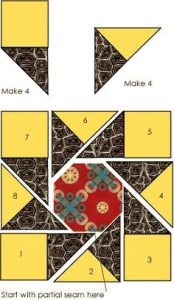
Lastly, before you touch your sewing machine, it is vital to lay out your pieces in the block formation. This allows you to visualize how the Shooting Star Quilt Block – Pattern will look once assembled and ensures you haven’t flipped any triangles accidentally. Taking a photo of your layout with your phone can serve as a helpful reference point as you move to the stitching phase.
To begin the actual construction of your Shooting Star Quilt Block – Pattern, start by sewing your HST units together. Always sew with a consistent 1/4-inch seam allowance, as this is the industry standard for quilting. If your machine doesn’t have a specialized foot, use a piece of painter’s tape on the throat plate to mark the correct distance for your fabric.
Pressing is just as important as sewing when creating a Shooting Star Quilt Block – Pattern. Instead of “ironing” (which can stretch the fabric), you should “press” your seams. Many quilters prefer to press seams toward the darker fabric to prevent them from showing through lighter areas, a technique known as pressing to the dark side, which keeps the star looking clean.
Once your individual units are prepared, you will begin assembling the Shooting Star Quilt Block – Pattern in rows. Usually, this pattern is organized into a 3×3 grid or a 4×4 grid, depending on the complexity of the “tail.” Join the units of the top row first, then the middle, and finally the bottom, checking that your corners match up perfectly at each intersection.
The “magic” of the Shooting Star Quilt Block – Pattern happens when you join the rows together. This is where nesting seams becomes your best friend. By pressing the seams of the first row to the left and the second row to the right, the fabric “locks” together at the junctions, resulting in perfectly aligned points that look professional and sharp.
As you progress, don’t forget to trim your units. Many beginners skip the squaring up process, but it is essential for the Shooting Star Quilt Block – Pattern. Use your ruler to trim each sub-unit to the exact size required before joining them into the larger block. This prevents “waves” in your quilt top and makes the final quilting process much smoother.
The final step in assembly is the outer border or sashing. While the Shooting Star Quilt Block – Pattern can be used as a standalone block for a pillow, it truly shines when repeated across a full quilt top. Adding sashing between the blocks creates breathing room, allowing each individual shooting star to stand out without competing with its neighbors.
One of the reasons the Shooting Star Quilt Block – Pattern remains so popular is its adaptability to different styles. You can create a “Scrappy Shooting Star” by using your fabric stash and choosing a different color for every star point. This is an excellent way to use up leftover fat quarters while creating a vibrant, eclectic look that is unique to your style.
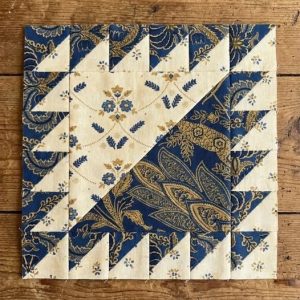
If you want a more elegant version of the Shooting Star Quilt Block – Pattern, consider using batik fabrics. The hand-dyed nature of batiks provides a wonderful texture that mimics the gases and dust of a real comet. Because batiks have a tighter weave, they are also less prone to fraying, making them ideal for the intricate piecing required in this quilt pattern.
For those who enjoy a challenge, try scaling the Shooting Star Quilt Block – Pattern down to a miniature size. A 6-inch block requires extreme precision and foundation paper piecing (FPP) techniques. FPP allows you to sew directly onto paper templates, ensuring that even the tiniest star points in your quilt block are perfectly sharp and accurately placed.
Another way to customize your Shooting Star Quilt Block – Pattern is through the use of negative space. Instead of filling the entire quilt with stars, place a few stars sporadically across a solid background. This “modern quilting” approach emphasizes the movement of the shooting star and creates a sophisticated, gallery-style aesthetic that is very popular in current interior design.
Don’t overlook the impact of the quilting motif itself. Once your Shooting Star Quilt Block – Pattern is pieced, you can use your stitching to enhance the design. Echoing the lines of the star’s tail with “straight-line quilting” or adding “swirls” in the background can give the impression of wind or cosmic energy, adding depth to the flat fabric.
Finally, consider the seasonal possibilities. A Shooting Star Quilt Block – Pattern can easily become a holiday quilt by using reds, greens, and metallics. Gold metallic thread used in the topstitching can add a literal sparkle to your star, making it the perfect centerpiece for a Christmas tree skirt or a festive wall hanging that catches the light.
One common issue when sewing the Shooting Star Quilt Block – Pattern is the “blunting” of the star points. This usually happens when the seam allowance is too wide, cutting off the tip of the triangle. To avoid this, always aim for a scant 1/4-inch seam, which accounts for the fold of the fabric and keeps your points perfectly visible and sharp.
Fabric stretching is another hurdle, especially since the Shooting Star Quilt Block – Pattern involves many bias edges. Bias edges (the diagonal cut of the fabric) are very stretchy and can easily become distorted. Using a bit of fabric starch before cutting can stiffen the fibers and help the pieces maintain their shape during the sewing process.
If your Shooting Star Quilt Block – Pattern ends up looking “wavy” or doesn’t lie flat on the table, it’s likely a result of uneven tension or inconsistent seams. Checking your sewing machine tension and using a walking foot can help feed the layers of fabric through the machine evenly, preventing one layer from stretching more than the other.
Sometimes, the colors in your Shooting Star Quilt Block – Pattern might “bleed” if you are using high-contrast fabrics like red and white. To prevent this, always pre-wash your fabrics or use a “color catcher” sheet during the first wash of the finished quilt. This ensures that your bright star doesn’t end up with a pinkish hue from the background fabric.
Mistakes in the direction of the “tail” can also occur. Since the Shooting Star Quilt Block – Pattern is directional, it’s easy to sew a unit upside down. A simple trick is to use clover clips or pins to mark the “top” of each unit as you work. This prevents the frustration of having to use a seam ripper to fix a reversed star trail.
Lastly, if you find that your blocks are coming out different sizes, check your cutting tools. A dull rotary blade can skip or pull the fabric, leading to inaccurate shapes. Replacing your blade before starting a new Shooting Star Quilt Block – Pattern project is a small investment that leads to much better results and a more enjoyable quilting experience.
Is the Shooting Star Quilt Block – Pattern suitable for absolute beginners?
While it is slightly more complex than a simple patchwork quilt, it is definitely achievable for a beginner who has mastered the half-square triangle. Taking your time with the cutting and pressing phases will ensure success.
What size is a standard Shooting Star Quilt Block – Pattern?
Most patterns are designed for a 12-inch finished block, which is a standard size in the quilting world. However, the pattern can easily be scaled to 6, 9, or even 18 inches depending on your project needs.
How much fabric do I need for a twin-size quilt using this pattern?
For a standard twin quilt, you would typically need about 6 to 7 yards of total fabric, including the background, star points, and borders. Always buy an extra 1/2 yard to account for any cutting errors.
Can I use a “Jelly Roll” for this pattern?
Yes! A Jelly Roll (pre-cut 2.5-inch strips) can be used for many parts of the Shooting Star Quilt Block – Pattern, especially for the star’s tail and the sashing. It’s a great way to get a coordinated variety of colors without buying yardage.
What is the best thread to use for piecing this block?
A high-quality 50wt cotton thread is recommended. It is strong enough to hold the seams together but thin enough that it doesn’t add bulk to the intersections, helping your star points stay flat.
Do I need a special ruler for this pattern?
While a standard acrylic ruler works fine, a tri-recs ruler or an HST ruler can make the process much faster and more accurate. These specialized tools are designed to help you trim star points with mathematical precision.
In this article, we have explored the intricate and beautiful world of the Shooting Star Quilt Block – Pattern. From understanding the foundational geometry and selecting the perfect quilting fabrics to mastering the assembly of half-square triangles and troubleshooting common sewing pitfalls, you now have the knowledge to create a stunning celestial masterpiece. We discussed how pressing techniques, precision cutting, and color theory all play vital roles in making your shooting star appear to leap off the fabric.
Whether you are making a single block for a decorative pillow or a full-sized quilt to pass down through generations, the Shooting Star Quilt Block – Pattern offers a rewarding experience for any maker. It combines tradition with a sense of wonder, capturing the ephemeral beauty of a star in the permanent medium of thread and cloth.


