
Patchwork Bird Tutorial

The Ann’s Star Quilt Block – Pattern represents a stunning intersection of classic geometric precision and the heartwarming tradition of American quilting. For generations, enthusiasts have turned to this specific design to create quilts that are both visually striking and deeply symbolic of domestic artistry. When you choose to work with the Ann’s Star Quilt Block, you are engaging with a legacy of makers who valued both the utility of a warm blanket and the aesthetic beauty of a well-balanced pattern.
Mastering the Ann’s Star Quilt Block – Pattern is an achievable goal for quilters of various skill levels, provided they approach the project with patience and attention to detail. The Ann’s Star Quilt Block is essentially a variation of the star motif, characterized by its clean lines and the dynamic way it guides the viewer’s eye toward the center of the design. By selecting the right fabrics and following the pattern steps carefully, you can produce a block that looks far more complex than it actually is to assemble.
In this comprehensive guide, we will delve into every aspect of the Ann’s Star Quilt Block – Pattern, ensuring you have the knowledge needed to create a masterpiece. From the initial fabric selection to the final pressing of the seams, we will explore why the Ann’s Star Quilt Block remains a favorite in the quilting community. Whether you are planning a single wall hanging or a king-sized heirloom, this pattern offers the flexibility and timeless appeal that every creator seeks in their fiber arts journey.
The success of your Ann’s Star Quilt Block – Pattern begins with a thoughtful selection of high-quality quilting cotton. Because the Ann’s Star Quilt Block features sharp points and distinct geometric shapes, choosing fabrics with a high thread count ensures that your seams remain stable and your points stay crisp. Many quilters prefer 100% cotton for this pattern because it is easy to handle and presses beautifully.
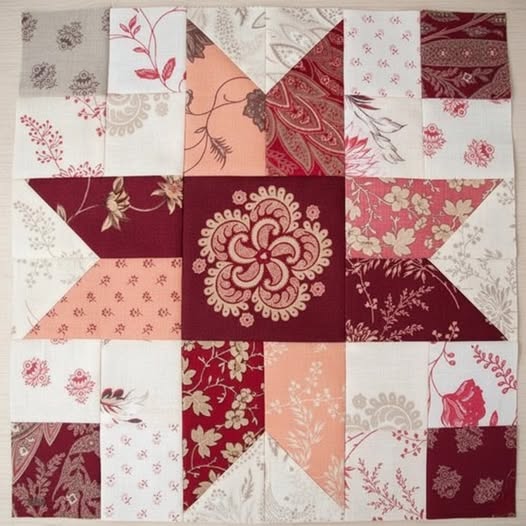
Color value is the secret weapon when executing the Ann’s Star Quilt Block. To make the star truly shine, you need a strong contrast between the “star points” and the “background” of the Ann’s Star Quilt Block – Pattern. Using a dark fabric for the star and a very light or neutral fabric for the background is a classic approach that never fails to impress.
Consider the scale of the prints you choose for your Ann’s Star Quilt Block – Pattern. Small-scale prints or “solids” work best because they don’t distract from the intricate lines of the Ann’s Star Quilt Block. Large, busy prints can sometimes swallow the design, making it difficult to see the beautiful star shape that defines this specific pattern.
Don’t overlook the importance of pre-washing your fabrics before starting the Ann’s Star Quilt Block. Since the Ann’s Star Quilt Block – Pattern often involves high-contrast colors like red and white or navy and cream, pre-washing prevents dye transfer. This step ensures that your hard work on the pattern isn’t ruined the first time the quilt is laundered.
Texture can also play a role in the modern interpretation of the Ann’s Star Quilt Block – Pattern. While traditional cotton is standard, some modern makers incorporate linens or even subtle metallic threads into the Ann’s Star Quilt Block. These variations can add a contemporary flair to the traditional pattern, making it a unique piece of contemporary art.
Lastly, calculate your yardage carefully based on the number of blocks you intend to make from the Ann’s Star Quilt Block – Pattern. It is always better to have a little extra fabric than to run out halfway through your Ann’s Star Quilt Block. Consistency in dye lots is vital for maintaining a professional look across the entire quilt surface.
Precision cutting is the foundation of a perfect Ann’s Star Quilt Block – Pattern. Using a rotary cutter and a specialized quilting ruler, you must ensure that every square and triangle for the Ann’s Star Quilt Block is cut exactly to the dimensions specified in the pattern. Even a sixteenth of an inch error can multiply as you join the pieces together.
The Ann’s Star Quilt Block – Pattern typically relies on units like Half-Square Triangles (HSTs) or Flying Geese. When preparing these for the Ann’s Star Quilt Block, many experts recommend “oversizing” the units slightly and then trimming them down to the exact size. This technique guarantees that your pattern units are perfectly square and easier to assemble.
Organization is your best friend when working on the Ann’s Star Quilt Block – Pattern. Label each stack of cut fabric pieces according to their placement in the Ann’s Star Quilt Block. This prevents the common mistake of sewing the wrong pieces together, which can be a significant setback when following a detailed pattern.
Before you touch the sewing machine, lay out your cut pieces for the Ann’s Star Quilt Block – Pattern on a design board. This allows you to see the “flow” of the colors in the Ann’s Star Quilt Block and make any necessary adjustments before the seams are permanent. Visualizing the pattern in its entirety helps catch errors early.
Check your sewing machine settings to ensure you are achieving a perfect “scant” quarter-inch seam for the Ann’s Star Quilt Block. This tiny adjustment accounts for the thickness of the fabric fold and is essential for the Ann’s Star Quilt Block – Pattern to finish at the correct size. Most modern patterns are designed with this specific seam allowance in mind.
Finally, ensure your workspace is well-lit and comfortable. Cutting and prepping the Ann’s Star Quilt Block – Pattern requires focus and steady hands. Taking the time to prepare properly means the actual sewing of the Ann’s Star Quilt Block will be a much smoother and more enjoyable process, leading to a professional finish.
The assembly of the Ann’s Star Quilt Block usually begins with the central unit. In many variations of the Ann’s Star Quilt Block – Pattern, the center is a simple square or a small four-patch. Ensuring this center is perfectly square is the most important step, as all other parts of the pattern will be built around it.
Next, you will assemble the “star points” for the Ann’s Star Quilt Block – Pattern. These are often created by sewing triangles to the sides of a central rectangle or square. When sewing these for the Ann’s Star Quilt Block, pay close attention to the direction of your seams to ensure the points of the star don’t get cut off in the seam allowance.
Joining the rows is the next phase in the Ann’s Star Quilt Block – Pattern. You will typically have three rows of three units each (a nine-patch construction) to complete the Ann’s Star Quilt Block. It is helpful to pin at every intersection to ensure the seams of the pattern line up perfectly, creating those beautiful, sharp star points.
Pressing is a critical part of the assembly for the Ann’s Star Quilt Block – Pattern. To reduce bulk, press your seams in alternating directions for each row of the Ann’s Star Quilt Block. This “nesting” of seams allows the pattern to lay flat and makes the final quilting process much easier for both hand and machine quilters.
Once the rows are joined, give the entire Ann’s Star Quilt Block a final, gentle press from the front. Avoid “pushing” the iron, which can distort the fabric; instead, lift and set the iron to flatten the Ann’s Star Quilt Block – Pattern. This sets the stitches and gives the pattern a crisp, professional appearance.
If your Ann’s Star Quilt Block – Pattern isn’t perfectly square at the end, don’t panic. You can often “square it up” by trimming the outer edges slightly, provided you don’t cut into the points of the star. A well-trimmed Ann’s Star Quilt Block is much easier to join with other blocks to form the final quilt top.
For those who have mastered the basic Ann’s Star Quilt Block – Pattern, there are many ways to add complexity. You might try “fussy cutting” a specific motif from your fabric to place in the center of the Ann’s Star Quilt Block. This draws even more attention to the heart of the pattern and adds a touch of whimsy to your work.
Another popular variation is the “Scrappy Ann’s Star Quilt Block.” Instead of using just two or three fabrics, use a different fabric for every point of the star within the Ann’s Star Quilt Block – Pattern. This creates a vibrant, eclectic look that is perfect for using up leftover bits of fabric from previous projects.
Changing the scale of the Ann’s Star Quilt Block – Pattern can also yield dramatic results. A “Giant Ann’s Star Quilt Block” can serve as a whole quilt top on its own, while miniature versions of the Ann’s Star Quilt Block can be used for intricate borders or decorative pillows. The flexibility of the pattern is one of its best features.
Consider secondary designs that appear when multiple units of the Ann’s Star Quilt Block are sewn together. The corners of the Ann’s Star Quilt Block – Pattern often form new shapes where they meet, creating a “secondary pattern” that can be enhanced by clever color placement. This adds a layer of depth to the finished quilt.
Quilting the finished Ann’s Star Quilt Block – Pattern is the final opportunity for creativity. You might choose to “echo quilt” around the star points of the Ann’s Star Quilt Block to emphasize the shape. Alternatively, a dense “stipple” in the background areas will make the star of the pattern pop forward visually.
Lastly, keep a quilting journal of your experience with the Ann’s Star Quilt Block – Pattern. Note which fabrics worked best and any adjustments you made to the Ann’s Star Quilt Block. This record becomes an invaluable resource for future projects and a wonderful way to track your growth as an artist within this timeless pattern.
What is the historical significance of the Ann’s Star Quilt Block?
The Ann’s Star Quilt Block is part of a long tradition of naming patterns after specific individuals or family members. While its exact origin is debated, it reflects the 19th-century practice of personalizing the Ann’s Star Quilt Block – Pattern to honor loved ones.
How difficult is the Ann’s Star Quilt Block – Pattern for a beginner?
It is considered an intermediate-level pattern. However, a confident beginner who understands basic sewing and cutting can successfully complete an Ann’s Star Quilt Block by following the instructions slowly and using pins to match intersections.
What is the best way to ensure my points aren’t cut off in the Ann’s Star Quilt Block?
The secret is the “scant” quarter-inch seam. When sewing the units of the Ann’s Star Quilt Block – Pattern, aim to sew just a thread’s width to the right of the intersection point. This leaves enough room for the fabric to fold without losing the sharp point of the star.
Can I make the Ann’s Star Quilt Block – Pattern in different sizes?
Yes, the Ann’s Star Quilt Block is mathematically scalable. Most patterns provide measurements for 6-inch, 12-inch, or 18-inch blocks. Simply adjust your cutting measurements according to the scale required for your specific Ann’s Star Quilt Block project.
What fabrics are best for a modern version of this pattern?
For a modern Ann’s Star Quilt Block – Pattern, try using solid fabrics in bold, saturated colors or “low-volume” prints for the background. This gives the traditional Ann’s Star Quilt Block a clean, graphic look that fits well in contemporary home decor.
How many blocks do I need for a standard-sized quilt?
For a 12-inch Ann’s Star Quilt Block – Pattern, you would typically need 30 blocks (5×6 grid) for a twin-sized quilt or 42 blocks (6×7 grid) for a queen-sized quilt, depending on the width of your borders.
Creating the Ann’s Star Quilt Block – Pattern is a journey that combines technical skill with artistic vision. In this article, we have covered the essential steps: from selecting high-contrast fabrics that make the Ann’s Star Quilt Block stand out, to the precision cutting and assembly techniques that ensure a flat, square finish.
We also explored how variations in color and quilting can transform this classic pattern into something entirely new and personal. By mastering the Ann’s Star Quilt Block, you are not just making a quilt; you are participating in a storied tradition of craftsmanship.


