
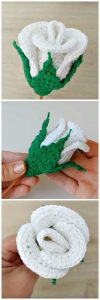
Crochet Flower - Tutorial

Finding the perfect Sun and Moon Crochet Square – Pattern is like discovering a hidden treasure in the world of fiber arts, combining celestial beauty with the tactile joy of handmade craftsmanship. This specific design has captured the hearts of makers globally because it balances the fiery energy of the sun with the serene, cool vibes of the moon, all within a compact crochet motif. Whether you are looking to create a stunning bohemian blanket, a unique tote bag, or even a celestial-themed cardigan, mastering this crochet pattern is a fantastic way to elevate your skills and add a touch of “cosmic chic” to your home decor.
In this comprehensive guide, we will explore everything you need to know about the Sun and Moon Crochet Square – Pattern, ensuring that even if you are relatively new to the craft, you can achieve a professional-looking result. We will dive deep into the specific crochet stitches required, such as the double crochet, half double crochet, and the intricate puff stitch used to give the sun its rays and the moon its cratered texture. By understanding the geometry of the square, you will learn how to transition from a circular celestial center to a crisp, four-cornered granny square base that makes joining multiple pieces a breeze.
The beauty of the Sun and Moon Crochet Square – Pattern lies in its versatility and the way it encourages color experimentation. Most crafters opt for high-contrast palettes, using golden yellow yarns for the sun and cool blues or silver greys for the moon, often framed by a deep midnight navy or a stark white border. As we progress through this step-by-step crochet tutorial, you will see how choosing the right yarn weight and hook size can drastically change the final look of your project, allowing for a personalized touch that reflects your individual style as a crochet artist.
Before diving into the actual stitches of the Sun and Moon Crochet Square | Tutorial – Pattern, you must gather the high-quality materials that will ensure your project lasts for years. Choosing a mercerized cotton yarn or a soft acrylic blend is often recommended because these fibers provide the stitch definition necessary to make the celestial faces pop. You will typically need at least three distinct colors to differentiate the sun, the moon, and the background sky, along with a tapestry needle for weaving in those inevitable ends.
Selecting the correct crochet hook size is the next vital step in the preparation process. For most medium-weight yarns, a 4.0mm (G) or 5.0mm (H) hook works perfectly to create a fabric that is firm enough to hold its shape but soft enough to drape well. If your tension is naturally tight, you might consider sizing up to ensure your celestial square doesn’t pucker or pull inward. Having a pair of sharp embroidery scissors and some stitch markers nearby will also make the process much smoother as you navigate the rounds.
The Sun and Moon Crochet Square – Pattern often begins with a magic ring (or magic circle), which is a crucial technique for any circular motif. This method allows you to pull the center of your work tight, leaving no visible hole in the middle of your sun or moon. If you find the magic ring challenging, you can substitute it by chaining four and joining with a slip stitch to form a ring, though the finish may be slightly less seamless.
Understanding your yarn tension is particularly important when working on a project that combines different shapes. Since the sun and moon are circular and the final frame is square, consistent tension prevents the “sun” from looking more like an oval. I recommend doing a small gauge swatch if you plan on making a large garment, ensuring every crochet square comes out the exact same size. This preparation prevents headaches later when it is time to assemble your final masterpiece.
It is also helpful to print out the crochet chart or have the written pattern instructions easily accessible. Many people find that a combination of visual diagrams and written text helps them visualize where the sun rays should align with the moon’s crescent. Being organized from the start allows you to focus on the meditative rhythm of the stitches rather than searching for misplaced tools or confusing instructions mid-row.
Lastly, consider the “vibe” of your Sun and Moon Crochet Square – Pattern. Are you going for a vintage, 1970s aesthetic with mustard yellows and burnt oranges, or a modern, minimalist look with monochrome tones? Setting your color palette beforehand ensures a cohesive look across all your crochet motifs. Once your materials are ready and your workspace is clear, you are officially prepared to start the creative journey of bringing these celestial bodies to life.
The core of the Sun and Moon Crochet Square | Tutorial – Pattern involves creating a split-circle design where one half represents the sun and the other the moon. To achieve this, you will work in rounds but switch colors halfway through each circle. This technique, known as tapestry crochet or color-carrying, allows the colors to remain vibrant without having to cut the yarn every few stitches. You will start by working the inner circle with your chosen sun and moon colors.
As you move into the second round of the Sun and Moon Crochet Square | Tutorial – Pattern, you will begin to define the features. For the sun side, you might use popcorn stitches or clusters to simulate the heat and texture of solar flares. On the moon side, using slip stitches and half double crochets can create a smoother, more crater-like appearance. This contrast in texture is what makes this celestial crochet pattern so visually appealing and unique compared to standard squares.
The transition between the two halves requires a clean color change technique. To do this, finish the last pull-through of the previous stitch with the new color. This ensures that the “line” between the sun and the moon remains sharp and professional. It takes a bit of practice to manage two strands of yarn at once, but the result is a beautiful, integrated crochet sun and moon that looks like a single piece of art rather than two pieces sewn together.
Once the central face is complete, the next phase of the Sun and Moon Crochet Square | Tutorial – Pattern is “squaring off” the circle. This is achieved by using stitches of varying heights in the corners. You will use treble crochets in the corners to add height, double crochets on the sides, and single crochets in the middle of the edges. This mathematical graduation of stitch height is the secret to turning a round sun into a perfectly flat, usable crochet square.
During this phase, pay close attention to the corner increases. Most patterns will require a “2 treble, chain 2, 2 treble” sequence in each of the four corners. This creates the sharp 90-degree angle needed for the granny square layout. If you skip an increase or miscount your stitches on the sides, your square will start to look like a pentagon or a circle again, so keeping a careful stitch count is essential for success in this tutorial.
After the first “squaring” round is done, the subsequent rounds of the Sun and Moon Crochet Square | Tutorial – Pattern are usually much simpler. You can continue with standard granny square clusters or rows of solid double crochet to reach your desired size. This outer border acts as the “sky,” providing a frame that highlights the intricate work you did in the center. By the end of this stage, you will have a complete, beautiful celestial motif ready for blocking.
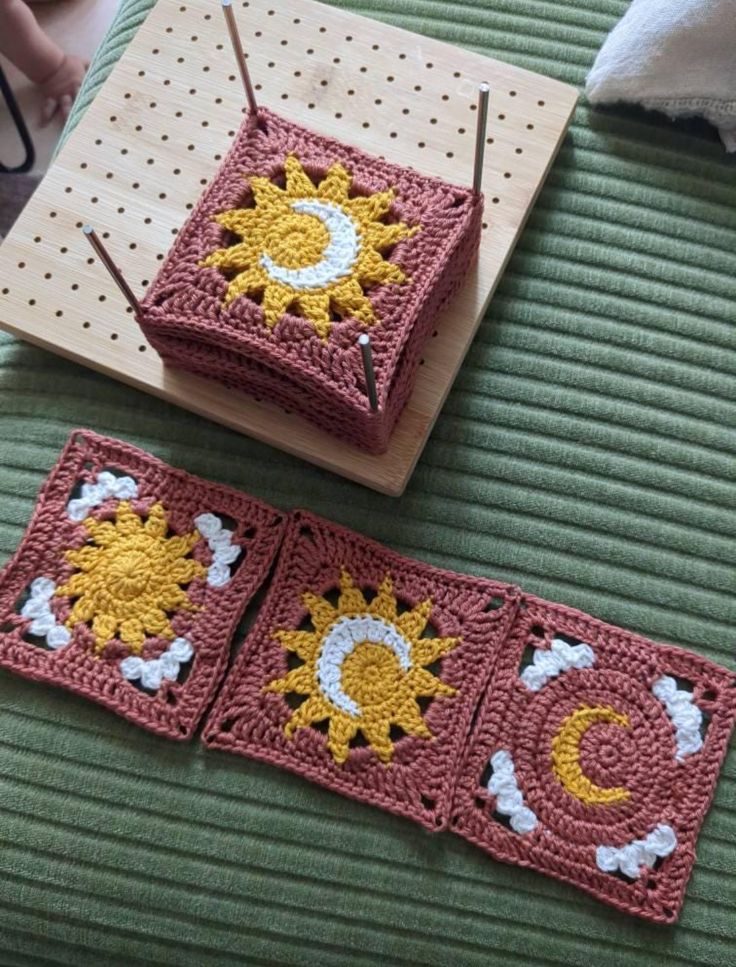
To truly master the Sun and Moon Crochet Square – Pattern, you should focus on the finishing touches that separate amateur work from professional pieces. One of the most important techniques is blocking. Since crochet can sometimes twist or pull, pinning your finished square motif to a blocking board and lightly steaming it helps the stitches settle into their final shape. This is especially important for the Sun and Moon design, as it ensures the sun stays perfectly round.
Another advanced tip for this Sun and Moon Crochet Square – Pattern is the use of the invisible join instead of a slip stitch at the end of rounds. The invisible join creates a faux-stitch top that mimics the surrounding stitches, making the “seam” of your square virtually undetectable. When you are working with high-contrast colors like yellow and blue, a bulky slip stitch can sometimes stand out, so the invisible join is a game-changer for a clean finish.
Managing your yarn tails is another area where you can improve your crochet technique. Instead of just weaving them in at the very end, try “crocheting over” your tails as you go. This secures the yarn and saves you hours of work once the project is finished. However, for the central sun and moon details, it is often safer to use a needle to weave the ends in the opposite direction of the stitch to ensure they don’t pop out after washing.
If you find that your Sun and Moon Crochet Square – Pattern is curling at the edges, it usually means your stitches are too tight or you haven’t added enough increases in the corners. Don’t be afraid to frog (rip out) a few rows to fix the tension. It is better to have a flat, beautiful crochet project than one that won’t lay right when you try to join it to others. Remember, every master was once a beginner who wasn’t afraid to restart.
For those who want to add extra flair, consider using metallic thread held together with your yarn for the sun’s rays or the moon’s crescent. This adds a subtle shimmer that catches the light, mimicking the actual glow of celestial bodies. This small addition to the Sun and Moon Crochet Square – Pattern can turn a simple blanket into a statement piece that looks like it came from a high-end boutique or a specialized craft fair.
Finally, think about the joining method you will use if you are making multiple squares. The join-as-you-go (JAYGO) method is very popular for this type of celestial pattern because it minimizes sewing at the end. Alternatively, a mattress stitch or a whip stitch can create a flat, nearly invisible seam that lets the Sun and Moon Crochet Square be the star of the show without distracting lines between the motifs.
Now that you have completed the Sun and Moon Crochet Square | Tutorial – Pattern, you might be wondering what to do with your beautiful creations. The most common use is a celestial-themed blanket. By alternating the sun and moon squares with solid-colored squares or stars, you can create a stunning “Galaxy Blanket” that is perfect for a nursery or a cozy living room. The repetitive nature of the squares makes it a relaxing long-term project.
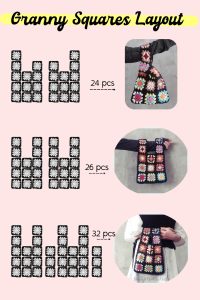
If you prefer smaller projects, the Sun and Moon Crochet Square | Tutorial – Pattern is perfect for creating crochet fashion accessories. Two squares joined together with a strap make a charming boho purse. You can also use a single square as the focal point on the back of a denim jacket or as a pocket on a cardigan. The celestial aesthetic is currently a huge trend in handmade fashion, making these squares very giftable and sellable.
Home decor is another fantastic outlet for your crochet squares. You can sew four squares together to create a unique celestial pillow cover. If you work with a thinner cotton thread and a smaller hook, these squares can even become beautiful crochet coasters or wall hangings. The versatility of the Sun and Moon Crochet Square | Tutorial – Pattern means you are only limited by your imagination and your yarn stash.
For those who love organizing, you can use these squares to make crochet pouches for tarot cards, crystals, or makeup. The symbolic nature of the sun and moon makes these pouches feel special and intentional. Adding a simple button closure or a drawstring to the top of two joined squares creates a functional piece of art that showcases your skills in the Sun and Moon Crochet Square | Tutorial – Pattern.
You can also experiment with yarn weights to change the scale of the project. Using chunky yarn and a large hook will result in a massive square that can serve as a floor cushion or a cat bed. Conversely, using lace-weight yarn can turn the Sun and Moon design into a delicate pair of earrings or a pendant. The adaptability of the crochet tutorial ensures it remains useful across many different types of craft projects.
Don’t forget the power of the community! Sharing your finished Sun and Moon Crochet Square | Tutorial – Pattern on social media platforms like Instagram or Pinterest is a great way to connect with other crochet enthusiasts. You can see how others have interpreted the pattern, what color combinations they used, and get inspired for your next project. Your work might even inspire a beginner to pick up a hook for the very first time.
What is the best yarn for a Sun and Moon Crochet Square?
For the best results with the Sun and Moon Crochet Square | Tutorial – Pattern, use a Category 4 (Medium) cotton or acrylic yarn. Cotton provides excellent stitch definition, which is vital for the celestial details, while acrylic offers softness and affordability for larger projects like blankets.
How do I prevent the colors from bleeding when I wash my project?
Since this pattern often uses high-contrast colors like yellow and navy, it is wise to use “color catcher” sheets in the laundry. Alternatively, you can pre-wash your yarn hanks or choose high-quality brands known for their colorfastness to ensure your sun and moon stay crisp.
Is this pattern suitable for absolute beginners?
The Sun and Moon Crochet Square | Tutorial – Pattern is best suited for “confident beginners” or intermediate crocheters. You should already be comfortable with basic stitches like the single crochet, double crochet, and changing colors. If you know these, the tutorial will guide you through the rest easily.
How many squares do I need for a full-sized blanket?
This depends on the size of your square and the desired blanket dimensions. On average, if your Sun and Moon Crochet Square is 6 inches wide, you would need about 100 squares for a 60×60 inch throw. It’s a great way to use up scrap yarn over time!
Can I sell items made from this Sun and Moon Crochet Square pattern?
Most designers allow you to sell finished items made from their crochet patterns, provided you give credit to the original design. However, always check the specific terms of the Sun and Moon Crochet Square | Tutorial – Pattern you are following to respect the creator’s intellectual property.
My square isn’t perfectly square; what did I do wrong?
The most common issue is a missed corner increase. Ensure you are placing the correct number of stitches into each corner space. Also, blocking your crochet motif at the end will almost always fix minor irregularities and give you those sharp, straight edges you desire.
In this article, we have explored the magical world of the Sun and Moon Crochet Square | Tutorial – Pattern, from selecting the right materials to mastering advanced finishing techniques. We learned how to transition between colors to create a striking celestial face and how to use varying stitch heights to “square off” our work into a versatile granny square. Whether you are aiming to create a cozy celestial blanket, a trendy tote bag, or unique home decor, this pattern provides a foundation for endless creativity and personal expression in your crochet journey.
The combination of the sun’s warmth and the moon’s mystery creates a timeless aesthetic that appeals to makers of all ages. By following the step-by-step crochet tutorial and applying the SEO-friendly tips provided, you are now equipped to produce high-quality pieces that look professional and feel handmade. Remember that patience and practice are key; every stitch is a step toward perfecting your craft and bringing a bit of the cosmos into your daily life.


