
Patchwork Bird Tutorial

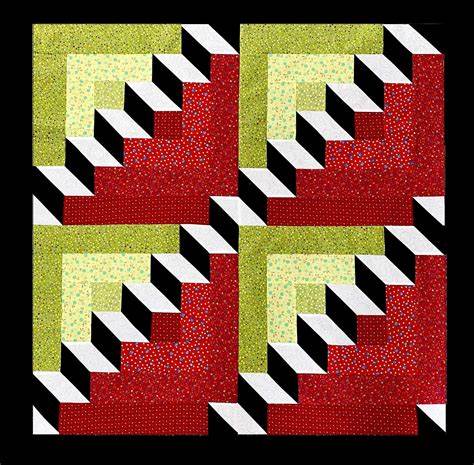
The Staircase Quilt Block – Pattern is a timeless design that brings a sense of architectural movement and structural beauty to any fabric project you undertake. For quilters who enjoy the look of geometric precision, this specific block offers a rhythmic repetition that mimics the ascending steps of a grand home, creating a visual flow that is both traditional and strikingly modern. Whether you are aiming to create a cozy heirloom or a contemporary wall hanging, mastering the Staircase Quilt Block – Pattern is an essential milestone for any sewing enthusiast looking to expand their repertoire.
What makes the Staircase Quilt Block – Pattern so captivating is its ability to play with light and shadow through clever color placement. By selecting contrasting fabrics, you can make the “steps” appear to pop off the surface, giving your quilt a three-dimensional quality that draws the eye across the room. This Staircase Quilt Block tutorial focuses on the simplicity of the construction, proving that you don’t need overly complex techniques to achieve a sophisticated look that impresses friends and family alike.
As we dive into the specifics of this Staircase Quilt Block – Pattern, it is important to remember that quilting is as much about the process as it is about the finished product. Working through a Staircase Quilt Block tutorial allows you to slow down, focus on your seam allowance, and enjoy the tactile nature of the fabric. In the following sections, we will break down the essential components of the design, ensuring that you have all the knowledge necessary to complete your project with confidence and artistic flair.
Before you make your first cut for the Staircase Quilt Block – Pattern, it is vital to prepare your fabric and tools for success. Precision is the soul of this design, so starting with starched and pressed fabric will make a world of difference when it comes time to align those geometric edges. A high-quality Staircase Quilt Block tutorial always emphasizes the importance of a clean, flat surface to ensure that your measurements remain accurate from start to finish.
The foundation of a great Staircase Quilt Block – Pattern lies in the selection of your cutting tools. A sharp rotary cutter, a non-slip quilting ruler, and a self-healing mat are the trio of essentials you will need. When following a Staircase Quilt Block tutorial, you’ll find that using a ruler with clear 45-degree markings helps immensely with the diagonal lines often found in step-like designs.
Color selection is where your Staircase Quilt Block – Pattern truly comes to life. To achieve the “stair” effect, most quilters choose at least three distinct values: a light, a medium, and a dark. Our Staircase Quilt Block tutorial suggests using a solid or a very subtle print for the “steps” themselves to ensure the geometric pattern doesn’t get lost in a busy floral or abstract design.
Organization is key when handling the multiple pieces required for the Staircase Quilt Block – Pattern. Using small clips or labeled trays to keep your squares and rectangles sorted by size will prevent confusion as you move to the sewing machine. Every successful Staircase Quilt Block tutorial focuses on this pre-sewing phase because a well-organized workspace leads to a much faster and more enjoyable assembly process.
Thread choice might seem secondary, but for a Staircase Quilt Block – Pattern, a high-quality 50wt cotton thread is ideal. It is thin enough to keep your seams from becoming bulky but strong enough to hold the quilt together for generations. Many experts in any Staircase Quilt Block tutorial recommend using a neutral grey or tan thread, as these colors tend to blend seamlessly with almost any fabric palette you choose.
Finally, ensure your sewing machine is in top shape before starting the Staircase Quilt Block – Pattern. A fresh needle (size 80/12 is usually perfect) and a clean bobbin area will prevent skipped stitches or tension issues. Following this Staircase Quilt Block tutorial means respecting your machinery, which in turn rewards you with perfectly straight seams and points that match up exactly as they should.
The math behind a Staircase Quilt Block – Pattern is surprisingly straightforward once you break it down into units. Most staircase designs are based on a grid, often a 4×4 or 5×5 layout, which determines the final size of your block. By following a structured Staircase Quilt Block tutorial, you can easily calculate how to scale the pattern up or down to fit anything from a small placemat to a king-sized bedspread.
When cutting the fabric for your Staircase Quilt Block – Pattern, always remember the mantra: “Measure twice, cut once.” Small errors in cutting can compound as you sew the pieces together, leading to a block that won’t lie flat. This Staircase Quilt Block tutorial recommends cutting your initial squares slightly larger if you are a beginner, allowing you to “trim down” to the perfect size after the units are joined.
Half-square triangles (HSTs) are often a core component of the Staircase Quilt Block – Pattern. To create the diagonal flow of the stairs, you will likely need to master the “two-at-a-time” HST method. In our Staircase Quilt Block tutorial, we explain how this technique saves time and ensures that the bias edges of the fabric are handled less, reducing the risk of stretching or warping the block.
The “steps” in the Staircase Quilt Block – Pattern are usually made of rectangles and squares that increase in size or quantity across the block. It is helpful to lay out your cut pieces on a design board or a flat table before you start sewing. This visual check, encouraged by every good Staircase Quilt Block tutorial, ensures that your colors are in the right position to create the intended stair-step illusion.
Waste management is another aspect to consider during the Staircase Quilt Block – Pattern process. Save your “bonus” triangles from the corners of your blocks; these can often be used for smaller scrap projects or decorative borders. A sustainable Staircase Quilt Block tutorial teaches you how to be efficient with your yardage, making the most of every inch of your favorite designer fabrics.
Symmetry is the goal of the Staircase Quilt Block – Pattern, so checking your block size after each row is a great habit. If your block is supposed to be 12.5 inches unfinished, but it’s measuring 12.25, you know your seam allowance might be a bit too wide. This Staircase Quilt Block tutorial emphasizes the “scant quarter-inch” seam, which is the gold standard for achieving perfectly sized blocks every time.
Now that your pieces are cut, the assembly of the Staircase Quilt Block – Pattern begins with chain piecing. This technique involves sewing units one after another without cutting the thread in between, which saves time and thread. Our Staircase Quilt Block tutorial highly recommends this method for the staircase design because it keeps your pairs organized and speeds up the construction of the multiple “step” units.
Pressing is the “secret weapon” for a flawless Staircase Quilt Block – Pattern. Unlike ironing, which involves sliding the iron and can stretch the fabric, pressing involves lifting and setting the iron down firmly. In this Staircase Quilt Block tutorial, we advise pressing your seams to the dark side whenever possible to prevent the seam allowance from showing through the lighter fabrics of your quilt.
The “nesting seams” technique is vital when joining the rows of your Staircase Quilt Block – Pattern. By pressing the seams of row one to the right and row two to the left, the seams will “lock” together when you pin them. This Staircase Quilt Block tutorial focus on nesting ensures that your corners meet perfectly, creating the sharp, clean lines that define the staircase aesthetic.
As the Staircase Quilt Block – Pattern starts to take shape, you may notice that the block feels a bit heavy in the center where many seams meet. To manage this bulk, some quilters prefer to press their seams open. While our Staircase Quilt Block tutorial usually favors pressing to the side for strength, pressing open can help the block lie much flatter, which is beneficial if you plan on doing intricate machine quilting later.
Pinning is not a sign of a beginner; it is the sign of a precise quilter working on a Staircase Quilt Block – Pattern. Use fine, glass-head pins to secure your intersections before sewing. This Staircase Quilt Block tutorial suggests pinning at every junction where two seams meet, as this prevents the fabric from shifting under the presser foot and keeps the “stairs” perfectly aligned.
Once the final row is attached, your Staircase Quilt Block – Pattern is almost complete. Give the entire block a final press from the front, being careful not to distort the edges. Following the steps in this Staircase Quilt Block tutorial should result in a beautiful, flat block that is ready to be joined with others to create a stunning quilt top full of movement and color.
One of the most exciting things about the Staircase Quilt Block – Pattern is how it changes based on the quilt’s overall layout. If you rotate every other block 90 degrees, you can create a “zigzag” or “woven” effect that looks far more complex than it actually is. This Staircase Quilt Block tutorial encourages you to play with your blocks on a design wall before sewing them together to discover hidden patterns.
Monochromatic themes work exceptionally well with the Staircase Quilt Block – Pattern. Imagine a quilt made entirely of various shades of blue, ranging from the deepest navy to the palest sky. Using this Staircase Quilt Block tutorial with a gradient approach creates a “watercolor” effect that is incredibly soothing and professional, making it a perfect gift for weddings or new babies.
For those who love a rustic look, the Staircase Quilt Block – Pattern can be made using “scrappy” techniques. Use your leftover fabric scraps to create the steps, maintaining a consistent background color to tie everything together. This Staircase Quilt Block tutorial proves that you don’t need expensive pre-cut bundles to create a masterpiece; sometimes the most beautiful quilts come from the smallest scraps.
The Staircase Quilt Block – Pattern isn’t just for large quilts; it makes an excellent feature for smaller items too. Try making a single block and turning it into a decorative throw pillow or a sturdy tote bag pocket. By following the Staircase Quilt Block tutorial, you can practice the technique on a small scale before committing to a full-sized bed quilt project.
Adding a border to your Staircase Quilt Block – Pattern can provide a “frame” that highlights the intricate internal work. A simple solid border in a dark color often makes the internal “stairs” appear brighter and more defined. This Staircase Quilt Block tutorial suggests experimenting with different border widths to see how they change the visual weight and impact of the finished block.
Finally, think about the quilting itself once your Staircase Quilt Block – Pattern is assembled. Straight-line quilting that follows the angle of the stairs can reinforce the geometric theme, while swirling, organic “free-motion” quilting can provide a beautiful contrast to the sharp lines. No matter how you choose to finish it, the Staircase Quilt Block tutorial provides the solid foundation you need for a truly spectacular textile creation.
Is the Staircase Quilt Block – Pattern suitable for beginners?
Yes! The Staircase Quilt Block – Pattern is excellent for beginners because it relies on basic shapes like squares and rectangles. While it looks complex, a good Staircase Quilt Block tutorial will show you that it is mostly about careful alignment and consistent seam allowances.
How much fabric do I need for a standard block?
For a 12-inch Staircase Quilt Block – Pattern, you typically need about a quarter-yard of three different fabrics. However, this varies depending on how many colors you use. Always check your Staircase Quilt Block tutorial for a specific cutting list before buying fabric.
Can I make this pattern using pre-cuts like Jelly Rolls?
Absolutely. The Staircase Quilt Block – Pattern is very adaptable to 2.5-inch strips. Many quilters use a Staircase Quilt Block tutorial specifically designed for “strip piecing” to make the process even faster and more efficient.
What is the “scant 1/4 inch” seam often mentioned?
In any Staircase Quilt Block tutorial, a “scant” 1/4 inch is a seam that is just one or two thread-widths narrower than a true quarter inch. This accounts for the space the fabric takes up when it is folded over the seam, ensuring your finished Staircase Quilt Block – Pattern is the exact size intended.
Why are my points getting cut off?
If the points of your Staircase Quilt Block – Pattern are disappearing into the seam, it’s usually because the seam allowance is too deep. Using pins and following a Staircase Quilt Block tutorial that emphasizes “aiming” for the “X” created by previous seams will help you keep your points sharp.
Can I hand-sew the Staircase Quilt Block – Pattern?
While most people use a machine, the Staircase Quilt Block – Pattern is perfectly suitable for hand-piecing. It takes longer, but the geometric nature of the Staircase Quilt Block tutorial makes it a very relaxing and portable project for those who enjoy slow sewing.
Throughout this article, we have delved deep into the construction and creative potential of the Staircase Quilt Block – Pattern. We’ve discussed the importance of preparation, the precision required for cutting, the technical skills needed for assembly, and the endless ways you can customize this design to suit your personal style.
By following a structured Staircase Quilt Block tutorial, you transform simple pieces of cloth into a work of art that captures the essence of movement and structural elegance.


