
Patchwork Bird Tutorial

The Fox and Geese block – Pattern is a gateway into the rich history of traditional American quilting, offering a design that is both visually striking and mathematically satisfying. This classic block, which has roots dating back to the 19th century, mimics the movement of a traditional board game, creating a sense of motion and playfulness within the fabric. By engaging with this Fox and Geese block tutorial – Pattern, quilters can connect with generations of artisans while utilizing modern cutting and sewing techniques to ensure every corner aligns with precision.
Exploring a Fox and Geese block tutorial – Pattern allows you to master the art of the half-square triangle and the four-patch unit, which are the fundamental building blocks of this specific design. The beauty of this pattern lies in its symmetry; it utilizes a central square surrounded by “geese” units that seem to fly around the “fox” in the middle. Whether you are looking to create a vintage-inspired heirloom or a contemporary wall hanging, this Fox and Geese block tutorial – Pattern provides the structural framework necessary to turn scraps of fabric into a cohesive and stunning work of textile art.
In this comprehensive guide, we will break down the Fox and Geese block tutorial – Pattern into manageable steps that even a confident beginner can follow with ease. Quilting is more than just sewing pieces of fabric together; it is about the rhythm of the machine, the choice of colors, and the precision of the iron. By the end of this Fox and Geese block tutorial – Pattern, you will have a deep understanding of how to manage seam allowances, how to select contrasting fabrics that make the design pop, and how to assemble the final block without losing your points.
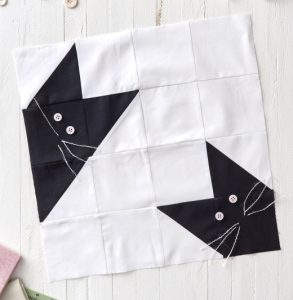
The first step in any Fox and Geese block tutorial – Pattern is choosing the right fabric combination to highlight the intricate geometry of the design. Traditional versions of this block often use a dark “fox” color and a lighter “geese” color to create a high-contrast look that defines the points. When you start your Fox and Geese block tutorial – Pattern, look for high-quality quilting cotton that has a tight weave, as this will prevent fraying when you are working with small triangles.
Color theory plays a massive role in the success of your Fox and Geese block tutorial – Pattern. If you choose fabrics that are too similar in value, the “geese” units will get lost against the background, and the dynamic movement of the block will be neutralized. A great tip for this Fox and Geese block tutorial – Pattern is to take a black-and-white photo of your fabric choices on your phone to ensure there is enough contrast between the different elements before you make your first cut.
Preparation is key when following a Fox and Geese block tutorial – Pattern, and many professionals recommend pre-washing or starching your fabric. Starching is particularly helpful for the Fox and Geese block tutorial – Pattern because the design involves many diagonal seams, which are prone to stretching. By applying a bit of starch, you give the fabric more stability, making it much easier to achieve those perfectly sharp points that make the Fox and Geese block tutorial – Pattern so visually appealing.
Quantity is another factor to consider before you dive into the Fox and Geese block tutorial – Pattern. You will need at least three distinct fabrics: one for the background, one for the primary “geese” triangles, and one for the central “fox” units. Most Fox and Geese block tutorial – Pattern instructions will give you specific yardage, but it is always wise to have a little extra on hand in case of a cutting error or if you decide to expand your project into a full-sized quilt.
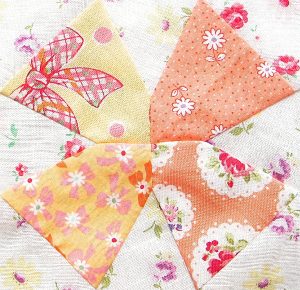
Prints and patterns can also add a layer of complexity to your Fox and Geese block tutorial – Pattern. While solid colors offer a modern and clean look, small-scale floral prints or geometric blenders can give the block a cozy, “scrappy” feel. If you are using a large-scale print in your Fox and Geese block tutorial – Pattern, be mindful of fussy cutting so that the most interesting part of the fabric is featured in the larger central squares of the design.
Finally, ensure you have all your cutting tools ready before starting the Fox and Geese block tutorial – Pattern. A sharp rotary cutter, a self-healing mat, and a reliable acrylic ruler are non-negotiable for this project. The Fox and Geese block tutorial – Pattern relies on precise increments, often down to the eighth of an inch, so having clear marking tools will help you maintain accuracy from the very first strip you cut to the final assembly of the block.
Precision cutting is the backbone of a successful Fox and Geese block tutorial – Pattern. For a standard 12-inch finished block, you will typically need to cut several squares that will later be transformed into half-square triangles (HSTs). This Fox and Geese block tutorial – Pattern encourages the “two-at-a-time” method for HSTs, which saves time and minimizes the handling of bias edges, ensuring that your units don’t become distorted during the sewing process.
As you work through the Fox and Geese block tutorial – Pattern, you will also need to cut the squares for the corner four-patch units. These units represent the “geese” in the pattern and are essential for creating the outer frame of the block. A common mistake in the Fox and Geese block tutorial – Pattern is misaligning the grain of the fabric, so always try to cut along the lengthwise or crosswise grain to keep your pieces stable and flat.
Organization is vital when dealing with the multiple small pieces required by the Fox and Geese block tutorial – Pattern. I recommend using small labeled trays or design boards to keep your “fox” units separate from your “geese” units. This Fox and Geese block tutorial – Pattern involves a lot of pieces—sometimes up to 20 or more for a single block—so keeping them sorted will prevent you from accidentally sewing the wrong colors together and having to reach for the seam ripper.
Marking your diagonal lines is a crucial step in the Fox and Geese block tutorial – Pattern that should not be skipped. Use a water-soluble pen or a ceramic lead pencil to draw a line from corner to corner on the back of your lighter squares. This line serves as your guide when sewing the HSTs that form the points of the Fox and Geese block tutorial – Pattern, allowing you to sew exactly a quarter-inch away from the center for perfect results.
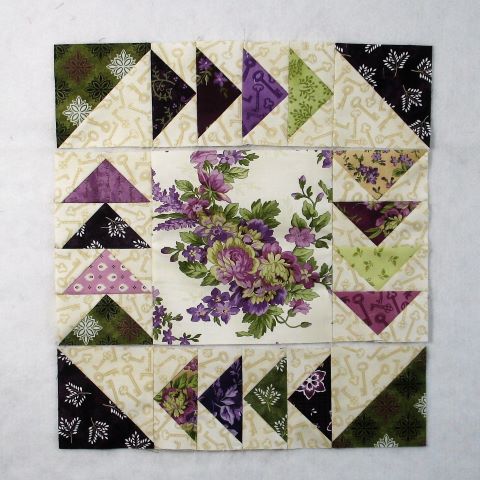
The central unit of the Fox and Geese block tutorial – Pattern is often a larger square or a smaller four-patch, depending on the specific variation you are following. This center acts as the “fox” and is the focal point where the eye naturally rests. In our Fox and Geese block tutorial – Pattern, we focus on a clean, single-square center to give the surrounding triangles more room to breathe and to simplify the assembly process for those who are new to this specific block style.
Once all your pieces are cut according to the Fox and Geese block tutorial – Pattern specifications, give them a quick press with a dry iron. Do not steam them yet, as steam can cause the fabric to shrink or warp slightly. Starting with flat, crisp pieces is the best way to ensure that your Fox and Geese block tutorial – Pattern goes together smoothly and that the finished block measures exactly what it is supposed to before it is joined with others.
The heart of the Fox and Geese block tutorial – Pattern is the construction of the half-square triangles. Place your marked squares right sides together and sew exactly a quarter-inch on both sides of the drawn line. This technique, highlighted in this Fox and Geese block tutorial – Pattern, is the most efficient way to create the “flying” units. Once sewn, you cut along the drawn line to reveal two identical triangle units that are ready for the next phase.
Pressing is a skill that is emphasized in every high-quality Fox and Geese block tutorial – Pattern. To keep the block flat, you should press your seams toward the darker fabric. However, some quilters prefer to press seams open in a Fox and Geese block tutorial – Pattern to reduce bulk where multiple points meet. Whichever method you choose, consistency is key to ensuring that the internal geometry of the block remains square and true to the original design.
Trimming your units is the “secret” step that makes a Fox and Geese block tutorial – Pattern look professional. Even the most careful sewing can result in units that are slightly off-size. Use a square ruler to trim each HST to the exact measurement required by the Fox and Geese block tutorial – Pattern. Removing those tiny “dog ears” (the little triangles of fabric at the ends of the seams) will make a world of difference when you start pinning your rows together.
In this Fox and Geese block tutorial – Pattern, the placement of the triangles is what creates the “geese” effect. You will pair an HST with a solid square to form a larger unit. Pay close attention to the orientation of the triangles as shown in the Fox and Geese block tutorial – Pattern diagrams. If one triangle is turned the wrong way, the “flight” of the geese will be broken, and the block will lose its characteristic sense of whirling motion.
As you continue with the Fox and Geese block tutorial – Pattern, you will notice the block starting to take shape on your sewing table. This is the “Aha!” moment where the individual pieces of fabric begin to tell a story. The Fox and Geese block tutorial – Pattern relies on the repetition of these units, so chain-piecing—sewing one unit after another without cutting the thread—is a great way to speed up the process while maintaining a steady rhythm.
Pinning is your best friend when working on the Fox and Geese block tutorial – Pattern. Because there are so many intersecting seams, using fine glass-head pins will help you lock those intersections together. This ensures that the points of your triangles meet perfectly in the finished Fox and Geese block tutorial – Pattern. A little extra time spent pinning at this stage will save you a lot of frustration later when you are looking at the finished quilt top.
Assembling the rows is the final major step of the Fox and Geese block tutorial – Pattern. Most versions of this block are constructed in a nine-patch grid—three rows of three units each. Following the Fox and Geese block tutorial – Pattern layout carefully, sew the units of the top row together, then the middle row, and finally the bottom row. This modular approach makes the complex-looking Fox and Geese block tutorial – Pattern feel very manageable and organized.
When you join the rows of your Fox and Geese block tutorial – Pattern, use a technique called “nesting seams.” This involves pressing the seams of the first and third rows in one direction and the middle row in the opposite direction. As you pin the rows of the Fox and Geese block tutorial – Pattern together, the seams will “lock” into each other, virtually guaranteeing that your corners will line up perfectly without any unsightly gaps or overlaps.
If you find that your Fox and Geese block tutorial – Pattern is turning out slightly smaller than intended, check your seam allowance. A “scant” quarter-inch seam is often required for blocks with many pieces. In the Fox and Geese block tutorial – Pattern, even a hair’s breadth of difference in each seam can add up to a significant discrepancy by the time you reach the final edge. Practice on a few scrap pieces to calibrate your machine for the project.
Another common issue in the Fox and Geese block tutorial – Pattern is “blunted points,” where the tip of a triangle is cut off by the joining seam. To avoid this, look at the back of your units while sewing. The Fox and Geese block tutorial – Pattern creates an “X” where the threads cross at the point; if you sew exactly through that “X,” your point will be perfectly preserved on the front of the block. This is a hallmark of a masterfully executed Fox and Geese block tutorial – Pattern.
Once the block is fully assembled, give it a final, thorough pressing. In this Fox and Geese block tutorial – Pattern, we recommend pressing from the front first to ensure there are no small “tucks” in the seams, and then from the back to ensure all seam allowances are lying flat. A well-pressed Fox and Geese block tutorial – Pattern should lie perfectly flat on your cutting mat, ready to be squared up to its final size before being incorporated into a larger quilt.
The Fox and Geese block tutorial – Pattern is incredibly versatile when it comes to borders and sashing. You can surround the block with a simple solid border to let the design shine, or use multiple blocks together to create a complex interlocking pattern. No matter how you choose to use it, the skills you have gained through this Fox and Geese block tutorial – Pattern—from precision cutting to nesting seams—will serve you well in all your future quilting endeavors.
Is the Fox and Geese block tutorial – Pattern suitable for beginners?
Yes, it is suitable for confident beginners. While it has many pieces, the individual units (squares and half-square triangles) are basic. Following a detailed Fox and Geese block tutorial – Pattern step-by-step will help a beginner navigate the assembly without feeling overwhelmed by the complexity.
How much fabric do I need for a single block?
For a 12-inch block in this Fox and Geese block tutorial – Pattern, you generally need about a quarter-yard of three different fabrics. This allows for cutting errors and trimming. If you are making a full quilt, the Fox and Geese block tutorial – Pattern will usually require around 3 to 4 yards of total fabric depending on the size.
What is the “Fox” in this pattern?
In the context of the Fox and Geese block tutorial – Pattern, the “fox” usually refers to the central square or the units that sit in the middle of the block. The “geese” are the triangular units that surround the center, creating the illusion of movement or a “chase” around the fox.
Can I make this block in different sizes?
Absolutely! The Fox and Geese block tutorial – Pattern can be scaled up to 18 inches or down to 6 inches. However, smaller blocks require much more precision and can be more difficult to sew. For your first attempt at this Fox and Geese block tutorial – Pattern, a 12-inch size is highly recommended.
Do I need a special ruler for this tutorial?
While a standard acrylic ruler works fine, a dedicated Half-Square Triangle ruler can make the Fox and Geese block tutorial – Pattern much easier to execute. These rulers allow you to trim the units to size before you even open them up, ensuring perfect accuracy every time.
What is the best way to press seams for this block?
As mentioned in the Fox and Geese block tutorial – Pattern, nesting seams is the best way to get flat intersections. Press row 1 and 3 to the left, and row 2 to the right. This allows the seams to fit together like puzzle pieces when you join the rows.
In this article, we have explored the intricate and beautiful world of the Fox and Geese block tutorial – Pattern. We have covered every essential stage of construction, from the careful selection of high-contrast fabrics to the precision cutting of units and the final, satisfying assembly of the nine-patch grid.
This pattern is a testament to the timeless nature of quilting, combining historical significance with the joy of modern creation. By mastering the units within this block, you have expanded your quilting repertoire and gained valuable skills in seam management and geometric alignment.


