
Patchwork Bird Tutorial

The Duck’s Foot in the Mud Quilt Block Tutorial – Pattern is a fascinating journey into the world of traditional quilting, offering a design that is both historically rich and visually striking. This specific block, often associated with early American quilting traditions, captures a sense of movement and rustic charm that is hard to find in more modern, geometric patterns. Whether you are a seasoned quilter looking to expand your portfolio or a beginner eager to tackle a project with character, this tutorial provides the perfect roadmap to creating a timeless piece of fabric art.
Quilting is more than just sewing pieces of fabric together; it is an act of storytelling and patience, and the Duck’s Foot in the Mud Quilt Block Tutorial – Pattern serves as a bridge between past craftsmanship and contemporary creativity. The name itself evokes a whimsical, natural image, which is mirrored in the way the triangles and squares interact to create a “footprint” effect across the quilt top. By mastering this pattern, you are not just learning a technique, but also preserving a slice of folk history that has been passed down through generations of makers.
In this comprehensive guide, we will explore every facet of the Duck’s Foot in the Mud Quilt Block Tutorial – Pattern, ensuring you have the confidence to select the right fabrics and execute precise seams. We will focus on the technical aspects of the quilt block construction, the importance of seam allowance, and the artistic flair required for fabric coordination. Prepare your cutting mat and rotary cutter, because we are about to dive deep into a project that promises to be as rewarding to make as it is beautiful to display.
The Duck’s Foot in the Mud Quilt Block Tutorial – Pattern is rooted in the “Scrap Quilt” tradition, where every remnant of fabric was utilized to create something functional and decorative. Historically, this pattern was a favorite among rural communities because it allowed for a high degree of fabric variation while maintaining a cohesive look through its repeating geometric structure. Understanding the history helps you appreciate the “mud” and “foot” symbolism found in the dark and light contrasts of the quilt design.
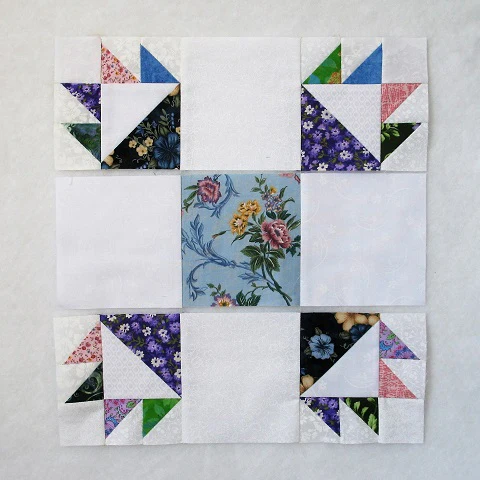
At its core, the geometry of this block relies heavily on the Half-Square Triangle (HST), which is the foundational unit for many classic quilts. When looking at the Duck’s Foot in the Mud Quilt Block Tutorial – Pattern, you will notice how the arrangement of these triangles creates a directional flow that mimics a path or a footprint. Precise fabric cutting is essential here, as even a small deviation can throw off the alignment of the “toes” in the duck’s foot.
The quilt block layout typically follows a grid system, often a 3×3 or 4×4 configuration depending on the specific variation you choose to follow. This grid-based approach makes the Duck’s Foot in the Mud Quilt Block Tutorial – Pattern an excellent exercise in spatial awareness and mathematical precision for quilters. By focusing on how the squares and triangles intersect, you can ensure that your finished block lies flat and squares up perfectly at the end of the process.
Color value plays a pivotal role in making this pattern successful, as the “mud” usually represents the darker, grounding fabrics, while the “foot” is highlighted by lighter tones. In our Duck’s Foot in the Mud Quilt Block Tutorial – Pattern, we recommend using high-contrast quilting cottons to make the design pop and ensure the silhouette is recognizable from a distance. Choosing a dark background can create a moody, modern look, while a light background keeps the project feeling airy and traditional.
One of the most appealing aspects of this pattern is its versatility; it can look incredibly complex while being built from very simple shapes. The Duck’s Foot in the Mud Quilt Block Tutorial – Pattern encourages quilters to experiment with fussy cutting or using bold prints within the larger triangles to add a layer of hidden detail. As you sew, you will see the “foot” emerge from the fabric, providing a satisfying sense of progress that keeps the momentum going.
Mastering the geometry of the Duck’s Foot in the Mud Quilt Block Tutorial – Pattern also involves understanding bias edges, which can be stretchy and difficult to handle if not treated with care. Using a bit of fabric starch before cutting can help stabilize these edges, ensuring that your triangles don’t warp during the sewing process. This attention to detail is what separates a homemade project from a professional-grade heirloom quilt that will last for decades.
To begin the Duck’s Foot in the Mud Quilt Block Tutorial – Pattern, you will need a few basic supplies that are staples in any sewing room. High-quality 100% cotton fabric is the gold standard for this project because it holds its shape well and is easy to press. You will also need a rotary cutter, a self-healing mat, and an acrylic ruler to ensure your fabric strips and squares are cut with absolute accuracy.
The first step in our Duck’s Foot in the Mud Quilt Block Tutorial – Pattern is to determine your finished block size, which typically ranges from 10 to 12 inches for this style. You will need to cut a series of background squares and accent squares that will later be transformed into the iconic triangles. Remember to always include a 1/4 inch seam allowance in your measurements, as this is the standard for almost all quilting patterns to ensure the pieces fit together.
Labeling your pieces is a pro tip that we highly recommend for the Duck’s Foot in the Mud Quilt Block Tutorial – Pattern. Since there are several similar-looking triangles and squares, using clover clips or small sticky notes to identify “Part A” and “Part B” can prevent frustrating mistakes. Organization is key when dealing with a multi-piece quilt block, as it allows you to focus on the joy of sewing rather than the stress of solving a puzzle.
Thread choice is another factor that can influence the outcome of your Duck’s Foot in the Mud Quilt Block Tutorial – Pattern. A neutral, high-quality 50wt cotton thread is ideal because it is strong yet thin enough to not add bulk to your seams. Since this pattern involves many intersecting points, reducing bulk is crucial for achieving flat seams and crisp corners that make the final quilt look polished and professional.
If you are following the Duck’s Foot in the Mud Quilt Block Tutorial – Pattern as a scrap-busting project, take a moment to iron all your scraps before cutting. Wrinkled fabric can lead to inaccurate cuts, which will haunt you later when you try to align the quilt points. A well-pressed piece of fabric is the foundation of a successful block, so don’t skip the “press as you go” rule that is vital for this specific design.
Finally, ensure your sewing machine is fitted with a quarter-inch foot. This specialized foot acts as a guide, helping you maintain a consistent seam throughout the entire Duck’s Foot in the Mud Quilt Block Tutorial – Pattern. Consistency is the secret ingredient in quilting; if your seams vary even slightly, the “duck’s foot” might look a bit lopsided, so take your time and enjoy the rhythmic process of the stitch.
The assembly phase of the Duck’s Foot in the Mud Quilt Block Tutorial – Pattern begins with creating your Half-Square Triangles (HSTs). To do this, place a light square and a dark square right sides together and draw a diagonal line across the back. Sew exactly 1/4 inch away from both sides of that line, cut down the middle, and you suddenly have two perfect units that form the “toes” of our quilt block.
Once your HSTs are ready, the next stage of the Duck’s Foot in the Mud Quilt Block Tutorial – Pattern involves trimming them to the exact size required. Using a squaring-up ruler ensures that every unit is identical, which is the only way to get those perfectly sharp points where the fabrics meet. Trimming might seem tedious, but it is the hallmark of a high-quality handmade quilt and makes the final assembly much smoother.
Now, you will begin arranging these units on your design table according to the Duck’s Foot in the Mud Quilt Block Tutorial – Pattern diagram. It is helpful to step back and look at the layout from a distance to ensure no pieces are rotated incorrectly. In this pattern, the orientation of the triangles is what creates the “duck’s foot” shape, so a quick visual check can save you from having to use your seam ripper later.
Sewing the units into rows is the next logical step in the Duck’s Foot in the Mud Quilt Block Tutorial – Pattern. Work slowly, pinning at every intersection to prevent the fabric from shifting as it moves under the needle. When you join the rows together, use the nesting seams technique—pressing one row’s seams to the left and the next row’s to the right—so they lock together like a puzzle, creating a perfectly flat center.
As you progress through the Duck’s Foot in the Mud Quilt Block Tutorial – Pattern, remember to press your seams open or to the dark side, depending on your preference. Pressing to the dark side prevents the seam allowance from showing through lighter fabrics, maintaining the visual integrity of the design. A hot iron and a bit of steam will be your best friends during this stage, helping to set the stitches and define the block’s shape.
The final step in the assembly of the Duck’s Foot in the Mud Quilt Block Tutorial – Pattern is the outer border or the “mud” frame, if your version includes one. This frames the “footprint” and gives the block a finished, professional appearance. Once the block is fully assembled, give it one final press from the front, being careful not to stretch the fabric, and admire the beautiful geometric pattern you have created.
Customization is where the Duck’s Foot in the Mud Quilt Block Tutorial – Pattern truly shines, allowing you to inject your personal style into a traditional layout. One way to modernize the look is through monochromatic color schemes, using various shades of a single color to create depth and texture. This turns the “mud” into a sophisticated gradient, making the quilt block look more like a piece of contemporary abstract art.
Another great tip for the Duck’s Foot in the Mud Quilt Block Tutorial – Pattern is to experiment with different scales. You can make a “Big Block” quilt by upsizing the measurements, where just four or nine large blocks create an entire throw quilt. Conversely, miniature versions of this block can be used for intricate pillows or wall hangings, showcasing your precision quilting skills on a smaller, more detailed stage.
Don’t be afraid to mix and match different fabric textures within your Duck’s Foot in the Mud Quilt Block Tutorial – Pattern. Combining standard quilting cotton with bits of linen or even upcycled clothing can add a tactile dimension to the work. Just be sure that all fabrics are of a similar weight and are pre-washed to prevent uneven shrinking later, ensuring your quilt’s longevity and durability.
The Duck’s Foot in the Mud Quilt Block Tutorial – Pattern also lends itself well to “fussy cutting,” where you feature a specific motif from your fabric (like a flower or an animal) in the center of the squares. This adds a “hidden” element to the quilt that viewers only notice upon closer inspection. It’s a wonderful way to use those feature fabrics you’ve been saving for a special project while still following a structured pattern.
If you are making a full quilt using the Duck’s Foot in the Mud Quilt Block Tutorial – Pattern, consider how the blocks will interact when sewn together. By rotating the blocks 90 degrees, you can create a secondary pattern where the “feet” appear to be walking in circles or following each other in a line. This secondary design is a common feature in advanced quilting and adds a layer of professional complexity to your work.
Finally, consider your quilting motifs for the finishing stage. Using a walking foot to do “stitch in the ditch” will emphasize the clean lines of the Duck’s Foot in the Mud Quilt Block Tutorial – Pattern. Alternatively, free-motion quilting with organic, swirling shapes can provide a beautiful contrast to the sharp geometric lines of the block, truly bringing the “mud” and “nature” theme to life in your finished quilt.
1. Is the Duck’s Foot in the Mud Quilt Block Tutorial – Pattern suitable for beginners?
Yes, while it requires some precision with triangles, it is an excellent project for a confident beginner who has mastered the basic 1/4 inch seam.
2. How much fabric do I need for one block?
Generally, you will need about 1/4 yard of two contrasting fabrics to complete a standard 12-inch block with some room for error.
3. Can I use a charm pack for this pattern?
Absolutely! Charm packs (5-inch squares) are perfect for the smaller units of the Duck’s Foot in the Mud Quilt Block Tutorial – Pattern, making fabric selection even easier.
4. What is the best way to handle bias edges in this pattern?
The best way is to use fabric starch before cutting and to avoid pulling or stretching the fabric as you sew the diagonal seams.
5. Is there a difference between “Duck’s Foot” and “Bear’s Paw” patterns?
They are very similar! The Duck’s Foot in the Mud Quilt Block Tutorial – Pattern usually features a slightly different arrangement of the “toes” and “heel,” but they belong to the same family of traditional animal-track blocks.
In this article, we have explored the intricate and beautiful world of the Duck’s Foot in the Mud Quilt Block Tutorial – Pattern. We covered everything from its historical roots and the geometric precision required for its assembly to the essential tools and customization tips that can make your version truly unique.
By following this guide, you now have the knowledge to create a block that is steeped in tradition but flexible enough for modern interpretation. We hope this tutorial inspires you to sit at your sewing machine and bring this classic design to life. Please leave your sincere opinion and any suggestions for future patterns you would like to see in the comments below!


