
Patchwork Bird Tutorial

The Jacob’s Ladder Quilt Block is a timeless masterpiece in the world of quilting, offering a striking visual rhythm that has captivated makers for generations. This specific pattern relies on the clever interplay of simple shapes—specifically squares and triangles—to create a secondary design of interlocking chains and paths. When you master the Jacob’s Ladder Quilt Block, you aren’t just sewing fabric together; you are participating in a historical tradition that balances geometric precision with artistic flair.
As you begin your journey with this Jacob’s Ladder Quilt Block pattern, it is essential to understand that its beauty lies in its versatility. By simply swapping your color palette or adjusting the contrast between your “ladder” and your “background,” the entire mood of the quilt shifts from traditional folk art to sleek modernism. The Jacob’s Ladder Quilt Block is a fantastic project for intermediate quilters looking to sharpen their piecing skills or ambitious beginners who want to tackle a design that looks far more complex than it actually is.
To achieve a professional finish with your Jacob’s Ladder Quilt Block, preparation is your best friend. In this tutorial, we will explore the essential components of the pattern, including the use of four-patch units and half-square triangles (HSTs). Whether you are aiming for a scrappy look or a strictly coordinated aesthetic, following this Jacob’s Ladder Quilt Block guide will ensure your points are crisp and your seams are flat. Let’s dive into the mechanics of this iconic quilting design and transform your fabric stash into a stunning heirloom.
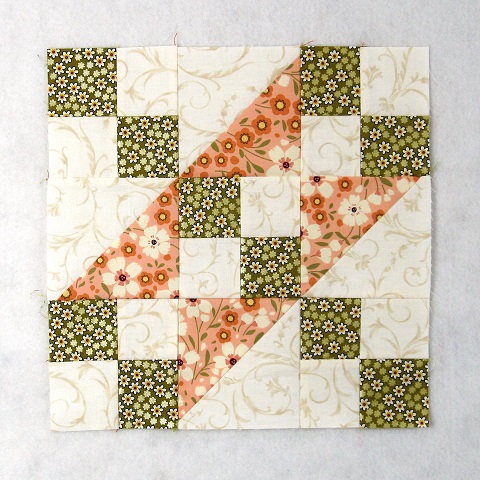
The Jacob’s Ladder Quilt Block is fundamentally a nine-patch construction, meaning the block is arranged in a 3×3 grid. To create the iconic pattern, you will need two primary components: the four-patch unit and the half-square triangle. The four-patch units create the “steps” of the ladder, while the HSTs create the diagonal lines that suggest movement across the quilt top.
Choosing the right fabric for your Jacob’s Ladder Quilt Block pattern is the first step toward success. Traditionally, this design utilizes high contrast between a dark fabric and a light background fabric to make the geometric shapes pop. If the contrast is too low, the distinctive “ladder” effect might get lost in the overall composition of the quilt.
Precision cutting is vital when preparing your fabric strips and squares for the Jacob’s Ladder Quilt Block. Most variations of this pattern require you to cut 2.5-inch or 3.5-inch squares, depending on the desired final size of your block. Using a rotary cutter and a non-slip ruler will help you maintain the accuracy needed for perfectly aligned seams later on.
The half-square triangle units within the Jacob’s Ladder Quilt Block are often considered the trickiest part for new quilters. However, by using the “two-at-a-time” method, you can quickly produce the HSTs needed for your pattern while minimizing fabric waste. Remember to press your seams toward the darker fabric to prevent shadowing on the finished quilt block.
Assembling the four-patch units involves sewing two strips of contrasting fabric together, pressing the seam, and then sub-cutting them into segments. This “strip piecing” technique is a staple in efficient quilting and ensures that your Jacob’s Ladder Quilt Block remains uniform throughout the entire project. It saves time and increases the structural integrity of the blocks.
Once you have your five four-patch units and four half-square triangle units, you are ready to lay them out. The magic of the Jacob’s Ladder Quilt Block happens during this layout phase, where the orientation of the triangles determines the direction of the “ladder.” Careful attention to the pattern orientation is what separates a good quilt from a great one.
To begin sewing your Jacob’s Ladder Quilt Block, arrange your units on a design board or flat surface. You should have three rows, each containing three units. In a standard Jacob’s Ladder Quilt Block pattern, the four-patch units occupy the four corners and the very center, while the HSTs fill the remaining four slots.
Start by sewing the units together into three horizontal rows. When working on the Jacob’s Ladder Quilt Block, it is helpful to use a scant 1/4-inch seam allowance. This tiny adjustment accounts for the fold of the fabric when pressing, ensuring that your finished pattern dimensions are exactly what the instructions call for.
Pressing is a critical step in the Jacob’s Ladder Quilt Block assembly process. For the first and third rows, press your seams to the right; for the middle row, press your seams to the left. This technique, known as nesting seams, allows the fabric to lock together perfectly when you join the rows, resulting in those elusive “perfect points” in your quilt.
Now, join the three rows together to complete the Jacob’s Ladder Quilt Block. Pin carefully at the intersections where the four-patch units meet the HSTs. Maintaining alignment here is what keeps the diagonal lines of the pattern straight and visually continuous across the entire surface of your quilt top.
After the block is fully sewn, give it a final press with a hot iron. Avoid “scrubbing” the iron back and forth, as this can distort the Jacob’s Ladder Quilt Block and cause it to become wavy. Instead, use a firm “press and lift” motion to set the stitches and flatten the seam allowances for a professional look.
Measure your completed Jacob’s Ladder Quilt Block to ensure it matches the target size of your pattern. If your block is slightly small, you may need to adjust your seam allowance; if it is slightly large, you can trim it down carefully using a square ruler. Consistency is the key to a flat, square finished quilt.
Color theory plays a massive role in how the Jacob’s Ladder Quilt Block is perceived by the eye. A two-color pattern (like blue and white) creates a crisp, classic look that highlights the geometric structure. This monochromatic approach is perfect for those who want a Jacob’s Ladder Quilt Block that feels calm and traditional.
For a more vibrant and energetic version, consider using a scrappy color palette. By using various prints within the same color family for the “ladder” portions of the Jacob’s Ladder Quilt Block, you add depth and visual interest. This is an excellent way to use up fat quarters or leftover scraps from previous quilting projects.
The “background” fabric in your Jacob’s Ladder Quilt Block pattern acts as the negative space that allows the design to breathe. While white or cream is standard, using a dark background like charcoal or navy can create a “glowing” effect for the ladder units. This modern twist on the Jacob’s Ladder Quilt Block is becoming increasingly popular in contemporary design.
Don’t be afraid to experiment with directional prints in your Jacob’s Ladder Quilt Block. However, be aware that stripes or one-way florals can be challenging to align within the four-patch units and HSTs. If you are a beginner, sticking to solids or non-directional prints will make the pattern construction much more straightforward.
Seasonal themes also work beautifully with the Jacob’s Ladder Quilt Block. Imagine a Christmas version using deep reds and forest greens, or a spring-inspired quilt with pastels and floral motifs. The Jacob’s Ladder Quilt Block serves as a versatile canvas for any holiday or room decor you have in mind.
Consider the “secondary pattern” that forms when multiple Jacob’s Ladder Quilt Blocks are sewn together. Depending on how you rotate the blocks, you can create large interlocking circles, diamonds, or continuous zig-zags. This is the true power of the Jacob’s Ladder Quilt Block pattern—the ability to create complex optical illusions with simple blocks.
To take your Jacob’s Ladder Quilt Block to the next level, focus on “fussy cutting” specific motifs for the centers of your four-patch units. This adds a customized, high-end feel to the pattern that makes each block look like a unique work of art. It’s a great way to showcase a favorite fabric designer within your work.
If you find that your half-square triangles are consistently coming out distorted, try using foundation paper piecing (FPP) for those specific units. While it takes a bit more time to prep, FPP ensures that every triangle in your Jacob’s Ladder Quilt Block is identical, which is crucial for a perfectly symmetrical quilt pattern.
Starch is a secret weapon for many professional quilters working on the Jacob’s Ladder Quilt Block. Lightly starching your fabric before cutting provides extra stability, especially when dealing with the bias edges of the triangles. This prevents the fabric from stretching out of shape as you move it through the sewing machine.
When it comes to quilting the finished top, “stitch in the ditch” is a popular choice for the Jacob’s Ladder Quilt Block because it emphasizes the geometric grid. However, a diagonal cross-hatch pattern can also look stunning, as it mimics the natural flow of the ladder lines within the pattern.
If you are making a large quilt, consider making your Jacob’s Ladder Quilt Blocks in batches. Chain-piecing all your four-patch units first, then all your HSTs, will significantly speed up the process. This assembly-line method keeps your tension consistent and helps you stay organized throughout the quilting process.
Lastly, always keep a “test block” from your Jacob’s Ladder Quilt Block project. This allows you to test your quilting density and thread color before committing to the entire quilt. A little extra care in the early stages of the pattern will result in a finished product you can be proud to display or gift.
Is the Jacob’s Ladder Quilt Block suitable for beginners? Yes! While it looks intricate, it only uses basic units like four-patch blocks and half-square triangles. If you can sew a straight line and maintain a consistent seam allowance, you can successfully create this pattern.
What size is a standard Jacob’s Ladder Quilt Block? Most patterns yield a 9-inch or 12-inch finished block. However, the Jacob’s Ladder Quilt Block is easily scalable. Simply adjust the size of your initial squares to change the final dimensions of the quilt block.
How many fabrics do I need for this pattern? At a minimum, you need two contrasting fabrics (one light and one dark). Many quilters prefer a “scrappy” look, using a variety of dark fabrics against a single consistent background fabric to make the Jacob’s Ladder Quilt Block more dynamic.
Why is it called Jacob’s Ladder? The name is biblical in origin, referring to the ladder to heaven seen by Jacob in a dream. In quilting history, the name reflects the diagonal “steps” created by the pattern’s layout. It has also been known by other names like “Underground Railroad” or “Gone to Chicago.”
How do I prevent my points from being cut off? To keep your points sharp in a Jacob’s Ladder Quilt Block, ensure you are sewing exactly a 1/4-inch from the edge. When joining rows, look for the “X” created by previous seams and sew directly through the center of that “X” to preserve the triangle points.
Can I use a charm pack for this quilt? Absolutely! A charm pack (5-inch squares) is perfect for making a Jacob’s Ladder Quilt Block. You can use the squares for your HSTs and sub-cut them for your four-patch units, making it a very “pre-cut friendly” pattern.
In this tutorial, we have explored the rich history and technical assembly of the Jacob’s Ladder Quilt Block. From understanding the basic nine-patch construction to mastering the four-patch units and half-square triangles, you now have the tools to create a stunning quilt pattern.
We discussed the importance of fabric contrast, the benefits of strip piecing, and how to achieve perfect points through nesting seams. The Jacob’s Ladder Quilt Block remains a favorite because it offers endless opportunities for customization and creative expression.


