
Patchwork Bird Tutorial

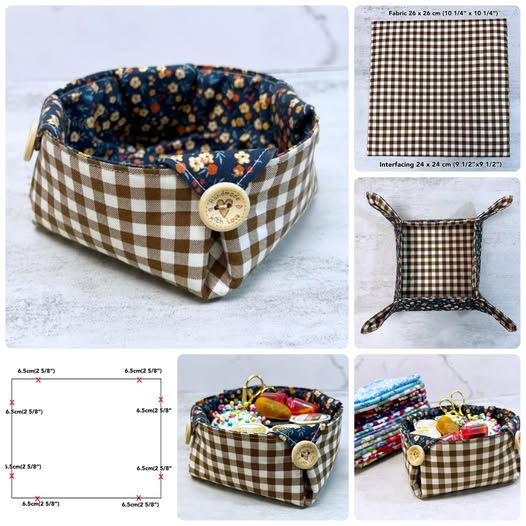
This FABRIC BASKET Tutorial – Pattern is designed to help you create a functional and stylish storage solution for your home using just a few supplies. Whether you are looking to organize your sewing room, tidy up a nursery, or create a personalized gift, mastering a FABRIC BASKET is a fundamental skill for any DIY enthusiast. This guide focuses on a simple yet effective Pattern that ensures your basket remains sturdy and aesthetically pleasing.
When you start working with a FABRIC BASKET Tutorial – Pattern, the first thing you will notice is how versatile the project is. You can play with different textures, colors, and sizes to match your specific needs. The beauty of this specific Pattern lies in its accessibility; it is tailored for beginners while still offering enough customization to keep advanced crafters engaged. By following the steps provided, you will learn the importance of structure and fabric choice in creating a long-lasting FABRIC BASKET.
To get the best results from this FABRIC BASKET Tutorial – Pattern, it is essential to focus on precision and preparation. Using a reliable Pattern eliminates the guesswork, allowing you to focus on the creative aspects like choosing a vibrant fabric or adding decorative handles. In the following sections, we will break down the essential materials, the step-by-step construction process, and tips for achieving professional results every time you decide to make a new FABRIC BASKET.
A FABRIC BASKET is more than just a container; it is a blend of textile art and practical utility. To begin this Pattern, you must understand that the “bones” of your basket come from the combination of outer fabric, lining, and a stabilizing interface. Choosing a high-quality Pattern ensures that your dimensions are accurate, which is the secret to a basket that stands up on its own without collapsing.
The first step in any FABRIC BASKET Tutorial – Pattern is selecting your materials. For the outer layer, a sturdy cotton canvas or home decor weight fabric is usually recommended. These materials provide the necessary weight to support the shape of the FABRIC BASKET. If you choose a lighter quilting cotton, you will need to compensate with a heavier interfacing to maintain the integrity of the Pattern.
The Pattern usually requires two main pieces of fabric: the exterior and the lining. The lining is what people see when they look inside the FABRIC BASKET, so it is a great opportunity to use a contrasting color or a fun print. In this FABRIC BASKET Tutorial – Pattern, we emphasize the “right sides together” technique, which is a standard sewing practice that hides raw edges and provides a clean, professional finish.
Interfacing is the unsung hero of the FABRIC BASKET Tutorial – Pattern. Without it, your FABRIC BASKET would be floppy and lose its charm. Most makers prefer fusible fleece or a heavyweight stiffener like Pellon 71F. Applying this to your fabric pieces according to the Pattern instructions will give your project the structure it needs to hold toys, magazines, or craft supplies.
Measuring and cutting are the foundations of a successful Pattern. You will need a rotary cutter, a cutting mat, and a clear acrylic ruler to ensure your squares or rectangles are perfectly straight. If your cuts are off by even a fraction of an inch, the FABRIC BASKET may end up lopsided. This FABRIC BASKET Tutorial – Pattern encourages a “measure twice, cut once” philosophy to avoid wasting your favorite materials.
Finally, consider the thread and needle you use. Since you will be sewing through multiple layers of fabric and interfacing, a 90/14 or 100/16 denim needle is often the best choice. A strong polyester thread will ensure that the seams of your FABRIC BASKET remain intact even when the basket is filled to capacity. This attention to detail is what separates a basic DIY project from a high-quality Pattern result.
The core of this FABRIC BASKET Tutorial – Pattern starts with the preparation of your templates. You can create a square, rectangular, or even a round FABRIC BASKET depending on the specific Pattern you choose to follow. For this tutorial, we are focusing on a rectangular box-bottom design, which is the most popular and efficient Pattern for home organization.
To execute the FABRIC BASKET Tutorial – Pattern correctly, cut two pieces of exterior fabric and two pieces of lining fabric to your desired dimensions (e.g., 15″ x 12″). Additionally, cut two pieces of your chosen interfacing to the same size. Consistency is key here; if your lining is larger than your exterior, the inside of your FABRIC BASKET will be bunchy and unattractive, ruining the effect of the Pattern.
Once your pieces are cut, the next phase of the FABRIC BASKET Tutorial – Pattern involves fusing the interfacing. Place the glue side of the interfacing against the wrong side of the exterior fabric. Use a hot iron and plenty of steam to bond them together. This step is crucial because it turns soft fabric into a rigid material capable of maintaining the FABRIC BASKET shape dictated by the Pattern.
Now, let’s talk about “boxing the corners,” a vital technique in this FABRIC BASKET Tutorial – Pattern. To create depth, you will cut small squares (e.g., 2″ x 2″) out of the bottom corners of your fabric pieces. This simple trick in the Pattern is what transforms a flat pouch into a 3D FABRIC BASKET. Make sure these cutouts are identical on all four pieces of fabric to ensure a level base.
Before you start sewing, it is helpful to mark any placements for handles if your FABRIC BASKET Tutorial – Pattern includes them. Handles can be made from leftover fabric scraps, cotton webbing, or even leather straps. Integrating them early in the Pattern process ensures they are securely fastened between the lining and the exterior layers for a sleek look on your finished FABRIC BASKET.
Double-check all your components before heading to the sewing machine. You should have two interfaced exterior panels and two lining panels, all with the corners notched out as per the FABRIC BASKET Tutorial – Pattern. This preparation stage is the most time-consuming part of the FABRIC BASKET process, but it ensures that the actual sewing is fast, smooth, and enjoyable.
With your pieces ready, the sewing phase of the FABRIC BASKET Tutorial – Pattern begins. Start by placing your two exterior fabric pieces with right sides facing each other. Sew down the sides and along the bottom edge, but do not sew the notched-out corners yet. This creates the basic “bag” shape of the FABRIC BASKET as outlined in the Pattern.
The next step in the FABRIC BASKET Tutorial – Pattern is to sew the lining in the exact same way. However, a professional tip for any Pattern is to leave a 4-inch gap at the bottom of the lining. This opening is essential for turning the FABRIC BASKET right side out later. Use a 1/2 inch seam allowance unless the Pattern specifies otherwise to ensure the pieces fit together perfectly.
Now we return to those notched corners to give the FABRIC BASKET its structure. Pull the corners apart and flatten them so the side seam aligns with the bottom seam. Pin them securely and sew straight across. Repeating this for both the exterior and the lining is the magic moment in the FABRIC BASKET Tutorial – Pattern where the 3D shape of the FABRIC BASKET finally appears.
Once the corners are boxed, it is time to assemble the two layers. Turn the exterior FABRIC BASKET right side out, but keep the lining inside out. Insert the exterior basket into the lining basket. In this part of the FABRIC BASKET Tutorial – Pattern, the right sides of the fabrics should be touching each other. Align the side seams and pin the top edges together all the way around.
Sew around the top circumference of the FABRIC BASKET using a steady pace. Because you are sewing through several layers of fabric and interfacing, take it slow to avoid breaking a needle. This step of the Pattern joins the inner and outer shells, creating a sturdy rim for your FABRIC BASKET. This is also where you would sandwich any handles you’ve prepared.
The most satisfying part of the FABRIC BASKET Tutorial – Pattern is “the turn.” Reach through the opening you left in the lining and carefully pull the exterior fabric through. Once the FABRIC BASKET is right side out, tuck the lining into the exterior. Use your fingers to push out the corners and give the Pattern its final shape. Press the top edge with an iron to get a crisp, professional finish.
The final stage of the FABRIC BASKET Tutorial – Pattern involves topstitching and closing the lining. First, find the hole in the lining and sew it shut, either by hand with a ladder stitch or by machine with a very close edge-stitch. Once closed, push the lining down into the FABRIC BASKET so it sits flat against the bottom, fulfilling the design of the Pattern.
Topstitching is what gives the FABRIC BASKET its high-end look. Sew a line of stitching approximately 1/8 to 1/4 inch from the top edge. This not only looks great but also prevents the lining from rolling out of the FABRIC BASKET. In this FABRIC BASKET Tutorial – Pattern, topstitching also adds an extra layer of reinforcement to the handles and the overall rim.
If you want to customize your FABRIC BASKET, there are many ways to deviate slightly from the standard Pattern. You can add a “cuff” by making the lining slightly taller and folding it over the top of the exterior. This adds a pop of color to the outside of the FABRIC BASKET and is a popular variation in many FABRIC BASKET Tutorial – Pattern guides found online.
Another way to enhance your FABRIC BASKET is by adding pockets. You can sew small fabric rectangles to the lining or the exterior before you assemble the main pieces. This modification to the Pattern is perfect for baskets intended to hold sewing tools, remote controls, or office supplies, making your FABRIC BASKET even more functional.
Labels and embellishments can also be added. A small leather “Handmade” tag or a piece of lace can give your FABRIC BASKET a boutique feel. When following a FABRIC BASKET Tutorial – Pattern, remember that the Pattern is just a blueprint; your personal touch is what makes the final FABRIC BASKET unique and special.
Now that you have completed your first FABRIC BASKET, you can experiment with different sizes. You can scale the Pattern up to create a large laundry hamper or scale it down for a tiny jewelry dish. The logic of the FABRIC BASKET Tutorial – Pattern remains the same regardless of dimensions, making it one of the most useful skills in your sewing repertoire.
1. What is the best fabric for a FABRIC BASKET?
The best fabrics are heavier weights like canvas, denim, or upholstery fabric. However, you can use quilting cotton if you apply a firm, fusible interfacing to give the Pattern the necessary stiffness.
2. Can I wash my FABRIC BASKET after it is finished?
Yes, most fabric baskets are washable. However, it depends on the interfacing you used. If you used fusible fleece, a gentle machine wash or spot cleaning is recommended to keep the Pattern from warping.
3. Why is my FABRIC BASKET not standing up straight?
This usually happens if the interfacing is too thin. For a sturdy FABRIC BASKET, ensure you are using a heavyweight stabilizer. Also, make sure your Pattern corners are boxed accurately to provide a flat, stable base.
4. How do I change the size of the Pattern?
To change the size, simply increase or decrease the initial dimensions of your fabric rectangles. Just remember to adjust the size of the boxed corners proportionally to maintain the balance of the FABRIC BASKET.
5. Do I need a special sewing machine for this project?
A standard home sewing machine is usually sufficient. However, because a FABRIC BASKET involves thick layers, using a walking foot and a sharp, heavy-duty needle will make the process much easier.
6. Can I make this FABRIC BASKET Tutorial – Pattern without a sewing machine?
While it is possible to sew a FABRIC BASKET by hand, it will be very time-consuming and difficult to get through the thick layers of interfacing. A machine is highly recommended for this specific Pattern.
In this article, we explored the complete journey of creating a beautiful and functional storage piece using our FABRIC BASKET Tutorial – Pattern. We covered everything from selecting the right materials and interfacing to the technical steps of boxing corners and topstitching.
By following this Pattern, you have learned how to transform simple pieces of fabric into a structured FABRIC BASKET that can be used for various organizational needs around the home.


