
Patchwork Bird Tutorial

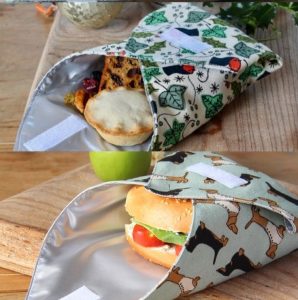
A Fabric pie bag Tutorial – Pattern is the perfect weekend project for anyone who loves combining their passion for baking with the art of sewing. If you have ever struggled to transport a fresh, warm pie to a family gathering or a potluck without ruining the crust or burning your hands, this Fabric pie bag is the ultimate solution. This project is not only functional but also incredibly eco-friendly, as it replaces the need for disposable plastic carriers or awkward cardboard boxes.
Creating your own Fabric pie bag allows you to customize the design to fit your favorite pie dishes while expressing your personal style through fabric choices. Whether you prefer a vintage floral look or a modern minimalist aesthetic, the Pattern we are discussing today is versatile enough to accommodate various skill levels, from beginners to advanced sewists. By following this Fabric pie bag Tutorial – Pattern, you will learn how to create a durable, washable, and stylish carrier that will make you the star of every dinner party.
The beauty of this specific Pattern lies in its simplicity and effectiveness. We will focus on a square-fold design that secures the dish tightly while providing sturdy handles for easy transport. Before we dive into the step-by-step instructions, it is essential to gather high-quality materials, such as 100% cotton fabric and heat-resistant batting, to ensure your Fabric pie bag is safe for handling warm treats. Let’s get started on crafting this essential kitchen accessory that balances form and function perfectly.
Choosing the right textile is the most critical step when starting your Fabric pie bag Tutorial – Pattern. You want a fabric that is “breathable” yet thick enough to offer protection, which is why 100% cotton is the gold standard for this project. Avoid synthetic fabrics like polyester, as they can melt if they come into contact with a dish that is still radiating significant heat.
The internal structure of your Fabric pie bag requires a layer of batting or flannel. This provides the necessary insulation to keep your pie warm while protecting your hands from the base of the dish. If you plan on transporting very hot items, you might even consider specialized thermal batting, though standard cotton batting usually suffices for most household pies.
When looking at the Pattern, you will notice it calls for two contrasting fabrics: one for the exterior and one for the lining. This is a fantastic opportunity to play with patterns, such as using a cherry-print fabric for a fruit pie theme or a classic gingham for a picnic vibe. Mixing and matching colors makes the final Fabric pie bag look professional and handmade with love.
Don’t forget the importance of thread quality; use a heavy-duty cotton or all-purpose polyester thread to ensure the seams can hold the weight of a heavy ceramic pie plate. Since a Fabric pie bag will likely encounter crumbs or the occasional sticky spill, choosing fabrics that are pre-shrunk and machine-washable is a smart move for long-term durability.
Hardware for the handles is another consideration in your Fabric pie bag Tutorial – Pattern. Some crafters prefer using cotton webbing for the handles because of its strength and grip, while others prefer to sew matching fabric tubes. Whichever you choose, ensure the attachment points are reinforced with “X” stitching to prevent the handles from snapping during transit.
Lastly, consider the size of your most-used pie dish before cutting your Pattern. While the standard size works for 9-inch plates, you may want to scale up the dimensions if you frequently bake deep-dish pies or use large tart tins. Having a clear plan for your measurements will make the sewing process much smoother and prevent any sizing frustrations later on.
The core of a successful Fabric pie bag is a well-drafted Pattern that focuses on a large square or cross-shape. Most tutorials suggest starting with two 20-inch or 22-inch squares of fabric to ensure there is enough room to wrap around the sides of the dish. This generous sizing is what makes the Fabric pie bag Tutorial – Pattern so forgiving for those new to sewing.
When you lay out your Pattern, you are essentially creating a sandwich of fabric. The “Right Sides Together” (RST) method is used, placing the batting on the bottom, followed by the exterior fabric (face up), and the lining fabric (face down). This ensures that once you sew and flip the project, the raw edges of the Fabric pie bag are neatly hidden inside.
The handles are integrated into the Pattern usually by sandwiching them between the fabric layers before the final perimeter stitch. This “hidden seam” technique is a staple in the Fabric pie bag Tutorial – Pattern because it creates a clean, professional finish. It is vital to pin or clip these handles securely so they don’t shift while you are machining the edges.
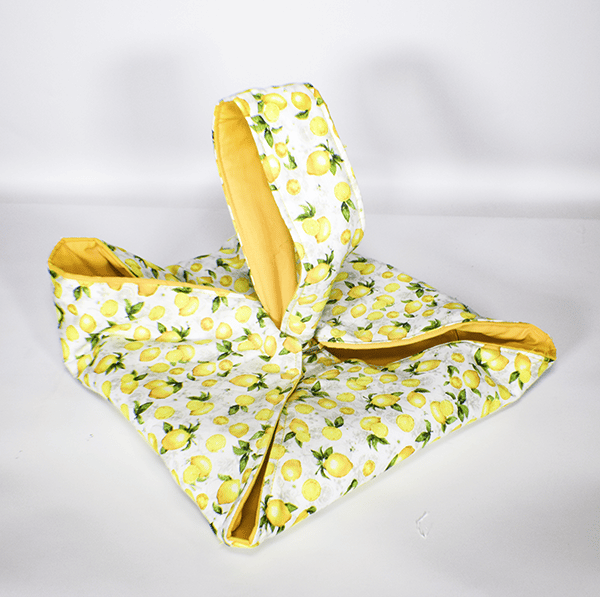
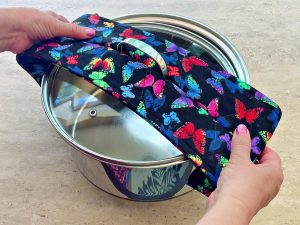
One unique aspect of the Fabric pie bag design is the “envelope” fold. Unlike a standard tote bag, this Pattern is designed to lay flat when open, making it easy to slide a pie dish into the center. The corners are then brought together or folded over to create the carrying shape, which provides superior stability for delicate crusts.
Precision in cutting is key to ensuring your Pattern remains symmetrical. If the squares are even slightly off, the Fabric pie bag might tilt to one side when carried, which is a recipe for disaster with a custard or pumpkin pie. Use a rotary cutter and a transparent quilting ruler to get the most accurate edges possible for your project.
As you study the Fabric pie bag Tutorial – Pattern, you will see that leaving a small opening for turning is the final structural requirement. This “turning gap” should be about 4 or 5 inches wide, located on one of the straight sides rather than a corner. This makes it easier to hand-stitch or top-stitch closed once the bag is turned right-side out.
Now that your pieces are cut according to the Pattern, it is time to start sewing your Fabric pie bag. Begin by pinning the three layers (lining, exterior, and batting) together. Sewing slowly is the secret here, especially when moving over the areas where the handles are tucked in, as these layers can become quite thick for a domestic sewing machine.
Use a 1/2-inch seam allowance as specified in the Fabric pie bag Tutorial – Pattern. This provides enough “bite” for the thread to hold the layers securely without eating up too much of the bag’s internal volume. Keep your stitches consistent and use a walking foot if you have one, as it helps move the bulky batting through the machine evenly.
Once you have sewn around the perimeter, remember to leave that opening we mentioned earlier. Before turning the Fabric pie bag right-side out, clip the corners. Clipping the excess fabric at the corners allows them to lay flat and sharp once turned, preventing the Pattern from looking bulky or rounded at the edges.
Turn the entire assembly through the gap, using a blunt tool like a chopstick to gently push the corners out. At this stage, your Fabric pie bag will look a bit wrinkled and floppy. A good steam iron is your best friend here; press the edges flat, ensuring the fabric at the opening is tucked in neatly to match the rest of the seam.
The final “pro” touch in this Fabric pie bag Tutorial – Pattern is the top-stitching. Sew a decorative yet functional stitch about 1/8-inch from the edge all the way around the bag. This not only closes the turning gap but also flattens the seams and gives the Fabric pie bag a crisp, high-end look that mimics store-bought accessories.
The last step in the assembly is creating the “pockets” or folds that hold the dish. Depending on the specific Pattern variation you chose, you may need to fold two sides toward the center and sew across the bottom. This creates the cradle that keeps your pie level, which is the ultimate goal of the Fabric pie bag Tutorial – Pattern.
Once you have mastered the basic Fabric pie bag Tutorial – Pattern, you can start getting creative with modifications. For instance, adding a layer of Insul-Bright (a specialized heat-reflective material) can turn your Fabric pie bag into a high-performance thermal carrier. This is a great upgrade if you often travel long distances with hot desserts.
You can also personalize your Fabric pie bag using embroidery or applique. Adding a label that says “Grandma’s Kitchen” or “Handmade by [Your Name]” adds a sentimental touch, especially if you are giving the Fabric pie bag as a gift along with a freshly baked pie. It turns a simple utility item into a cherished keepsake.
If you find that your pie dishes vary in size, you can modify the Pattern by adding adjustable closures. Instead of fixed handles, try using large buttons, velcro, or even drawstrings. This flexibility ensures that your Fabric pie bag remains useful whether you are carrying a small 8-inch tin or a large 10-inch ceramic deep-dish plate.
Maintenance of your Fabric pie bag is straightforward since we chose cotton materials. Simply toss it in the washing machine on a cold cycle and tumble dry on low. Because the Pattern is essentially a flattened square when unbuttoned, it dries quickly and is easy to iron back into its original, crisp shape after every use.
Beyond pies, this Fabric pie bag Tutorial – Pattern is surprisingly versatile. It can be used to carry round cake pans, quiches, or even a stack of warm tortillas for a taco night. Once you see how easy it is to sew, you might find yourself making a whole set of these carriers in different sizes for various kitchen needs.
Finally, consider the environmental impact of your new Fabric pie bag. By using up fabric scraps or repurposing old linens for the Pattern, you are participating in sustainable crafting. Share your creations with friends and encourage them to use reusable carriers too; it’s a small step toward a more eco-conscious lifestyle that starts right in your kitchen.
What is the best size for a Fabric pie bag?
Most standard patterns use a square of fabric between 20 and 22 inches. This size is ideal because it allows enough room to wrap around a standard 9-inch pie dish while leaving enough “slack” for the handles to be gripped comfortably.
Can I wash my Fabric pie bag in the machine?
Yes, as long as you used 100% cotton fabric and batting. It is recommended to wash on a gentle cycle with cold water to prevent shrinking and air dry or tumble dry on low. Always iron it afterward to maintain the shape of the Pattern.
Is a Fabric pie bag heat-proof?
While cotton and batting provide a layer of insulation, they are “heat-resistant” rather than “heat-proof.” You should let a pie cool for at least 10–15 minutes before placing it in the bag. For extreme heat, use a layer of thermal batting like Insul-Bright inside your Fabric pie bag.
Do I need a sewing machine to make this?
While a sewing machine makes the process much faster and ensures stronger seams, you can technically hand-sew a Fabric pie bag. If hand-sewing, use a backstitch for maximum durability, especially around the handles.
What kind of batting should I use?
100% cotton batting is preferred. Avoid polyester batting if possible, as it does not handle high heat as well as natural fibers. Flannel can also work as a thinner, lighter alternative if you don’t have batting on hand.
Can I use this for square dishes?
Absolutely! The “envelope” style of this Pattern is very flexible. While designed for round pies, it easily accommodates square brownie pans or small casserole dishes, making it a multi-purpose kitchen tool.
In this article, we have explored the comprehensive journey of creating a Fabric pie bag Tutorial – Pattern, from the initial selection of high-quality cotton fabrics to the final top-stitching that ensures a professional finish.
We discussed why choosing the right Pattern is essential for stability and how simple modifications can turn a basic carrier into a thermal powerhouse. By now, you should feel confident in your ability to sew a Fabric pie bag that is both beautiful and functional, helping you transport your baked goods with ease and style.


