
Crochet Flower - Tutorial

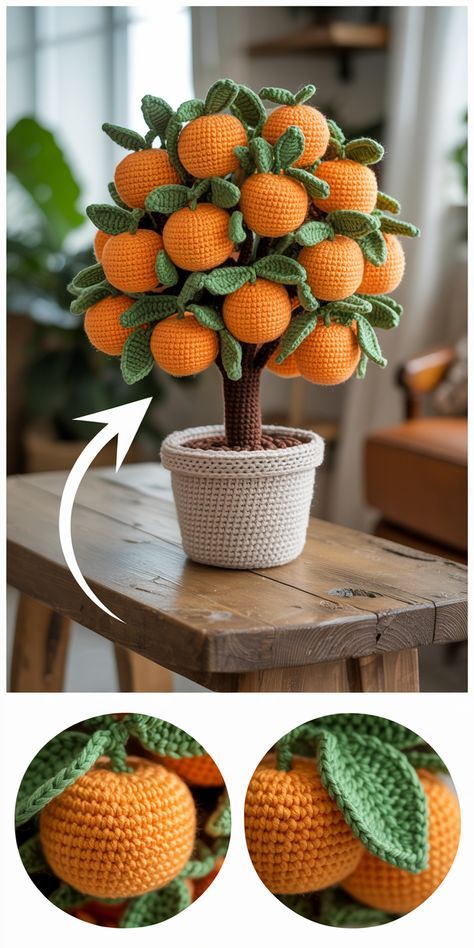
This Crochet tangerine vase Tutorial – Pattern is the perfect way to bring a touch of eternal summer and handmade charm into your home decor. Whether you are looking for a unique centerpiece or a thoughtful handmade gift, crafting a crochet tangerine vase allows you to blend the organic beauty of nature with the intricate art of crochet. This project is beginner-friendly yet offers enough detail to satisfy experienced crafters who want to experiment with structural designs and vibrant colors.
If you have been searching for a pattern that combines functionality with a whimsical aesthetic, this crochet tangerine vase tutorial will guide you through every stitch. The beauty of this specific project lies in its texture; by using the right crochet tangerine vase techniques, you can mimic the “peel” of a real citrus fruit, creating a tactile experience that looks as good as it feels. We will explore how to select the right yarn, maintain tension for a sturdy shape, and assemble the final piece.
Following a well-structured pattern is essential for ensuring your vase stands upright and maintains its spherical integrity. This Crochet tangerine vase Tutorial – Pattern focuses on the “Amigurumi” style of tight stitching, which prevents the stuffing or internal glass liner from showing through. As we dive into the details, you will learn how to master the crocheted tangerine vase look, from the leafy green accents to the dimpled orange surface that makes this pattern a standout piece in any fiber art collection.
Before picking up your hook, it is vital to understand what makes a Crocheted tangerine vase – Pattern successful. Unlike a flat scarf or a soft blanket, a crocheted tangerine vase requires a dense fabric to support its own weight. This means choosing a pattern that utilizes smaller hook sizes than the yarn label usually recommends to create a stiff, durable structure.
The primary goal of this Crocheted tangerine vase Tutorial – Pattern is to achieve a realistic citrus shape. When we talk about a crocheted tangerine vase, we are referring to a vessel—either decorative or functional—that mimics the color, size, and texture of a tangerine. The pattern usually involves working in continuous rounds to avoid visible seams that might distract from the fruit’s natural appearance.
To start your crocheted tangerine vase, you must familiarize yourself with the pattern notation for increases and decreases. These mathematical adjustments are what create the round, bulging middle of the fruit and the narrower opening at the top. Using a high-quality Crocheted tangerine vase – Pattern ensures that your “fruit” doesn’t end up looking like a simple ball, but rather a slightly flattened, realistic tangerine.
Material selection is a cornerstone of this Crocheted tangerine vase Tutorial – Pattern. For a truly authentic crocheted tangerine vase, mercerized cotton yarn is often preferred because it has a slight sheen and excellent stitch definition. This type of yarn helps the pattern details pop, making the “pores” of the tangerine skin look more lifelike and professional.
Another key aspect of the crocheted tangerine vase is the internal support. While some patterns are purely decorative and stuffed with fiberfill, this Crocheted tangerine vase Tutorial – Pattern can be adapted to fit around a small glass jar. This allows the pattern to function as a real flower vase, combining the softness of crochet with the utility of a waterproof container.
Finally, remember that the Crocheted tangerine vase – Pattern is versatile. You can scale the pattern up or down by changing yarn weights. A bulky yarn will result in a large, statement crocheted tangerine vase, while a fine lace weight will produce a delicate, miniature version perfect for a dollhouse or a keychain, proving the flexibility of this pattern.
To begin your Crocheted tangerine vase Tutorial – Pattern, you will need a few specific supplies to ensure success. The star of the show is, of course, the orange yarn used to create the body of the crocheted tangerine vase. Look for shades like “burnt orange” or “bright nectarine” to give your pattern a vibrant, organic feel that catches the eye immediately.
Next, you will need a crochet hook that is slightly smaller than the yarn’s suggested size. For this Crocheted tangerine vase – Pattern, if you are using a medium-weight cotton, a 3.0mm or 3.5mm hook is ideal. This ensures the crocheted tangerine vase has no gaps, which is a hallmark of a well-executed pattern designed for structural integrity and longevity.
Don’t forget the accents for your crocheted tangerine vase. A small amount of forest green yarn is necessary to follow the leaf and stem portion of the pattern. This Crocheted tangerine vase Tutorial – Pattern includes a small leaf attachment at the top, which adds a professional “freshly picked” look to your finished crocheted tangerine vase project.
Stitch markers are your best friend when working on a Crocheted tangerine vase – Pattern. Since the pattern is worked in rounds, it is incredibly easy to lose track of where a row begins. Marking the first stitch of each round in your crocheted tangerine vase will save you from the frustration of having to frog (unravel) your hard work later on.
You will also need a tapestry needle and sharp scissors to finish your Crocheted tangerine vase Tutorial – Pattern. The tapestry needle is used to weave in ends and sew the leaf onto the crocheted tangerine vase. A clean finish is what separates a hobbyist project from a boutique-quality pattern result, so take your time with the final assembly.
If you plan to use your crocheted tangerine vase for live flowers, have a small cylindrical glass or plastic insert ready. This Crocheted tangerine vase – Pattern is designed to be stretched slightly over a waterproof core. By integrating a solid base, your pattern transforms from a simple plushie into a sophisticated piece of functional home decor.
The journey of creating your crocheted tangerine vase begins with a magic ring. This Crocheted tangerine vase Tutorial – Pattern starts at the base, where you will work several single crochet stitches into the ring. This technique is essential for any pattern involving circular shapes, as it allows you to pull the center tight, leaving no hole at the bottom of your crocheted tangerine vase.
Once the base is established, the pattern moves into the expansion phase. In each subsequent round, you will gradually increase the number of stitches. Following this Crocheted tangerine vase – Pattern carefully during the increase rows is crucial for achieving that characteristic wide “waist” of a tangerine. The crocheted tangerine vase should begin to bowl upward as you progress through the rows.
The middle section of the Crocheted tangerine vase Tutorial – Pattern is often referred to as the “even rounds.” Here, you will simply crochet one stitch into each stitch from the previous row. This gives the crocheted tangerine vase its height. It is during these rounds that the beautiful texture of your chosen yarn really shines, showcasing the repetitive beauty of the pattern.
After reaching the desired height, the pattern will instruct you to begin decreasing. This is where the crocheted tangerine vase starts to curve back inward toward the neck. If you are inserting a glass jar, this is the point in the Crocheted tangerine vase Tutorial – Pattern where you should slide the jar inside to ensure a snug and perfect fit for your vase.
The neck of the crocheted tangerine vase is worked over several rows without further decreases, creating a collar where the stems of your flowers will rest. This pattern detail is what distinguishes a vase from a simple fruit toy. A well-defined neck gives the crocheted tangerine vase an elegant silhouette that mimics traditional pottery but with a soft, crocheted twist.
Finally, you will follow the leaf pattern included in this Crocheted tangerine vase Tutorial – Pattern. This involves working around a foundation chain to create a pointed, ribbed leaf. Once finished, you sew it near the rim of the crocheted tangerine vase. This final flourish completes the pattern, turning a simple orange vessel into an unmistakable tangerine-inspired masterpiece.
To truly master the Crocheted tangerine vase Tutorial – Pattern, you must pay close attention to your tension. If your stitches are too loose, the crocheted tangerine vase will become floppy and lose its shape. If they are too tight, the pattern may become difficult to work and the fabric might pucker. Finding a middle ground is key to a beautiful crocheted tangerine vase.
Choosing the right color palette can elevate your Crocheted tangerine vase – Pattern significantly. While bright orange is traditional, you can experiment with “clementine” or “satsuma” shades. Some crafters even use variegated yarn in their crocheted tangerine vase to simulate the natural color variations found in real fruit, adding depth and realism to the pattern.
Blocking your finished piece is a secret tip for any Crocheted tangerine vase Tutorial – Pattern. Even though it is a 3D object, a light steaming can help the stitches settle and give the crocheted tangerine vase a more polished look. Just be careful not to melt synthetic fibers if you aren’t using 100% cotton for your pattern.
Adding weight to the bottom of your crocheted tangerine vase is a great way to ensure stability. If you aren’t using a glass insert, you can place a small bag of poly-pellets or clean pebbles at the base of the pattern. This prevents the crocheted tangerine vase from tipping over when you place taller decorative items or dry flowers inside.
Consider the “purl” side of crochet for a different texture. Sometimes, the “wrong side” of a crochet stitch actually looks more like the skin of a citrus fruit. This Crocheted tangerine vase Tutorial – Pattern can be worked “inside out” to take advantage of that bumpy texture, giving your crocheted tangerine vase an even more authentic and unique pattern finish.
Lastly, don’t be afraid to customize. This Crocheted tangerine vase – Pattern is a foundation. You can add “water droplets” using clear beads or even a tiny crochet blossom. The more love and detail you put into your crocheted tangerine vase, the more it will be cherished as a piece of art. The joy of the pattern is in the personal touches you add along the way.
1. What is the best yarn for a crocheted tangerine vase?
The best yarn for this pattern is 100% mercerized cotton. It provides the necessary stiffness for the crocheted tangerine vase to stand upright and offers a beautiful stitch definition that highlights the “orange peel” texture.
2. Can I wash my crocheted tangerine vase?
Yes, if you use cotton or acrylic yarn, you can gently hand wash your crocheted tangerine vase. If the pattern includes a glass insert, be sure to remove it before washing the fabric cover.
3. Is this pattern suitable for absolute beginners?
While some experience with the magic ring and increasing/decreasing is helpful, this Crocheted tangerine vase Tutorial – Pattern is designed to be accessible. It uses basic stitches like the single crochet, making it a great “first 3D project.”
4. How long does it take to finish a crocheted tangerine vase?
Depending on your speed, a standard-sized crocheted tangerine vase can be completed in about 3 to 5 hours. It’s a perfect weekend project for anyone following a pattern.
5. Can I use this vase for real flowers?
If you follow the Crocheted tangerine vase Tutorial – Pattern and include a glass or plastic waterproof liner inside, you can definitely use it for real flowers with water. Otherwise, it is best for dried or artificial blooms.
6. What hook size do you recommend?
For most medium-weight yarns used in this pattern, a 3.0mm or 3.5mm hook is recommended to ensure the crocheted tangerine vase has a tight, opaque fabric.
In this Crocheted tangerine vase Tutorial – Pattern, we have covered everything from selecting the perfect orange yarn to the technical steps of shaping your vessel and adding decorative leaves.
We explored how the crocheted tangerine vase relies on tight tension and strategic increases/decreases to achieve its iconic citrus look. By following this pattern, you have created more than just a craft; you have made a functional piece of art that brings color and joy to any room.


