
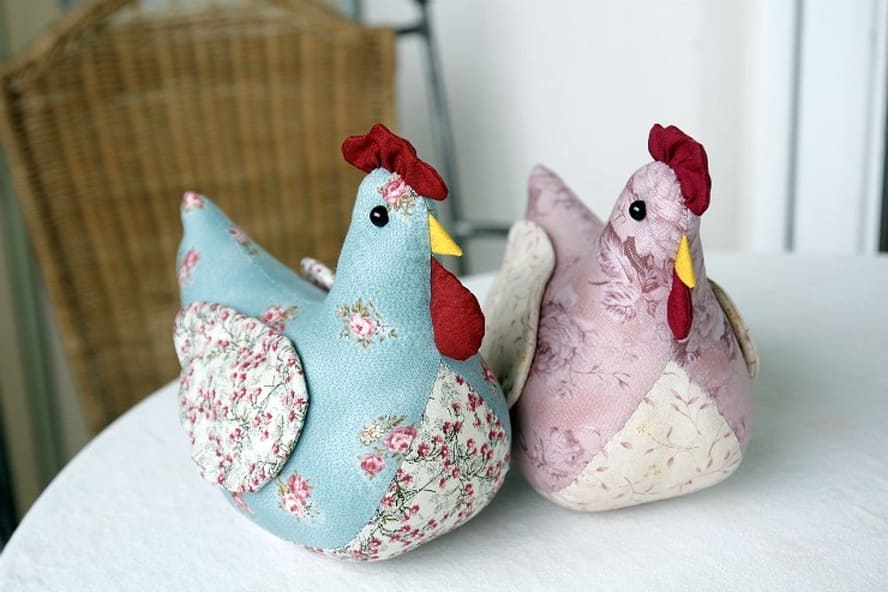
Patchwork Bird Tutorial

This Fabric Chicken Tutorial – Pattern is designed to help you create a charming, handmade decorative piece that brings a touch of farmhouse warmth to any room. Whether you are a seasoned seamstress or a curious beginner, following a Fabric Chicken – Pattern is an incredibly rewarding way to repurpose fabric scraps and practice your stitching skills. In this guide, we will explore everything from selecting the right materials to the final assembly, ensuring your Fabric Chicken looks professional and full of personality.
The beauty of a Fabric Chicken Tutorial – Pattern lies in its versatility, as these little birds can serve as doorstops, pincushions, or simple shelf sitters. By using a well-structured pattern, you ensure that the proportions are just right, giving your chicken that signature plump and quirky look. Throughout this process, we will focus on using high-quality fabrics and precise sewing techniques to make sure your creation stands the test of time.
Diving into a Fabric Chicken Tutorial – Pattern project is also a fantastic way to engage with the DIY crafting community and create personalized gifts for friends and family. Because the Fabric Chicken – Pattern is so adaptable, you can play with different textures, colors, and sizes to match any decor style. Let’s get started by breaking down the essential components and steps needed to bring your feathered friend to life.
Selecting the best materials is the first step in ensuring your Fabric Chicken – Pattern turns out exactly as pictured. For the body, 100% cotton fabric is the most popular choice because it is easy to handle, breathes well, and comes in endless prints. You will also need felt for the comb and wattle, as felt doesn’t fray and provides a nice structural contrast to the softer body fabric.
The “Pattern” refers to the template or blueprint used to cut the fabric pieces into the specific shapes required for assembly. A good Fabric Chicken – Pattern will include pieces for the body, the beak, the wings, and the crown (comb). Having a precise paper pattern helps in maintaining symmetry across multiple projects, especially if you plan on making a whole flock.
For the filling, most crafters prefer polyester fiberfill because it provides a soft, squishy texture that holds its shape. If you want your Fabric Chicken to be a functional doorstop, you might consider adding a small bag of dried beans or poly-pellets at the bottom for weight. This extra step transforms a simple plush into a heavy-duty household accessory.
Don’t forget the small details like embroidery floss or safety eyes to give your chicken its expression. Using a Fabric Chicken Tutorial – Pattern allows you to decide if you want a primitive, rustic look with simple “X” stitches for eyes or a more realistic appearance with shiny beads. The aesthetic choices you make here will define the character of your finished piece.
Proper tools are just as important as the materials themselves when following a Fabric Chicken – Pattern. You will need sharp fabric shears, a reliable sewing machine (though hand-sewing is possible), and plenty of pins to keep everything in place. High-quality all-purpose thread in a coordinating color will ensure that your seams are strong and nearly invisible.
Finally, consider the interlining or stabilizer if you are using very thin fabrics. A lightweight fusible interface can be applied to the back of your fabric before cutting the pattern pieces to prevent stretching. This ensures that the Fabric Chicken maintains its plump, rounded silhouette even after years of being handled or moved around.
Before you even touch your scissors, it is vital to pre-wash and iron your fabric to account for any potential shrinkage. Once your fabric is smooth, lay out your Fabric Chicken – Pattern pieces according to the grainline of the cloth. This prevents the fabric from warping once it is stuffed, which is a common mistake in DIY softie projects.
The term Fabric Chicken refers to the textile-based bird craft that serves as the centerpiece of this tutorial. To create a successful version, you must trace the pattern onto the wrong side of the fabric using a washable fabric marker or tailor’s chalk. Make sure to leave a seam allowance of about 1/4 inch if it isn’t already included in your printed template.
When cutting the wings and beak, precision is key to achieving a professional look. Since these pieces are smaller, they require careful handling and sharp scissors to avoid jagged edges. Following the Fabric Chicken – Pattern instructions for these smaller details ensures that the beak sits centered and the wings are level on both sides of the body.
If your Fabric Chicken Tutorial – Pattern features a “patchwork” style, this is the stage where you coordinate your different fabric scraps. Mixing a floral print body with a polka-dot wing can add a whimsical, handmade charm that is highly sought after in country-style decor. Just ensure that the fabric weights are similar so the tension remains even during sewing.
Organization during the cutting phase will save you a lot of frustration later on. Group your cut pieces into small piles: body panels, wing sets, and the red felt pieces for the comb. Keeping your pattern pieces pinned to the fabric until you are ready to sew them helps identify which side is which, especially with reversible prints.
Lastly, check that you have cut two mirrored pieces for the body and four pieces for the wings (to make two double-sided wings). The Fabric Chicken – Pattern relies on these pairs to create a three-dimensional shape. Once everything is cut and organized, you are ready to move to the sewing machine and start bringing the bird to life.
The assembly process begins by sewing the smaller features like the comb and beak first. Pin the comb and wattle pieces to the right side of one body panel, pointing inward, according to the marks on your Fabric Chicken – Pattern. This technique, known as “sandwiching,” ensures that when you flip the chicken right-side out, the features are perfectly tucked into the seams.
When you begin sewing the main body of the Fabric Chicken, it is best to use a short stitch length on your machine. This creates a stronger bond that can withstand the pressure of the stuffing. Following the curves of the pattern slowly is much better than rushing, as the rounded “bottom” of the chicken is what gives it its stable base.
Always remember to leave an opening for turning, usually at the bottom or the back of the chicken. This gap should be about 2 inches wide—large enough to fit your thumb and the stuffing through, but small enough to close easily with a ladder stitch later. A well-placed opening is a hallmark of a high-quality Fabric Chicken Tutorial – Pattern.
After sewing, it is essential to clip the curves. This involves making small snips into the seam allowance (without cutting the stitches) around the rounded parts of the Fabric Chicken – Pattern. This allows the fabric to stretch and lay flat once turned, preventing that “puckered” look that often happens with round sewing projects.
Turning the chicken right-side out is the “magic moment” where the Fabric Chicken finally takes its shape. Use a turning tool or a blunt chopstick to gently push out the seams, especially around the sharp corners of the beak and the points of the comb. Smooth out the edges from the inside to ensure the silhouette matches your original design.
Now comes the stuffing phase, which requires patience to avoid lumps. Tear off small bits of fiberfill and push them into the furthest corners first, like the head and the tail. As you fill the body of the Fabric Chicken – Pattern, keep checking for firmness; you want it to be sturdy enough to stand up but soft enough to look cozy and inviting.
Once your chicken is stuffed to your liking, it is time to close the opening using a blind stitch or ladder stitch. This hand-sewing technique hides the thread inside the folds of the fabric, making the seam virtually invisible. It is a vital skill for any Fabric Chicken Tutorial – Pattern enthusiast who wants a “boutique” finish on their handmade items.
The Fabric Chicken truly comes alive when you add the eyes and decorative elements. You can sew on black buttons, use a French knot with black embroidery thread, or even use fabric paint for a more modern look. Following the eye placement suggested in your pattern ensures the bird doesn’t look cross-eyed or unbalanced.
For those who want a more rustic or primitive style, you can “age” your chicken by dipping it in a light tea or coffee bath before stuffing. This gives the fabric a vintage, tea-stained appearance that looks beautiful in farmhouse kitchens. This customization is what makes the Fabric Chicken – Pattern so popular among diverse groups of crafters.
Adding decorative wings is another way to enhance the design. You can quilt the wings with a simple straight stitch before attaching them to the body, or even use contrasting thread to make the “feathers” pop. Some Fabric Chicken Tutorial – Pattern variations even suggest adding real feathers or lace trim to the tail for extra flair.
If you are making these for a craft fair or as gifts, consider adding a small “Handmade” tag to the bottom seam. This small touch increases the perceived value of your Fabric Chicken and highlights the effort put into the DIY process. People love knowing that a Fabric Chicken – Pattern was used to create something unique just for them.
Finally, take a moment to admire your work and perhaps spray a little linen scent on the fabric. Your completed Fabric Chicken Tutorial – Pattern project is now ready to decorate your home or be gifted to someone special. Don’t be afraid to experiment with the pattern size—scaling it up or down can create a whole family of chickens in different sizes!
1. What is the best fabric to use for a Fabric Chicken?
The most recommended fabric is 100% cotton or quilting cotton. It is easy to sew, holds its shape well, and comes in a variety of patterns that suit the “farmhouse” aesthetic. You can also use linen or flannel for a different texture.
2. Can I make this Fabric Chicken without a sewing machine?
Yes, you can! While a machine is faster, a Fabric Chicken – Pattern can be completed by hand using a strong backstitch. It will take more time, but it allows for great precision, especially on the smaller pieces like the beak and comb.
3. How do I make my Fabric Chicken stand up on its own?
To ensure stability, fill the bottom third of the chicken with a heavy material like dried rice, beans, or plastic pellets. Top the rest of the body with fiberfill to keep the upper part soft and light.
4. Is this tutorial suitable for absolute beginners?
Absolutely. The Fabric Chicken Tutorial – Pattern is a great “first project” because the shapes are relatively simple and it teaches fundamental skills like sewing curves, clipping seams, and hand-closing an opening.
5. How do I clean my handmade Fabric Chicken?
If you used fiberfill and cotton, you can spot-clean it with a damp cloth. If it needs a deeper clean, hand wash it gently in cold water and air dry. Note: If you used food items like rice or beans for weight, do not submerge it in water.
6. Can I sell chickens made from this pattern?
Generally, most DIY patterns allow for small-scale commercial use (like selling at craft fairs), but it is always best to check the specific license of the Fabric Chicken – Pattern you are using to be sure.
In this Fabric Chicken Tutorial – Pattern article, we have covered everything from the initial material selection to the intricate details of assembly and finishing.
We learned that using a high-quality Fabric Chicken – Pattern is the foundation for success, ensuring that your bird has the perfect shape and stability. We also discussed how to customize your Fabric Chicken using different fabrics, weights, and decorative stitches to create a truly unique piece of art.


