
Patchwork Bird Tutorial

The Churn Dash Patchwork Block – Pattern is one of the most beloved and enduring designs in the world of quilting, offering a perfect blend of geometric simplicity and historical charm. This classic design dates back to the early 19th century and remains a staple for both beginners and seasoned quilters due to its versatility and clean lines. By mastering the Churn Dash Patchwork Block – Pattern, you are not just sewing fabric together; you are participating in a rich tradition of American folk art that transforms simple scraps into a cohesive masterpiece.
When you decide to work with a Churn Dash Patchwork Block – Pattern, you are choosing a layout that excels in visual storytelling through high-contrast fabrics. The name itself is evocative, referring to the hollow wooden tub (the churn) and the stick (the dash) used to transform cream into butter, reflecting the domestic roots of the craft. In modern quilting, the Churn Dash Patchwork Block – Pattern serves as an excellent “canvas” for showcasing bold prints or practicing precision in half-square triangles and strip piecing techniques.
Understanding the mechanics of the Churn Dash Patchwork Block – Pattern is essential for creating a professional-looking quilt top that lays flat and aligns perfectly. This specific quilt pattern relies on a 3×3 grid system, also known as a nine-patch construction, which makes it incredibly easy to scale up or down depending on your project needs. Whether you are aiming for a rustic farmhouse aesthetic or a vibrant contemporary wall hanging, the Churn Dash Patchwork Block – Pattern provides the structural foundation required for a successful and rewarding sewing experience.
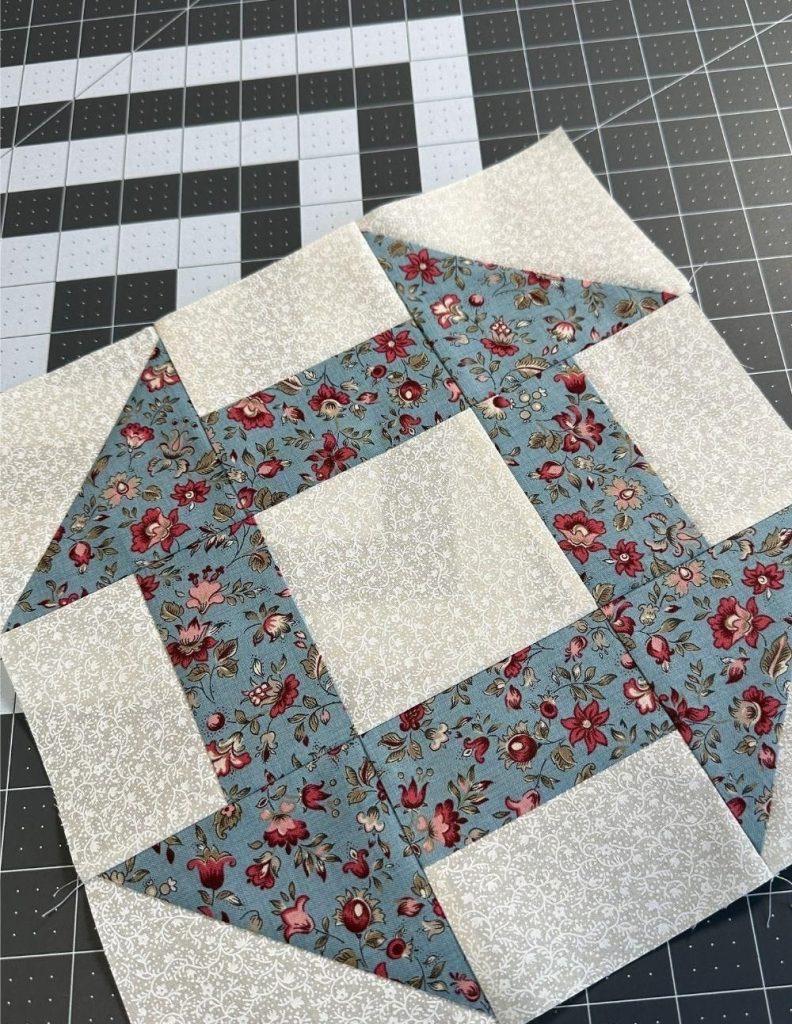
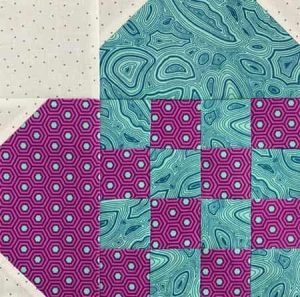
The Churn Dash Patchwork Block – Pattern is fundamentally composed of three distinct elements: a center square, four corner units, and four side units. This symmetrical arrangement is what gives the block its iconic “frame” appearance, making it instantly recognizable even from a distance.
To execute a flawless Churn Dash Patchwork Block – Pattern, you must first master the half-square triangles (HSTs) that occupy the four corners. These triangles create the diagonal energy of the block, directing the eye toward the center while framing the interior components with sharp, clean angles.
The side units of the Churn Dash Patchwork Block – Pattern are typically created using strip piecing, where two rectangles of contrasting fabric are sewn together. These units represent the “dash” part of the name and act as the connectors between the decorative corners and the solid heart of the block.
At the very center of the Churn Dash Patchwork Block – Pattern lies a simple square, which acts as the focal point for the entire design. Many quilters use this space to “fussy cut” a specific motif from their fabric, such as a flower or an animal, to add a personalized touch to the quilt design.
Choosing the right fabric contrast is vital when working with this patchwork pattern. To make the “churn” shape pop, it is highly recommended to use a dark or vibrant fabric for the main lines and a light, neutral fabric for the background, ensuring the geometric shapes remain distinct.
Accuracy in your seam allowance is the secret ingredient to a successful Churn Dash Patchwork Block – Pattern. Because this block involves multiple seams meeting at various points, sticking to a strict 1/4 inch seam ensures that your corners match and your final block dimensions are perfectly square.
Before diving into the assembly of your Churn Dash Patchwork Block – Pattern, gathering the right high-quality tools will save you time and prevent frustration. A sharp rotary cutter, a self-healing cutting mat, and a non-slip acrylic ruler are the trifecta of tools needed for precision cutting.
When selecting materials for the Churn Dash Patchwork Block – Pattern, 100% cotton quilting fabric is the gold standard due to its ease of handling and durability. Cotton holds a crease well when pressed, which is crucial for achieving the crisp edges that define this particular geometric quilt block.
Color theory plays a massive role in how your Churn Dash Patchwork Block – Pattern will eventually look. Using a color wheel can help you decide between a monochromatic look, which feels sophisticated, or a complementary color scheme that creates high energy and visual “vibration” across the quilt top.
Pre-washing your fabrics is a debated topic, but for a Churn Dash Patchwork Block – Pattern involving high-contrast colors (like red and white), it is often safer to pre-wash to prevent dye bleeding. This ensures that the crisp white background of your patchwork remains pristine after the first laundry cycle.
Don’t overlook the importance of your sewing machine needles and thread quality. A fine, strong 50-weight cotton thread is ideal for the Churn Dash Patchwork Block – Pattern because it doesn’t add bulk to the seams, allowing the fabric to lay much flatter during the final pressing stage.
Finally, having a reliable steam iron and a wool pressing mat will elevate your Churn Dash Patchwork Block – Pattern from amateur to professional. Pressing each seam as you go—rather than waiting until the end—is the hallmark of a disciplined quilter and results in a much more accurate block assembly.
The first step in creating the Churn Dash Patchwork Block – Pattern is the cutting phase, where you will prepare your squares and rectangles according to your desired finished size. Precision here is non-negotiable, as even a 1/8 inch error can snowball into a misaligned quilt block by the final step.
Start by constructing the half-square triangles for the corners of your Churn Dash Patchwork Block – Pattern. By placing two squares right sides together and sewing a 1/4 inch away from a center diagonal line, you can efficiently create two units at once, a technique known as the two-at-a-time HST method.
Next, move on to the “dash” units by sewing your long strips of contrasting fabric together along the long edge. Once joined, you will sub-cut these strips into smaller rectangular units that match the width of your center square, ensuring a cohesive fit within the nine-patch grid.
Layout your pieces on a flat surface or a design board before you start sewing the rows of the Churn Dash Patchwork Block – Pattern. This allows you to verify the orientation of your triangles and strips, preventing the common mistake of sewing a piece upside down or in the wrong position.
Sew your components into three distinct rows: the top row with two HSTs and a dash, the middle row with two dashes and the center square, and the bottom row mirroring the top. This row-by-row assembly is the most efficient way to manage the Churn Dash Patchwork Block – Pattern without getting confused.
The final act of construction involves joining the three rows together. Using pins or fabric clips to “nest” your seams where the corners meet will result in those perfect points that every quilter strives for when completing a Churn Dash Patchwork Block – Pattern.
If you find that your Churn Dash Patchwork Block – Pattern is coming out slightly smaller than intended, check your scant 1/4 inch seam. Often, the fold of the fabric takes up a tiny bit of space, so sewing just a thread’s width narrower than a true quarter-inch can solve your sizing issues.
For those who want to modernize the Churn Dash Patchwork Block – Pattern, consider “freshening” the design by using negative space. By using the same color for the background and the center square, you create a floating effect that feels very contemporary and minimalist.
Another popular variation is the wonky Churn Dash, where the angles are intentionally cut at irregular degrees. This takes the pressure off of achieving perfect points and results in a whimsical, improvisational version of the traditional Churn Dash Patchwork Block – Pattern that is great for art quilts.
Scaling the Churn Dash Patchwork Block – Pattern can also change its impact; imagine a single “giant” block that covers an entire baby quilt, or dozens of tiny 4-inch blocks for a complex, detailed miniature quilt. The math remains the same regardless of the scale you choose to work with.
Mixing different fabric textures, such as linens or chambrays, into your Churn Dash Patchwork Block – Pattern can add a tactile dimension to your work. Just be mindful that different fabric weights might stretch differently, so using a bit of fabric stabilizer or starch can help maintain accuracy.
Finally, remember that the Churn Dash Patchwork Block – Pattern is an excellent project for scrap busting. By using a consistent background color but different scraps for each “churn” unit, you can create a “scrappy yet organized” quilt that is both colorful and harmonious.
What is the best size for a Churn Dash Patchwork Block – Pattern?
The most common sizes are 6-inch, 9-inch, and 12-inch blocks. A 12-inch block is often the easiest for beginners because the individual pieces are larger and easier to handle under the sewing machine foot.
How do I calculate the fabric needed for a full quilt?
To calculate fabric for a Churn Dash Patchwork Block – Pattern quilt, determine the number of blocks needed to cover your bed size, then multiply the fabric requirements of one block by that number, adding 15% extra for “oops” cuts and shrinkage.
Can I use a jelly roll for this pattern?
Yes! A jelly roll (2.5-inch strips) is perfect for the “dash” units of a Churn Dash Patchwork Block – Pattern. You would just need to cut additional squares for the corners and the center to match the 2.5-inch width.
Why are my corners not pointing correctly?
This usually happens because the seams weren’t “nested” or the half-square triangles weren’t trimmed to the correct size before assembly. Always trim your HST units to a perfect square before sewing them into the block.
Is this pattern suitable for a complete beginner?
Absolutely. The Churn Dash Patchwork Block – Pattern is one of the top recommended patterns for new quilters because it teaches three fundamental skills: straight line sewing, half-square triangles, and grid-based assembly.
In this article, we have explored the rich history and technical precision required to create a stunning Churn Dash Patchwork Block – Pattern. We covered everything from the initial fabric selection and color contrast to the specific step-by-step assembly of the nine-patch grid and the importance of a scant 1/4 inch seam.
By following these guidelines, you can confidently produce a quilt block that is both structurally sound and visually captivating. The Churn Dash Patchwork Block – Pattern remains a timeless choice that bridges the gap between traditional craft and modern design, proving that some patterns never go out of style.


