
Patchwork Bird Tutorial

The Loop the Loop Quilt Block – Pattern is a timeless design that brings a sense of fluid motion and geometric elegance to any quilting project. This specific pattern is beloved by quilters of all skill levels because it offers a sophisticated look without requiring overly complex sewing techniques. When you decide to master the Loop the Loop Quilt Block – Pattern, you are diving into a world where curves and straight lines harmonize to create a visually stunning secondary pattern across your quilt top.
Whether you are a seasoned quilter looking for your next challenge or a beginner eager to learn how to manage curved piecing, the Loop the Loop Quilt Block – Pattern provides an excellent canvas for creativity. The versatility of this quilt block allows you to experiment with bold, contrasting colors for a modern aesthetic or soft, floral prints for a more traditional, “shabby chic” vibe. Understanding the structure of the Loop the Loop Quilt Block – Pattern is the first step toward creating a masterpiece that will be cherished for generations.
In this comprehensive guide, we will explore everything you need to know about the Loop the Loop Quilt Block – Pattern, from the initial fabric selection to the final quilting stitches. By focusing on precision and accurate seam allowances, you can ensure that your blocks align perfectly, creating that iconic “looping” effect that gives the pattern its name. Let’s break down the process of creating this beautiful quilt design into manageable steps that guarantee success.

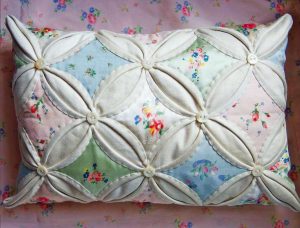
The foundation of the Loop the Loop Quilt Block – Pattern lies in its unique geometric construction, which usually involves a combination of arc shapes and squares. Unlike a standard Nine-Patch or Star block, this design relies on the interaction between the background fabric and the “loop” fabric to create an optical illusion of interlocking circles. When multiple blocks are sewn together, the Loop the Loop Quilt Block – Pattern creates a rhythmic flow across the fabric.
To start, you must choose a high-quality quilting cotton that holds its shape well, especially when dealing with bias edges. Because the Loop the Loop Quilt Block – Pattern often involves cutting curves, using a rotary cutter with a sharp blade is essential for clean lines. Many quilters prefer using acrylic templates specifically designed for this pattern to ensure every piece is uniform.
The color palette you choose will significantly impact how the loops appear; high contrast makes the loops pop, while monochromatic schemes offer a subtle, sophisticated texture. Incorporating solid fabrics can highlight the precision of your stitching, whereas small-scale prints can hide minor imperfections in your piecing. The Loop the Loop Quilt Block – Pattern is truly a shapeshifter in the world of textile art.
Before cutting into your favorite fabric, it is highly recommended to create a test block. This allows you to check your 1/4-inch seam allowance and ensure that the curves of the Loop the Loop Quilt Block – Pattern fit together smoothly without puckering. A bit of preparation goes a long way in achieving a professional-looking quilt top.
Organization is key when working with the Loop the Loop Quilt Block – Pattern. Since there are several pieces involved in creating the “loop” effect, keeping your fabric scraps and cut pieces labeled will prevent confusion during the assembly phase. Many quilters use design boards to visualize the layout before committing to the final stitch.
Lastly, remember that the Loop the Loop Quilt Block – Pattern is as much about the negative space as it is about the loops themselves. The background fabric acts as the stage upon which the loops perform, so don’t overlook its importance. A well-chosen background can elevate the Loop the Loop Quilt Block – Pattern from a simple project to a true work of art.
To achieve a perfect Loop the Loop Quilt Block – Pattern, having the right tools is non-negotiable. You will need a reliable sewing machine, a sharp rotary cutter, and a self-healing cutting mat. Because this pattern thrives on precision, a specialized ruler or a set of custom templates for the Loop the Loop Quilt Block – Pattern will save you hours of frustration.
When it comes to fabric, the Loop the Loop Quilt Block – Pattern is a great candidate for fat quarters or even jelly rolls if the loops are designed for strips. However, most traditional versions of the Loop the Loop Quilt Block – Pattern require larger cuts of fabric to accommodate the curved templates. Always pre-wash your fabric to prevent bleeding, especially if you are using high-contrast colors like red and white.
Cutting your fabric for the Loop the Loop Quilt Block – Pattern requires a steady hand and a focus on the grainline. When cutting curves, you will inevitably deal with the bias, which is the diagonal direction of the fabric that tends to stretch. Handling these pieces gently is crucial to maintaining the integrity of the Loop the Loop Quilt Block – Pattern design.
Using fabric starch can be a game-changer when prepping your pieces for the Loop the Loop Quilt Block – Pattern. By stiffening the fabric slightly, you reduce the risk of the curves stretching out of shape while you pin and sew. Starch provides that extra bit of “grip” that makes curved piecing feel much more like sewing a straight line.
Precision cutting leads to precision sewing. Ensure that your template placement is consistent across all your fabric pieces to keep the Loop the Loop Quilt Block – Pattern symmetrical. If your cuts are off by even a fraction of an inch, the loops may not meet up correctly when you join the blocks together, disrupting the visual flow.
Finally, don’t forget to maintain your equipment. A dull needle or a lint-filled bobbin case can cause skipped stitches, which is the last thing you want when working on a detailed Loop the Loop Quilt Block – Pattern. A fresh needle and a clean machine will ensure your quilting journey is smooth and enjoyable from start to finish.
The most intimidating part of the Loop the Loop Quilt Block – Pattern for many is the curved piecing. However, with a few “tricks of the trade,” sewing curves can become one of your favorite techniques. The secret to a flat Loop the Loop Quilt Block – Pattern is proper pinning—find the center of both the convex and concave curves and pin them together first.
Once the centers are pinned, align the ends of the pieces and pin those as well. For the Loop the Loop Quilt Block – Pattern, using more pins than usual is actually helpful. As you sew, let the feed dogs of your sewing machine do the work of easing the two different lengths of fabric together. Go slowly, and don’t be afraid to stop with the needle down to adjust your fabric.
Pressing is another vital step in assembling the Loop the Loop Quilt Block – Pattern. Instead of “ironing” (which involves sliding the iron and can stretch the fabric), you should “press” by lifting the iron and placing it down firmly. Press your seams toward the darker fabric or toward the “loop” to help the Loop the Loop Quilt Block – Pattern lay as flat as possible.
As you assemble the individual components of the Loop the Loop Quilt Block – Pattern, keep an eye on your seam intersections. For the loops to look continuous across the quilt, these points must match up perfectly. Using fine glass-head pins can help you “nest” your seams, ensuring a crisp finish for every Loop the Loop Quilt Block – Pattern you produce.
If you find that your Loop the Loop Quilt Block – Pattern is slightly “wonky” after sewing, you can use a squaring-up ruler to trim it to the exact size needed. However, if you followed the cutting and pinning steps carefully, your quilt block should be very close to the target dimensions. Consistency is what makes the Loop the Loop Quilt Block – Pattern look professional.
Don’t be discouraged if your first few attempts at the Loop the Loop Quilt Block – Pattern aren’t perfect. Like any skill, quilting curves takes practice. The more you work with the Loop the Loop Quilt Block – Pattern, the more intuitive the movement becomes, and soon you’ll be breezy through your quilt assembly with confidence.
Once you have completed your Loop the Loop Quilt Block – Pattern units, it’s time to think about the overall quilt layout. You can arrange the blocks in a standard grid, or you can rotate them to create entirely different secondary patterns. The Loop the Loop Quilt Block – Pattern is famous for how it transforms depending on the orientation of the blocks.
Adding a border can frame your Loop the Loop Quilt Block – Pattern beautifully. A simple solid border can let the intricate loops take center stage, while a “pieced border” can extend the complexity of the design. When you reach the quilting stage, consider following the lines of the loops with echo quilting to emphasize the motion inherent in the Loop the Loop Quilt Block – Pattern.
For those who love a bit of flair, the Loop the Loop Quilt Block – Pattern can be modified using appliqué techniques. Instead of piecing the curves, you can “fussy cut” the loops and stitch them onto a solid background using a blanket stitch or a zigzag stitch. This variation of the Loop the Loop Quilt Block – Pattern offers a different texture and can be faster for some.
Thread choice is another way to customize your project. Using a variegated thread can add a playful touch to the Loop the Loop Quilt Block – Pattern, while a matching silk thread can provide a luxurious, nearly invisible finish. The goal is to complement the hard work you put into the Loop the Loop Quilt Block – Pattern construction.
Don’t forget the quilt backing and binding. A bold, wide-back fabric can make the quilt reversible, while a striped binding cut on the bias can add a final “pop” of energy to the edges of your Loop the Loop Quilt Block – Pattern. Every choice you make contributes to the final story your quilt tells.
In conclusion, the Loop the Loop Quilt Block – Pattern is more than just a sewing project; it is an exercise in precision, a study in geometry, and an outlet for artistic expression. By following these steps and embracing the process, you will create a Loop the Loop Quilt Block – Pattern that is not only technically sound but also visually captivating.
1. Is the Loop the Loop Quilt Block – Pattern suitable for beginners?
While it is slightly more advanced than basic square patterns due to the curved seams, a patient beginner with a good quality template and a slow sewing pace can definitely succeed with the Loop the Loop Quilt Block – Pattern.
2. What is the best fabric for this pattern?
High-quality 100% quilting cotton is best. Avoid stretchy or slippery fabrics like rayon or silk until you are very comfortable with the Loop the Loop Quilt Block – Pattern, as these can make curved piecing much more difficult.
3. Do I really need templates for the Loop the Loop Quilt Block – Pattern?
While you can draw your own, acrylic templates are highly recommended. They provide the accuracy needed to ensure that all the pieces of your Loop the Loop Quilt Block – Pattern fit together perfectly every time.
4. How do I prevent the curves from stretching?
Using fabric starch before cutting and being very careful not to pull the fabric as it goes through the sewing machine are the two best ways to keep your Loop the Loop Quilt Block – Pattern shapes stable.
5. Can I use a regular sewing foot for this pattern?
Yes, a standard 1/4-inch quilting foot is perfect for the Loop the Loop Quilt Block – Pattern. Some quilters also find a walking foot helpful if they are dealing with multiple layers or thick seams.
6. What size is a typical Loop the Loop Quilt Block – Pattern?
Most patterns are designed for 10-inch or 12-inch blocks, but the beauty of the Loop the Loop Quilt Block – Pattern is that it can be scaled up or down depending on your project needs.
Throughout this article, we have explored the intricate details of the Loop the Loop Quilt Block – Pattern, covering everything from its geometric anatomy to the nuances of curved piecing and fabric selection.
We discussed the importance of using templates, the role of starch in stabilizing bias edges, and how the final quilting design can enhance the sense of motion within the pattern. The Loop the Loop Quilt Block – Pattern remains a favorite for its ability to create complex-looking results from simple, repetitive steps.


