
Patchwork Bird Tutorial

The Flying Geese Block – Pattern is one of the most versatile and essential components in the world of quilting, offering a sense of movement and direction that few other designs can match. Historically, this traditional quilt block has been used to tell stories and guide eyes across fabric landscapes, representing the seasonal migration of birds in a geometric form. Whether you are a beginner looking to master the basics or an advanced quilter designing a complex masterpiece, understanding the Flying Geese Block – Pattern is a fundamental step in your creative journey.
Mastering the Flying Geese Block – Pattern allows you to unlock hundreds of secondary designs, as these units are the building blocks for famous stars, borders, and modern abstract quilts. The beauty of this quilt construction lies in its simple ratio: the block is always twice as wide as it is high. This mathematical harmony ensures that when you sew multiple units together, the “geese” appear to fly in a seamless, rhythmic row that adds a professional touch to any handmade quilt project.
In this comprehensive guide, we will explore the nuances of the Flying Geese Block – Pattern, diving into the best techniques for accurate piecing, fabric selection, and modern variations. By focusing on precise cutting and scrappy quilting techniques, you can transform simple rectangles and squares into dynamic works of art. Let’s break down everything you need to know about this iconic design to ensure your next sewing session is a soaring success.
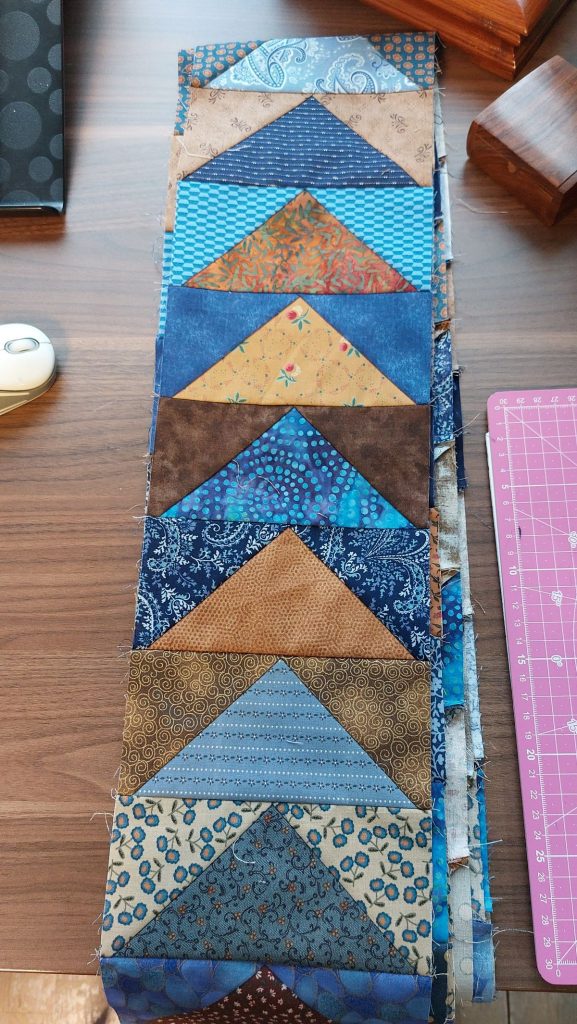
The classic Flying Geese Block – Pattern consists of one large center triangle (the “goose”) and two smaller side triangles (the “sky”). In technical terms, the large triangle is a right-angled isosceles triangle, and the two smaller ones are its mirrored counterparts. This structure creates a clean, pointed unit that can be used individually or stacked in columns.
When working with the Flying Geese Block – Pattern, the most important rule is maintaining the 1:2 ratio. For example, if your finished block is 2 inches high, it must be 4 inches wide. This geometric consistency is what allows quilters to calculate yardage and fabric requirements accurately across different quilt sizes.
To achieve a perfect Flying Geese Block – Pattern, you must account for the 1/4 inch seam allowance. If you lose the tip of your “goose” in the seam, it’s often called “chopping off the nose.” This is why precise seam nesting and careful pinning are vital steps in the assembly process.
There are several ways to construct the Flying Geese Block – Pattern, including the “stitch and flip” method or the “four-at-a-time” method. Each technique has its own benefits depending on your quilting style. The stitch-and-flip method is great for beginners, while the four-at-a-time method is a favorite for high-efficiency quilting.
Choosing the right fabric contrast is essential for making your Flying Geese Block – Pattern pop. Typically, quilters use a darker or more vibrant fabric for the “goose” and a lighter, neutral fabric for the “sky.” This contrast defines the shape and ensures the directional movement of the pattern is clearly visible from a distance.
Finally, the Flying Geese Block – Pattern is a staple in quilt block exchanges and “Bee” quilts because it is universally recognized. Learning to sew it consistently will improve your overall quilting accuracy, making you a more confident maker. It truly is a foundational skill that pays dividends in every future project you undertake.
To create a flawless Flying Geese Block – Pattern, you need more than just fabric; you need the right quilting notions. A high-quality rotary cutter with a fresh blade is non-negotiable for achieving the crisp edges required for sharp points. Dull blades can lead to frayed edges, which compromise the structural integrity of your seams.
A dedicated quilting ruler is another “must-have” for the Flying Geese Block – Pattern. Many manufacturers offer specialty “Flying Geese Rulers” that have built-in markings for seam allowances and trimming. These tools help you trim the units to the exact size needed before they are joined into a larger quilt top.
Cotton fabric is the preferred choice for the Flying Geese Block – Pattern because of its stability and ease of pressing. Using high-thread-count quilting cotton prevents the fabric from stretching on the bias, which is a common issue when sewing diagonal seams. Starching your fabric beforehand can also add extra fabric stability.
Your sewing machine setup plays a huge role in the success of the Flying Geese Block – Pattern. Using a quarter-inch presser foot helps maintain a consistent seam throughout the project. Additionally, using a fine 80/12 or 70/10 needle prevents bulky holes in the fabric, allowing the points of your geese to stay sharp and defined.
Don’t underestimate the power of a good steam iron. In the Flying Geese Block – Pattern, pressing is just as important as sewing. You should always press your seams toward the “sky” triangles to reduce bulk at the tip of the goose. This technique makes quilt top assembly much smoother and prevents “lumps” when you eventually quilt the layers together.
Lastly, having a marking pen or tailor’s chalk is helpful for the “stitch and flip” version of the Flying Geese Block – Pattern. Drawing a diagonal line on the back of your “sky” squares acts as a guide for your needle. This simple step significantly reduces errors and ensures your geometric quilt units are perfectly symmetrical every time.
The most popular way to start a Flying Geese Block – Pattern is the “stitch and flip” method. You begin with one large rectangle and two smaller squares. You place a square on one side of the rectangle, sew across the diagonal, trim the excess, and flip it open. Repeating this on the other side completes the quilt unit.
For those who value speed, the “no-waste” Flying Geese Block – Pattern method is a game-changer. This involves starting with one large square and four smaller squares. By sewing them in a specific sequence and cutting them apart, you produce four identical geese at once. This is the ultimate time-saving quilting tip for large projects.
Regardless of the method, fussy cutting can be applied to the Flying Geese Block – Pattern to highlight specific motifs in your fabric. If you have a fabric with small flowers or animals, placing them in the center of the “goose” triangle adds a whimsical and personalized touch to your textile art.
Maintaining bias edge awareness is critical during the construction of the Flying Geese Block – Pattern. Because many of the cuts are on the diagonal, the fabric becomes stretchy. Avoid pulling or tugging the fabric as it goes through the feed dogs of your sewing machine, as this can distort the block’s rectangular shape.
After sewing your Flying Geese Block – Pattern, the “trimming phase” is where the magic happens. Even the most experienced quilters sometimes have slight variations in their seams. Using a square-up ruler to shave off those tiny slivers of fabric ensures that every block is identical, which is the secret to a perfectly flat quilt.
Once your units are finished, you can arrange the Flying Geese Block – Pattern in various layouts. You can point them all in one direction for a “streaming” effect, or alternate directions to create a zigzag or chevron design. The versatility of this block is why it remains a top choice in modern quilt patterns.
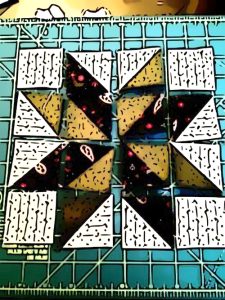
One of the most exciting ways to use the Flying Geese Block – Pattern is in a “Dutchman’s Puzzle” layout. This involves grouping four geese units together so their points meet in the center, creating a spinning wheel effect. It is a fantastic way to experiment with color theory and secondary patterns within a single quilt.
You can also incorporate the Flying Geese Block – Pattern into your quilt borders. A “Geese in a Row” border adds a sophisticated, high-energy frame to a simple center medallion. This use of directional piecing can make a small quilt feel much larger and more dynamic than a standard solid fabric border.
For a contemporary look, try the “wonky” Flying Geese Block – Pattern. This involves intentional asymmetry, where the triangles are tilted at different angles. This improvisational quilting style is very popular in modern art quilts and allows for a more relaxed, “sketch-like” appearance in your fiber art.
Using the Flying Geese Block – Pattern in a circular arrangement results in a “Lone Star” or “Compass” design. While this requires more advanced Y-seam construction, the visual impact is stunning. It showcases the goose unit as more than just a rectangle, but as a wedge in a larger, radiating geometric design.
Color-grading your Flying Geese Block – Pattern from dark to light creates an “Ombre” effect that is very on-trend. By carefully selecting your fabric palette, you can make the geese look like they are emerging from shadows or fading into the clouds, adding a beautiful artistic depth to the pattern.
Don’t forget that the Flying Geese Block – Pattern works beautifully in miniature! Making tiny geese (1″ x 2″) is a great way to use up fabric scraps. These micro-blocks can be used for pincushions, mug rugs, or intricate doll quilts, proving that this classic quilt motif works at any scale.
What is the standard size for a Flying Geese Block – Pattern?
There is no single “standard” size, but common sizes include 2″ x 4″, 3″ x 6″, and 4″ x 8″ (finished). The key is always maintaining the 2:1 width-to-height ratio.
How do I avoid cutting off the points of my geese?
The secret is to sew exactly a “scant” 1/4 inch seam. When you look at the back of your block, you should see the “X” where your seams cross. If you sew right through the center of that X, your point will be perfect on the front.
Can I use the Flying Geese Block – Pattern for a beginner project?
Absolutely! The “stitch and flip” method is very beginner-friendly. It teaches the basics of diagonal sewing and pressing, making it an excellent starting point for new quilters.
Why are my Flying Geese blocks coming out wavy?
Waviness is usually caused by stretching the bias edges. Try using fabric starch before cutting and avoid “pushing” the fabric under the needle. Let the machine’s feed dogs do the work.
What is the “No-Waste” method?
It is a technique where you sew four geese at once using one large square and four small squares. It eliminates the small triangles that are usually cut off and thrown away in the traditional method.
The Flying Geese Block – Pattern remains a cornerstone of the quilting world for good reason. From its rich history to its endless modern applications, this block offers something for everyone. We’ve covered the essential geometry, the tools you need for success, the step-by-step construction methods, and creative ways to make the design your own.
By mastering the precise piecing and color balance required for this block, you are well on your way to creating stunning, professional-grade quilts.


