
Patchwork Bird Tutorial

The Star of Bethlehem Block – Pattern is one of the most iconic and breathtaking designs in the world of quilting, representing a timeless tradition that bridges the gap between historical craftsmanship and modern textile art. Known for its radiating points and intricate diamond construction, this specific pattern captures the imagination of quilters who want to create a masterpiece that symbolizes light, hope, and technical skill. Whether you are a seasoned quilter looking for a challenge or a passionate beginner ready to dive into the deep end of geometric precision, mastering this design is a rite of passage that yields a stunning visual reward.
When we discuss the Star of Bethlehem Block – Pattern, we are looking at a complex arrangement of diamonds that expand from a central point to create a massive, eight-pointed star. Often referred to as the Lone Star in certain regions, the Star of Bethlehem is unique because of its scale and the specific way colors are graded to create a shimmering effect. This quilt pattern requires a keen eye for color theory and a steady hand for “fussy cutting” or strip-piecing, ensuring that every seam aligns perfectly to prevent the dreaded “puckering” at the center of the star.
Choosing to work on a Star of Bethlehem Block – Pattern project means committing to accuracy and patience, but the result is a functional heirloom that can be passed down through generations. The geometry involved in this quilt design is mathematically satisfying, using 45-degree angles to form the diamond shapes that make up the star’s “petals.” In this guide, we will explore the nuances of this quilt block, provide tips for flawless execution, and look at how modern tools have made this traditional sewing pattern more accessible than ever before.
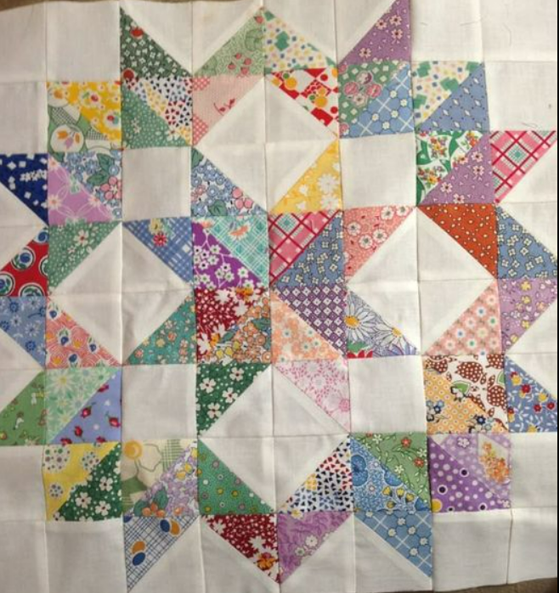
The Star of Bethlehem Block – Pattern carries a deep historical significance, particularly within the American quilting tradition and religious communities. For centuries, this star motif has been used to signify guidance and spirituality, often gifted during significant life events like weddings or births. The anatomy of the star is built upon eight primary points, each composed of smaller rhombus shapes or diamonds that radiate outward in concentric rows.
To successfully execute the Star of Bethlehem Block – Pattern, a quilter must understand the “set-in” or “Y-seam” technique, which is often necessary when joining the star points to the background fabric. Modern variations of the pattern have introduced ways to simplify this, but the classic look remains the gold standard for artistic quilts. The visual impact of the block depends heavily on the value contrast between the star and the background.
Precision cutting is the foundation of this design. Because the Star of Bethlehem relies on so many intersecting lines, even a 1/8-inch error can multiply across the rows, leading to a center that won’t lay flat. Using a rotary cutter and a specialized ruler for 45-degree angles is highly recommended for anyone attempting this sewing project.
The color placement within the Star of Bethlehem Block – Pattern is what gives it that “glowing” appearance. By choosing a gradient of fabrics—moving from dark in the center to light at the tips—you create a sense of movement and depth. This color play is a hallmark of the traditional pattern, turning a flat piece of fabric into a three-dimensional illusion.
In the world of textile arts, this pattern is considered a “show-stopper.” It is frequently the centerpiece of quilt shows because of its complexity and the skill required to keep the points sharp. When you look at a well-made Star of Bethlehem, you aren’t just looking at fabric; you are looking at a mathematical puzzle solved through craftsmanship.
Finally, the Star of Bethlehem Block – Pattern is incredibly versatile in terms of size. While often seen as a large “Lone Star” that covers an entire bed, the block can be scaled down for wall hangings or decorative pillows. This adaptability makes it a favorite for custom quilting enthusiasts who want to incorporate traditional symbols into modern home decor.
Before you begin sewing your Star of Bethlehem Block – Pattern, selecting the right high-quality cotton fabric is your most important decision. Since this quilt block involves many bias edges (stretchy edges), using a fabric with a tight weave and minimal stretch is crucial. Many quilters prefer solid colors or small “tone-on-tone” prints to ensure the focus remains on the star’s geometric perfection.
Your quilting toolkit for this project must include a sharp rotary cutter, a self-healing mat, and a long acrylic ruler. For the Star of Bethlehem Block – Pattern, a template specifically designed for diamond shapes can be a lifesaver. These tools ensure that every piece is uniform, which is the only way to ensure the star’s points meet perfectly at the center without a bulk of fabric.
Thread choice also plays a significant role in the Star of Bethlehem Block – Pattern. Using a fine, strong 50-weight cotton thread helps reduce seam bulk, allowing the many intersections of the star to lie flat when pressed. A neutral color like grey or tan often works best, as it blends into most fabric colors without showing through the seams of your star points.
Marking tools are another necessity when working with the Star of Bethlehem. Because the pattern involves complex joinery, marking your seam intersections on the wrong side of the fabric can help you navigate the “Y-seams” more effectively. Whether you use a water-soluble pen or a chalk marker, having clear guides will save you hours of frustration and “un-sewing.”
Starch is the secret weapon for any Star of Bethlehem Block – Pattern expert. Applying a light amount of fabric starch to your material before cutting helps stabilize the bias edges. This prevents the diamonds from stretching out of shape as you handle them, ensuring that the quilt top remains square and the star stays symmetrical throughout the assembly process.
Lastly, consider the background fabric as the stage for your star. A dark background can make a bright Star of Bethlehem pop, while a light or white background gives it a classic, airy feel. The negative space around the star provides an excellent opportunity for intricate free-motion quilting later on, adding another layer of detail to your finished pattern.
The modern approach to the Star of Bethlehem Block – Pattern often involves strip piecing, a technique that saves time and increases accuracy. Instead of cutting hundreds of individual diamonds, you sew long strips of fabric together and then cut them at a 45-degree angle. This creates pre-sewn rows of diamonds that are much easier to manage than individual small pieces of fabric.
Once your strips are cut, you begin assembling the star segments. For a Star of Bethlehem Block – Pattern, you will typically create eight identical wedges. Each wedge is a smaller diamond composed of the various color rows you’ve prepared. It is vital to use a 1/4-inch seam allowance consistently; even a tiny deviation will cause the star to “bowl” or “wave.”
Pressing is just as important as sewing in this quilt pattern. To avoid bulk, most professionals recommend pressing seams open or in alternating directions so they “nest” together. In a Star of Bethlehem Block – Pattern, managing the center point where all eight wedges meet is the hardest part. Pressing carefully and using a “spinning” technique at the center can help the quilt block lay completely flat.
After the eight wedges are finished, it is time to join them into halves, and then finally into the full star. This is where the Star of Bethlehem Block – Pattern truly begins to take shape. Matching the intersections of the diamonds across the wedges is the key to a professional-looking result. Using fine pins to “lock” these intersections before sewing is a mandatory step for most quilters.
The next stage involves adding the background squares and triangles to turn the star into a square quilt block. This is where those “Y-seams” come into play. By stopping your seam exactly a quarter-inch from the edge, you leave space to pivot the fabric and join the background pieces. It sounds intimidating, but with the Star of Bethlehem, it is a skill that comes with practice.
Finally, once the star is set into the background, you have completed the Star of Bethlehem Block – Pattern top. The final step is a thorough pressing of the entire block. Check for any “lost points” (where the tip of a diamond is cut off by a seam) and celebrate the fact that you’ve conquered one of the most difficult and rewarding patterns in the quilting world.
One common issue when making a Star of Bethlehem Block – Pattern is the center point becoming too thick or “pointy.” If your star looks like a mountain in the middle, it usually means your seam allowances were slightly too large. You can sometimes fix this by gently steaming and pressing, but the best cure is prevention through precise cutting and 1/4-inch piecing.
If you notice that your star’s outer edges are wavy, it’s likely that the bias edges stretched during sewing. In future Star of Bethlehem Block – Pattern attempts, try to handle the pieces as little as possible and use plenty of starch. For your current project, “stay-stitching” around the edge of the star before adding the background can help keep everything in its proper geometric place.
Quilting the finished Star of Bethlehem Block – Pattern is the fun part. You can choose to “quilt in the ditch,” which means sewing along the existing seams to emphasize the diamond shapes. Alternatively, you can use contrasting thread to quilt feathers or swirls in the negative space of the background, which creates a beautiful contrast against the sharp, straight lines of the star.
Borders can also enhance the Star of Bethlehem Block – Pattern. Adding a simple “mitered border” can frame the star like a piece of art. When choosing a border fabric, look for something that complements one of the colors inside the star to create a cohesive visual design. This helps draw the eye back to the center of your work of art.
For those who want a more modern look, consider an “asymmetrical” Star of Bethlehem. You can achieve this by using a monochromatic color palette or by placing the star off-center on the quilt top. This breathes new life into the traditional pattern, making it suitable for modern minimalist homes while still honoring the quilting heritage.
Regardless of how you finish it, completing a Star of Bethlehem Block – Pattern is an achievement to be proud of. It requires a blend of mathematical logic, artistic vision, and manual dexterity. As you bind the edges of your quilt, you are finishing a journey that has taught you more about sewing precision and color harmony than almost any other project could.
1. Is the Star of Bethlehem Block – Pattern suitable for beginners?
While it is an advanced pattern due to the Y-seams and bias edges, a determined beginner can succeed by using strip-piecing methods and following a detailed guide. It is recommended to practice with a smaller “LeMoyne Star” first.
2. How much fabric do I need for a full-sized Star of Bethlehem?
The amount varies based on the number of colors you use. Generally, for a large Lone Star version of the pattern, you will need approximately 6 to 8 yards of fabric in total, including the background and the various star points.
3. Can I make this pattern without Y-seams?
Yes, there are “modern” versions of the Star of Bethlehem Block – Pattern that use half-square triangles or “stitch-and-flip” methods to avoid Y-seams, though the look is slightly different from the traditional diamond-based star.
4. What is the difference between a Lone Star and a Star of Bethlehem?
In many circles, the terms are used interchangeably. However, historically, the Star of Bethlehem is often part of a more complex layout with multiple stars, while the Lone Star refers to one large, singular star dominating the quilt top.
5. How do I keep my star points from being cut off?
The key is to ensure your seam allowance is exactly 1/4 inch. When you cross an intersection, your needle should go exactly through the point where the previous seams meet. This preserves the sharp “v” of the star pattern.
6. Can I use scraps for a Star of Bethlehem Block – Pattern?
Absolutely! A “Scrappy Star” is a beautiful variation. However, it is much harder to use strip-piecing with scraps, so you would likely need to cut individual diamonds, which requires even more attention to cutting accuracy.
In this article, we have explored the rich history and technical intricacies of the Star of Bethlehem Block – Pattern. We covered the essential tools needed for success, such as rotary cutters and fabric starch, and discussed the importance of precision cutting and strip-piecing to ensure your star lays flat and looks professional. We also touched on troubleshooting common issues like “wavy edges” and “bulky centers,” providing you with the knowledge to create a high-quality quilt masterpiece. This pattern is more than just a sewing project; it is a stunning display of geometric art and a testament to a quilter’s dedication to their craft.
We would love to hear from you! Have you ever attempted a Star of Bethlehem Block – Pattern, or are you planning to start one soon? Please leave your sincere opinion on this guide and share any suggestions or tips you might have for fellow quilters in the comments below!


