
Crochet Flower - Tutorial

Finding the perfect CROCHET STAR – Pattern is like discovering a hidden gem in the world of fiber arts, offering a versatile design that works for everything from holiday decor to stylish appliqués. Whether you are a seasoned pro or a curious beginner, mastering the CROCHET STAR – Pattern allows you to create geometric beauty with just a hook and some yarn. These celestial shapes carry a timeless charm, making them a staple project for anyone looking to sharpen their skills while producing something truly eye-catching and meaningful.
When you dive into a CROCHET STAR – Pattern, you aren’t just following a set of instructions; you are engaging in a rhythmic craft that promotes relaxation and creativity. The beauty of the CROCHET STAR – Pattern lies in its adaptability, as you can easily scale the size by changing your yarn weight or hook size. From tiny stars used as table confetti to large, plush star-shaped pillows, the possibilities are endless once you understand the basic construction and the logic behind the increases that form those iconic points.
In this comprehensive guide, we will explore the essential elements of the CROCHET STAR – Pattern, ensuring you have all the knowledge needed to succeed. We will break down the terminology, discuss the best materials to use, and provide tips for achieving crisp, sharp points every time. By the end of this article, you will feel confident in your ability to execute a flawless CROCHET STAR – Pattern and integrate it into your future crochet collections, gifts, or home styling projects.
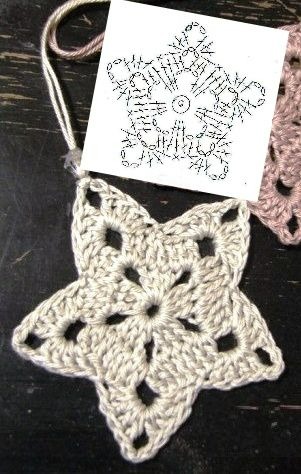
To begin your journey, you must understand that the CROCHET STAR – Pattern usually starts with a magic ring or a small chain loop. This central circle acts as the foundation from which all the points will radiate outward, ensuring a tight and professional-looking center.
The most common CROCHET STAR – Pattern utilizes a five-point design, which is achieved through a specific sequence of stitches like the double crochet (dc) and triple crochet (tr). These taller stitches help create the height needed to form the peaks of the star without causing the fabric to curl or pucker.
A crucial aspect of a high-quality CROCHET STAR – Pattern is the use of chains at the tips of each point. By “chaining” and then working back down the side of the point, you create that signature sharpness that defines a star shape rather than a simple pentagon.
When working on a CROCHET STAR – Pattern, stitch markers can be your best friend to keep track of your increases. Since the symmetry of the star depends on an even distribution of stitches, losing count can result in a lopsided star, which is why precision is key during the first two rounds.
The choice of yarn significantly impacts the final look of your CROCHET STAR – Pattern. For home decor, a stiff mercerized cotton is often preferred because it holds its shape exceptionally well, whereas a soft acrylic might be better for stars intended for baby blankets or clothing.
Finally, blocking your finished CROCHET STAR – Pattern project is a step you shouldn’t skip. Using pins to stretch the points while the yarn is slightly damp will transform a slightly rounded shape into a professional, crisp celestial star that looks store-bought.
Before you pick up your hook, selecting the right tools for your CROCHET STAR – Pattern is the first step toward a masterpiece. An ergonomic crochet hook is highly recommended, especially if you plan on making multiple stars, as the repetitive nature of the points can be taxing on the hands.
The yarn weight you choose dictates the utility of your CROCHET STAR – Pattern. For instance, using a lace weight yarn with a tiny hook will produce delicate stars perfect for earrings, while a chunky wool will result in a cozy, oversized star that functions as a hot pad or cushion.
Don’t forget the importance of a tapestry needle for weaving in your ends. Because the CROCHET STAR – Pattern has multiple directions of travel, hiding your yarn tails securely within the stitches ensures the star won’t unravel after a few washes or heavy use.
If you are following a specific CROCHET STAR – Pattern for the first time, check the gauge. While gauge isn’t always critical for decorative items, it ensures that your star ends up the size you expect and that you don’t run out of yarn mid-way through a point.
Sharp embroidery scissors are another must-have for any CROCHET STAR – Pattern enthusiast. Making clean cuts prevents fraying, which is especially important when you are finishing the final “invisible join” to make the edge of your star look seamless and polished.
Lastly, consider adding beads or sequins to your CROCHET STAR – Pattern for a bit of extra flair. Threading these onto your yarn before you start allows you to pull them up into the stitches, creating a shimmering effect that is perfect for holiday ornaments or nursery decor.
Once you have mastered the basic CROCHET STAR – Pattern, you can experiment with color changes. By switching colors at the start of each round, you can create a “burst” effect that makes the center of the star pop against the outer points, adding depth to the design.
Another popular variation in the CROCHET STAR – Pattern world is the textured star. By using front post double crochet (fpdc) stitches, you can create raised ridges that run from the center to each tip, giving your star a 3D architectural look that is very modern.
The CROCHET STAR – Pattern can also be worked in the “round” or as a “granny star.” The granny style uses clusters of stitches and spaces, resulting in a vintage, lacy appearance that is lighter and uses less yarn than the solid-stitch versions.
For those who want a challenge, try a multi-layered CROCHET STAR – Pattern. This involves crocheting a smaller star and then attaching it to the front of a larger one, or working into the back loops only to create a tiered effect that adds significant visual interest.
Precision in tension is vital when working through a CROCHET STAR – Pattern. If your tension is too tight, the star will bowl up like a cup; if it is too loose, the points will flop. Practice finding a “middle ground” tension to keep the star perfectly flat on a surface.
Learning the invisible join technique is a game-changer for the CROCHET STAR – Pattern. Instead of a standard slip stitch, which can leave a visible bump, the invisible join mimics the top of a stitch, making it impossible to tell where the round ended and the star was finished.
One of the most frequent issues with the CROCHET STAR – Pattern is the points curling inward. This usually happens because there aren’t enough stitches in the “valleys” (the spaces between the points) or because the chain at the tip is too tight, pulling the fabric together.
If your CROCHET STAR – Pattern looks more like a circle than a star, you likely need to increase the height difference between your stitches. Ensure you are moving from a single crochet (sc) in the valleys to a triple crochet (tr) at the peaks to create that sharp contrast.
Gaping holes in the center of your CROCHET STAR – Pattern can be frustrating. To solve this, always use the magic ring method instead of the “chain and join” method, as the magic ring allows you to pull the center tight until the hole completely disappears.
Symmetry is the soul of a good CROCHET STAR – Pattern. If one point looks longer than the others, recount your stitches. It is very easy to accidentally skip a stitch in the “valley,” which throws off the alignment for the rest of the round.
Sometimes the CROCHET STAR – Pattern can become “wavy” around the edges. This is a sign of too many stitches. If the fabric starts to ripple, you may need to reduce the number of stitches in the foundation round or use a slightly smaller hook to tighten the structure.
Remember that every CROCHET STAR – Pattern behaves differently depending on the fiber content of the yarn. Cotton has no stretch, while wool is very forgiving. If your pattern feels “off,” try swapping your yarn type before giving up, as the fiber plays a huge role in stitch definition.
How long does it take to complete a standard CROCHET STAR – Pattern?
For a small ornament-sized star, an experienced crocheter can finish one in about 15 to 20 minutes. Larger projects or those with intricate textures will obviously take longer.
What is the best yarn for a CROCHET STAR – Pattern intended for a Christmas tree?
A cotton yarn with a metallic thread (lamé) is the most popular choice. It provides the stiffness needed to hang straight and the sparkle required for a festive holiday look.
Can I use a CROCHET STAR – Pattern to make a blanket?
Absolutely! You can either make many small stars and join them together (joining as you go), or you can follow a “star blanket” pattern which is essentially a giant star that grows with every round.
Why are my star points rounded instead of sharp?
This is usually due to a lack of “peak” stitches. Make sure your CROCHET STAR – Pattern includes a chain-2 or chain-3 at the very tip of each point to create that sharp, defined corner.
Do I need to block my crochet stars?
While not mandatory, blocking is highly recommended for stars. It helps even out the tension and ensures all five (or six) points are uniform in length and shape.
Is the CROCHET STAR – Pattern suitable for beginners?
Yes, it is a great “intermediate-beginner” project. It introduces the concept of varying stitch heights and working in the round, which are fundamental skills for advancing in the craft.
In summary, the CROCHET STAR – Pattern is a delightful and rewarding project that offers a perfect blend of simplicity and sophistication. We have covered everything from the foundational stitches and necessary materials to advanced texturing techniques and troubleshooting tips for curling or lopsided points.
By focusing on stitch height and proper tension, you can create beautiful stars that serve as ornaments, gifts, or decorative accents for your home. This pattern is a testament to how a few basic stitches can be transformed into something celestial and timeless.


