
Patchwork Bird Tutorial

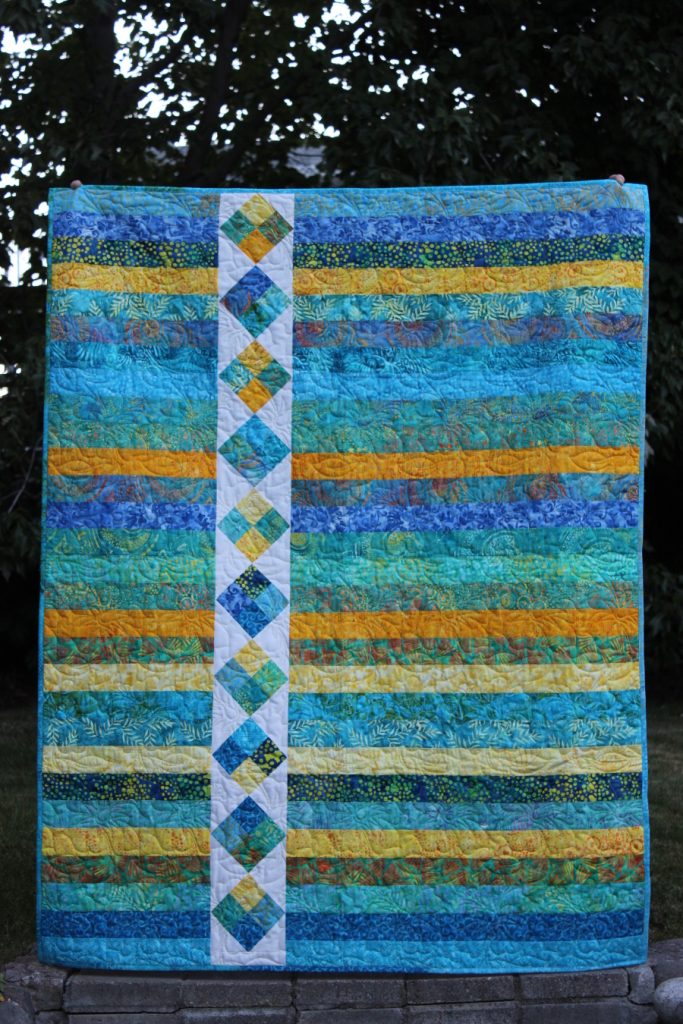
The Island Four Patch Quilt – Pattern is a breath of fresh air for quilters who want to combine the rhythmic simplicity of traditional blocks with the vibrant, breezy energy of a tropical getaway. This specific quilt design has gained massive popularity because it balances high-contrast colors with a geometric layout that looks far more complex than it actually is to assemble. Whether you are looking to brighten up a bedroom or create a handmade gift that evokes the feeling of a sun-drenched beach, the Island Four Patch Quilt – Pattern provides the perfect roadmap for your creative journey.
Choosing the right quilt pattern is often the hardest part of starting a new project, but the Island Four Patch Quilt – Pattern stands out due to its versatility and “scrap-friendly” nature. By focusing on a central four-patch block and surrounding it with complementary borders or sashing, quilters can play with color theory in exciting ways. You can use batik fabrics to mimic the ripples of the ocean or bright floral prints to represent island flora, making every version of this Island Four Patch Quilt – Pattern a completely unique piece of art.
As we dive into the technicalities of this sewing project, it is important to remember that successful quilting is all about precision and preparation. The Island Four Patch Quilt – Pattern relies on clean lines and crisp corners to maintain its visual impact. In this guide, we will explore the essential materials, the step-by-step construction of the quilt blocks, and how to finish your masterpiece with professional flair. Let’s get started on your path to mastering the Island Four Patch Quilt – Pattern and bringing a bit of paradise into your home.
When you begin your Island Four Patch Quilt – Pattern, the fabric selection is what defines the “island” vibe of the entire project. To achieve that signature look, many quilters opt for high-quality cotton fabrics in shades of turquoise, sandy beige, coral, and lush green. These colors instantly transport the viewer to a coastal setting, making your quilt top feel cohesive and thematic.
Using batiks is highly recommended for this specific Island Four Patch Quilt – Pattern. Batiks are created using a wax-resist dyeing technique that produces mottled, organic textures which look like moving water or shifting shadows. Because the four-patch block is so geometric, the fluid nature of batik fabric helps soften the edges and adds a sophisticated depth to the final quilt design.
Don’t forget the importance of value contrast in your Island Four Patch Quilt – Pattern. To make the “four-patch” pop, you should pair dark fabrics with very light ones. If all your fabrics have the same visual weight, the beautiful pattern you are sewing will get lost. Aim for a mix of saturated tones and neutral backgrounds to ensure your hard work is visible from across the room.
The amount of fabric you need will depend on the size of the quilt you intend to make, whether it is a lap quilt, a queen-size spread, or a baby quilt. Always buy a little extra yardage to account for shrinkage during the pre-washing phase or any cutting errors. For an Island Four Patch Quilt – Pattern, having extra fabric also allows you to make a matching scrappy border later on.
Pre-washing your fabric is a debated topic, but for an Island Four Patch Quilt – Pattern featuring bright blues and reds, it is often a wise choice. This prevents “bleeding,” where dark dyes run into light areas during the first wash of the finished quilt. Using a color catcher in the wash can also protect the integrity of your Island Four Patch Quilt – Pattern for years to come.
Finally, consider the backing fabric and binding. While the front of the Island Four Patch Quilt – Pattern is the star of the show, a soft flannel backing or a bold, striped binding can provide the perfect finishing touch. Choose a binding color that pulls from one of the accent colors in your four-patch blocks to frame the work beautifully.
The heart of the Island Four Patch Quilt – Pattern is the block itself, which is essentially four squares of fabric sewn together to form a larger square. To start, you will need to cut several fabric strips of equal width. A common size for the Island Four Patch Quilt – Pattern is using 2.5-inch strips, which are often referred to as jelly rolls in the quilting community.
One of the most efficient ways to assemble an Island Four Patch Quilt – Pattern is through strip piecing. Instead of cutting individual small squares, you sew two long strips of contrasting fabric together along the long edge. This creates a “unit” that you can then sub-cut into smaller segments, saving you hours of time and ensuring much better piecing accuracy.
Once you have your sub-cut units, you will flip one of them over and join it to another, nesting the seams so they lock together perfectly. This creates the classic four-patch look required for the Island Four Patch Quilt – Pattern. Pressing your seams toward the darker fabric is a standard quilting technique that prevents the seam allowance from showing through the lighter fabric on the front.
Accuracy in cutting is vital for the Island Four Patch Quilt – Pattern. Use a rotary cutter, a self-healing cutting mat, and a non-slip quilting ruler to ensure every piece is exactly the same size. If your initial strips are even a fraction of an inch off, those errors will multiply as you assemble the quilt top, making it difficult to get the blocks to line up.
Organization is key when working on a large Island Four Patch Quilt – Pattern. I recommend using design boards or small trays to keep your cut pieces organized by color or value. This prevents you from accidentally sewing the wrong pieces together and helps you visualize how the colors are distributing across the overall quilt layout.
As you finish a set of blocks for your Island Four Patch Quilt – Pattern, take a moment to “square them up.” This means trimming the edges of each completed four-patch block so they are all exactly the same dimensions. This small extra step makes the final assembly of the Island Four Patch Quilt – Pattern much smoother and results in a flatter, more professional-looking quilt.
Now that your blocks are ready, it is time to arrange them into the full Island Four Patch Quilt – Pattern layout. This is where a design wall (or just a clean floor) becomes your best friend. Lay out all your four-patch blocks and move them around until the color distribution feels balanced. You want to avoid having too many “hot” colors like orange or red clumped together in one corner of your quilt.
Many versions of the Island Four Patch Quilt – Pattern use sashing, which are strips of fabric sewn between the blocks. Sashing acts like a frame for each block, giving the eye a place to rest and making the overall quilt design look more organized. For an island theme, a crisp white or a very pale “sand” colored sashing works wonders to make the colors pop.
When sewing your rows together for the Island Four Patch Quilt – Pattern, use a consistent 1/4-inch seam allowance. This is the “golden rule” of quilting. If your seams vary in width, your rows won’t match up, and the quilt top will become wavy or distorted. Most sewing machines have a specific foot designed to help you maintain this exact distance.
To add even more visual interest to your Island Four Patch Quilt – Pattern, you can include cornerstones in your sashing. These are small squares of fabric placed at the intersections where the sashing strips meet. Using a contrasting color for the cornerstones can create a secondary pattern that dances across the surface of the Island Four Patch Quilt – Pattern.
Once the rows are joined, you will likely want to add borders. Borders serve as the final frame for your Island Four Patch Quilt – Pattern. You can do a simple single border or a more complex double border with a thin “inner” strip and a wider “outer” strip. This adds “heft” to the quilt and allows you to adjust the final size to fit a specific bed.
The final step of the assembly is a thorough pressing. Press the entire quilt top of your Island Four Patch Quilt – Pattern from the center outward. Make sure there are no “pleats” at the seam lines. A well-pressed quilt top is much easier to quilt (the process of sewing the three layers together) because it lies flat and resists puckering.
With the quilt top completed, you are ready for the “quilting” stage of the Island Four Patch Quilt – Pattern. This involves creating a “quilt sandwich” by layering the quilt top, the batting (the middle fluff), and the backing fabric. Secure these layers together using basting pins or a temporary spray adhesive to prevent them from shifting while you sew.
For the Island Four Patch Quilt – Pattern, you have several options for the actual quilting design. Straight-line quilting or “stitching in the ditch” (sewing directly in the seams) is a great choice for beginners because it emphasizes the geometric nature of the four-patch blocks. It is clean, modern, and relatively easy to execute on a home machine.
If you want to lean into the tropical theme of the Island Four Patch Quilt – Pattern, consider free-motion quilting. You can quilt designs that look like waves, swirls, or even palm leaves. This adds a layer of artistry and movement to the quilt, making the flat fabric feel alive. If you aren’t comfortable doing this yourself, many quilters send their Island Four Patch Quilt – Pattern to a longarm quilter.
The batting you choose will affect the “loft” or thickness of your quilt. A cotton batting is traditional and gives a flatter, vintage look that gets softer with every wash. A polyester or wool batting will give your Island Four Patch Quilt – Pattern more puffiness and warmth. Consider the climate where the quilt will be used when making this choice.
Once the quilting is finished, trim the excess batting and backing so the edges are flush with the quilt top. Now it is time for the binding. The binding covers the raw edges and protects your Island Four Patch Quilt – Pattern from wear and tear. Most quilters use a double-fold binding for durability, sewing it to the front by machine and finishing it on the back by hand.
Lastly, don’t forget to add a quilt label to the back of your Island Four Patch Quilt – Pattern. Include your name, the date, and the name of the pattern. Quilts are often passed down through generations, and a label ensures that the history of your Island Four Patch Quilt – Pattern stays with it. You’ve now created a beautiful, functional piece of art!
Is the Island Four Patch Quilt – Pattern suitable for beginners?
Yes, it is one of the best patterns for beginners. Because it uses basic square shapes and straight lines, it helps new quilters practice their seam allowance and cutting skills without getting overwhelmed by complex angles.
How much fabric do I need for a standard throw-size quilt?
Generally, for a throw-size Island Four Patch Quilt – Pattern, you will need about 2 to 3 yards of focal fabrics and about 2 yards of background fabric, plus extra for the binding and backing.
Can I use pre-cut fabric like “Charm Packs” for this pattern?
Absolutely! Charm Packs (5-inch squares) are perfect for the Island Four Patch Quilt – Pattern. They allow you to have a wide variety of colors and patterns without having to buy full yards of each fabric.
What is the best thread to use for quilting this pattern?
A 50-weight cotton thread is the standard for piecing the Island Four Patch Quilt – Pattern. It is strong but thin enough that it doesn’t add bulk to your seams.
How do I care for my quilt once it is finished?
Wash your Island Four Patch Quilt – Pattern on a gentle cycle with cold water and a mild detergent. To preserve the colors and fibers, it is often best to air dry or tumble dry on low heat.
What makes this “Island” themed specifically?
The “Island” aspect usually comes from the color palette and the use of batiks. However, the Island Four Patch Quilt – Pattern is a structural layout, so you could easily make it look “Autumnal” or “Modern” just by changing the fabric choices.
In this article, we have explored the vibrant and rewarding process of creating an Island Four Patch Quilt – Pattern. From the initial excitement of selecting tropical-themed fabrics and batiks to the precision required in strip piecing and squaring up blocks, this pattern offers something for every skill level.
We discussed how to organize your quilt layout, the importance of sashing and borders, and the final steps of quilting and binding to ensure your project lasts for generations. This quilt design is truly a celebration of color and geometry, providing a relaxing yet engaging sewing experience.


