
Crochet Flower - Tutorial

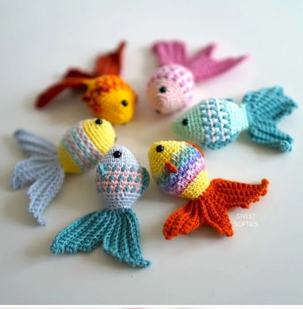
The Crochet Mosaic Fish- Pattern is one of the most vibrant and engaging projects a yarn enthusiast can undertake, blending geometric precision with artistic flair. Whether you are looking to create a stunning wall hanging, a textured blanket, or a unique kitchen accessory, the Crochet Mosaic Fish- Pattern offers a refreshing break from standard stitches. By using the mosaic crochet technique, you can create intricate, multicolored designs without the hassle of frequent yarn changes in the middle of a row, making it a favorite for those who love high-contrast visuals.
Diving into a Crochet Mosaic Fish- Pattern requires a bit of focus, but the results are incredibly rewarding for crafters of all skill levels. This specific fish design relies on the interplay of overlay mosaic crochet or inset mosaic crochet, which allows the “scales” and “fins” of the fish to pop against a contrasting background. Because the Crochet Mosaic Fish- Pattern is so versatile, you can easily adjust the scale of your project by changing your hook size or yarn weight, moving from a small amigurumi-style motif to a large-scale graphic masterpiece.
In this comprehensive guide, we will explore everything you need to know about mastering the Crochet Mosaic Fish- Pattern. We will break down the essential crochet supplies, the logic behind the mosaic charts, and the step-by-step process to ensure your handmade fish decor looks professional and polished. If you have been searching for a project that combines texture, colorwork, and a nautical theme, the Crochet Mosaic Fish- Pattern is exactly what your hook has been waiting for.
The foundation of any successful Crochet Mosaic Fish- Pattern lies in understanding how mosaic crochet differs from traditional colorwork. Unlike tapestry crochet, where you carry yarn behind your work, the mosaic technique typically involves working with one color at a time per row. This makes the Crochet Mosaic Fish- Pattern much more manageable for beginners who find managing multiple strands of yarn frustrating or prone to tangling.
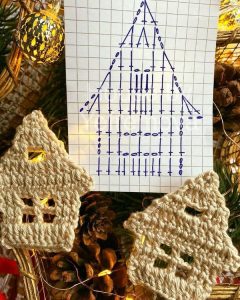
When you look at a Crochet Mosaic Fish- Pattern chart, you are essentially looking at a grid of single crochet and double crochet stitches. The magic happens when you work a long double crochet into a skipped stitch two rows below, which creates the vertical lines and shapes of the fish. This layering effect is what gives the Crochet Mosaic Fish- Pattern its signature “pixelated” or “mosaic” appearance that looks far more complex than it actually is.
To get started with your Crochet Mosaic Fish- Pattern, you will need two highly contrasting colors—usually a dark “background” and a light “pattern” color. This contrast is vital because the fish silhouette needs to be sharp and recognizable. Using a variegated yarn alongside a solid color can also yield stunning results, giving your Crochet Mosaic Fish- Pattern a shimmering, underwater effect that mimics real fish scales.
Choosing the right crochet hook is the next step in perfecting your Crochet Mosaic Fish- Pattern. Most designers recommend using a hook slightly smaller than what the yarn label suggests to ensure a tight, crisp stitch definition. A tighter tension prevents the background color from peeking through the mosaic stitches, ensuring that your Crochet Mosaic Fish- Pattern remains clean and the design remains the focal point.
It is also important to familiarize yourself with reading crochet charts, as most Crochet Mosaic Fish- Pattern instructions are presented visually. Each square on the grid represents a stitch, and specific symbols indicate when to drop down for a mosaic double crochet. Once you find the rhythm of the Crochet Mosaic Fish- Pattern, you will find that it becomes a meditative process where the image of the fish slowly emerges from the rows.
Finally, remember that the Crochet Mosaic Fish- Pattern is highly customizable in terms of application. You can repeat the motif to create a “school of fish” effect or use a single large fish as a centerpiece for a pillow. The Crochet Mosaic Fish- Pattern is not just a set of instructions; it is a template for your creativity, allowing you to experiment with nautical themes and vibrant fiber arts in a structured, rewarding way.
Before you pull your first loop, gathering the correct crochet tools is essential for a smooth Crochet Mosaic Fish- Pattern experience. You will primarily need worsted weight yarn or cotton yarn, depending on the intended use of your finished piece. For a mosaic dishcloth, cotton is superior due to its durability, while an acrylic or wool blend is perfect for a cozy Crochet Mosaic Fish- Pattern throw blanket.
The color palette you choose will define the mood of your Crochet Mosaic Fish- Pattern. Classic combinations like navy blue and white evoke a traditional maritime style, while neon oranges and bright yellows can create a tropical, “Clownfish” inspired look. High-quality mercerized cotton is often recommended for the Crochet Mosaic Fish- Pattern because it has a slight sheen and excellent stitch definition, which makes the mosaic pattern stand out.
You cannot complete a Crochet Mosaic Fish- Pattern without a set of ergonomic crochet hooks. Since mosaic crochet involves many repetitive movements and sometimes tighter tension, a comfortable grip will prevent hand fatigue during long crafting sessions. Ensure you have a range of sizes, such as 3.5mm to 5.0mm, so you can test which one produces the best fabric density for your specific Crochet Mosaic Fish- Pattern.
Stitch markers are your best friends when working on a Crochet Mosaic Fish- Pattern. Because the pattern relies on precise counting, marking the beginning of your repeats or the edges of the fish’s body will save you from having to “frog” (rip out) hours of work. In the Crochet Mosaic Fish- Pattern, missing just one dropped double crochet can throw off the entire alignment of the fins and eyes.
A pair of sharp yarn scissors and a tapestry needle are also required for finishing your Crochet Mosaic Fish- Pattern. Mosaic projects often result in many yarn tails if you are cutting the yarn at the end of every row, though some Crochet Mosaic Fish- Pattern variations use an “envelope border” to hide the ends. Regardless of the method, weave in your ends securely to ensure your crochet artwork lasts for years to come.
Lastly, consider having a digital row counter or a printed version of the Crochet Mosaic Fish- Pattern chart that you can mark off with a pencil. Staying organized is the secret to success with any colorwork crochet. When you keep track of your progress, the Crochet Mosaic Fish- Pattern transforms from a complex puzzle into a delightful and organized journey through the world of modern crochet design.
The first technical step in the Crochet Mosaic Fish- Pattern is the foundation row. Usually, this involves a series of foundation single crochets or a simple chain followed by a row of single crochet. This base provides the stability needed for the mosaic overlay to sit correctly. In the Crochet Mosaic Fish- Pattern, these initial rows set the width of your fish and determine the spacing of the scales.
Once the base is set, you will begin the color rotation characteristic of the Crochet Mosaic Fish- Pattern. You will work two rows in Color A, then two rows in Color B (in the case of inset mosaic) or alternate every row (in overlay mosaic). The Crochet Mosaic Fish- Pattern usually starts from the tail and moves toward the head, or vice versa, depending on the specific crochet chart you are following.
The defining stitch of the Crochet Mosaic Fish- Pattern is the MDC (Mosaic Double Crochet). This stitch is worked into the front loop of a stitch from two rows below, skipping the stitch behind it on the current row. This is how the “fish” shapes are “painted” onto the background fabric. Mastery of this stitch is what allows the Crochet Mosaic Fish- Pattern to take on its three-dimensional, textured appearance.
As you progress through the middle of the Crochet Mosaic Fish- Pattern, you will encounter the body of the fish. This is where the geometric repeats become most frequent. It is crucial to maintain consistent tension here; if your long stitches are too tight, the fabric will pucker, ruining the flat look of your Crochet Mosaic Fish- Pattern. If they are too loose, the fish will look distorted and messy.
Adding details like the eye or the curvature of the gills in a Crochet Mosaic Fish- Pattern requires careful attention to the chart. These small details are often created by a single mosaic stitch placed strategically within the field of the background color. These “anchor points” in the Crochet Mosaic Fish- Pattern are what give the creature its character and make the final product look like a professional piece of fiber art.
The final rows of your Crochet Mosaic Fish- Pattern will typically involve a finishing border or a simple row of single crochet to “lock” the pattern in place. If you are making a scarf or a blanket, you might consider adding a fringe or a double border to hide the yarn carries. Completing the Crochet Mosaic Fish- Pattern is a moment of great satisfaction as you see the final tail fin take shape and the underwater scene come to life.
To make your Crochet Mosaic Fish- Pattern truly stand out, consider the “Blocking” process. Blocking involves wetting your finished piece and pinning it to a board to dry in the correct shape. For a Crochet Mosaic Fish- Pattern, blocking is essential because it opens up the stitches and allows the mosaic design to lay perfectly flat, highlighting the crisp lines of the fish’s silhouette.
Another tip for a flawless Crochet Mosaic Fish- Pattern is to use the “standing stitch” method when joining new yarn colors. This prevents the bulky knots that can sometimes appear at the edges of mosaic crochet. By keeping your edges clean, your Crochet Mosaic Fish- Pattern will have a much more professional finish, making it suitable for gifting or even selling at craft fairs.
If you find that your Crochet Mosaic Fish- Pattern is leaning to one side, you may be working your stitches with a slight slant. This is common in overlay mosaic. To fix this, try to ensure your double crochets are perfectly vertical. Some crafters find that using a wooden crochet hook provides more grip, which can help stabilize the stitches in a complex Crochet Mosaic Fish- Pattern.
Experimenting with yarn textures can also elevate your Crochet Mosaic Fish- Pattern. While smooth yarns are standard, using a slightly fuzzy yarn for the background and a smooth, shiny yarn for the fish can create a “depth of field” effect. This makes the Crochet Mosaic Fish- Pattern look like it is swimming in murky water, adding an element of artistic realism to your crochet work.
Don’t be afraid to modify the Crochet Mosaic Fish- Pattern to suit your needs. If the pattern is too wide for your project, you can remove some of the background stitches on either side. Mosaic crochet is essentially math-based art, so as long as you keep your repeats consistent, the Crochet Mosaic Fish- Pattern is quite forgiving when it comes to structural adjustments.
Lastly, always take photos of your Crochet Mosaic Fish- Pattern in natural light. The shadows and highlights of the textured stitches are best captured when the sun is bright, showing off the intricate work you’ve put into your handcrafted project. Sharing your Crochet Mosaic Fish- Pattern on social media or in crochet communities is a great way to inspire others and get feedback on your color choices.
1. Is the Crochet Mosaic Fish- Pattern suitable for beginners?
Yes, if you know the basic single and double crochet stitches, you can learn the Crochet Mosaic Fish- Pattern. It requires patience and counting, but it is not as difficult as it looks!
2. How much yarn do I need for a standard Crochet Mosaic Fish- Pattern?
For a small wall hanging, you typically need about 200-300 yards of each color. However, the Crochet Mosaic Fish- Pattern consumption depends entirely on the size of your project.
3. Can I use the Crochet Mosaic Fish- Pattern to make a blanket?
Absolutely! You can repeat the fish motif in rows or columns to create a full-sized nautical blanket. It is a very popular way to use the Crochet Mosaic Fish- Pattern.
4. What is the difference between Overlay and Inset in this pattern?
Overlay mosaic (common for this pattern) usually involves cutting yarn at each row, while inset mosaic involves working two rows of the same color before switching, avoiding many ends.
5. How do I read the Crochet Mosaic Fish- Pattern chart?
Each square is a stitch. An empty square is usually a single crochet, and a square with an ‘X’ or a symbol is a double crochet worked into the row below.
6. Do I need to block my finished fish project?
While not mandatory, blocking is highly recommended for the Crochet Mosaic Fish- Pattern to ensure the fish shape is clearly defined and the fabric sits flat.
In this article, we have explored the wonderful world of the Crochet Mosaic Fish- Pattern, covering everything from the basic logic of mosaic stitches to the essential tools and finishing techniques. We learned that the Crochet Mosaic Fish- Pattern is a versatile and visually striking method to create ocean-themed crochet art that looks complex but is accessible to anyone willing to follow a chart. By mastering the MDC stitch and choosing high-contrast yarns, you can create stunning pieces that celebrate the beauty of aquatic life through the lens of modern fiber craft.
The Crochet Mosaic Fish- Pattern is more than just a hobby; it is a way to express creativity and build something durable and beautiful with your own hands. We hope this guide has inspired you to pick up your hook and start your own mosaic journey.


