
Crochet Flower - Tutorial

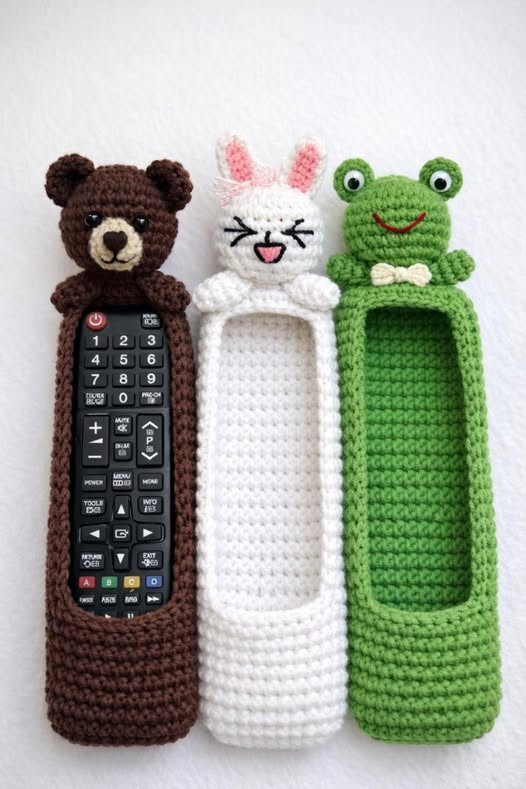
Finding the perfect Crochet Remote Control Covers – Pattern is a fantastic way to combine home organization with the cozy, artisanal charm that only handmade items can provide. In many modern households, the living room coffee table is often cluttered with various plastic devices that look cold and utilitarian, but a well-crafted Crochet Remote Control Covers – Pattern can instantly soften the room’s aesthetic. Beyond just looking beautiful, these covers serve a practical purpose by protecting your expensive electronics from scratches, dust, and the inevitable wear and tear of daily use.
When you dive into the world of making a Crochet Remote Control Covers – Pattern, you are essentially creating a custom-fit “sweater” for your technology. Most people don’t realize how much dirt and oil accumulate on buttons over time, but by utilizing a Crochet Remote Control Covers – Pattern, you create a washable barrier that keeps your remotes hygienic and easy to find. The texture of the yarn also provides a superior grip, making it less likely for the remote to slide off the arm of the sofa or slip out of your hand during a movie night.
The versatility of a Crochet Remote Control Covers – Pattern is truly endless, as it allows you to match your living room decor or even create themed sets for different holidays. Whether you prefer a minimalist look with neutral tones or a vibrant, eclectic style with variegated yarns, the right Crochet Remote Control Covers – Pattern acts as a blueprint for your creativity. In this article, we will explore everything you need to know about selecting materials, measuring your devices, and executing the perfect stitches to bring your vision to life.
Choosing the right material is the first and most critical step when starting your Crochet Remote Control Covers – Pattern. Since remotes are handled frequently, you want a yarn that is durable, non-slip, and easy to clean, such as mercerized cotton or a high-quality acrylic blend. Cotton is particularly excellent for a Crochet Remote Control Covers – Pattern because it doesn’t stretch out of shape easily and offers great stitch definition, which is important for the small scale of this project.
The weight of the yarn will dictate the bulkiness of your finished Crochet Remote Control Covers – Pattern. Most crafters prefer using a fingering weight or sport weight yarn to ensure the cover remains sleek and doesn’t interfere with the ease of pressing the buttons. If you choose a yarn that is too thick for your Crochet Remote Control Covers – Pattern, the remote might feel cumbersome to hold, and you may struggle to feel the tactile feedback of the buttons through the fabric.
Your crochet hook should be slightly smaller than what is recommended on the yarn label to create a tight, dense fabric for your Crochet Remote Control Covers – Pattern. A dense stitch pattern ensures that the plastic of the remote doesn’t peek through the holes and provides better protection against spills. For a standard Crochet Remote Control Covers – Pattern, a 2.5mm or 3.0mm hook is usually the “sweet spot” for achieving that snug, professional-looking fit.
Color choice plays a significant role in the functionality of your Crochet Remote Control Covers – Pattern. Darker colors are excellent at hiding the oils and stains from frequent handling, while bright, neon colors make it much harder to lose the remote between the couch cushions. Many people using a Crochet Remote Control Covers – Pattern like to color-code their devices—using blue for the TV, red for the gaming console, and green for the soundbar—to stay organized.
Elasticity is another factor to consider when following a Crochet Remote Control Covers – Pattern. Some patterns incorporate a tiny bit of elastic thread held alongside the yarn at the opening to ensure the cover stays securely on the device without slipping off. If your Crochet Remote Control Covers – Pattern doesn’t include this, choosing a stitch with natural “give,” like a ribbed stitch, can provide that necessary tension to keep the cover in place.
Lastly, think about the “feel” of the yarn against your skin as you work on the Crochet Remote Control Covers – Pattern. Since you will be holding this item for hours while watching television, a soft, breathable fiber is much more pleasant than something scratchy or purely synthetic. Investing in a soft, premium yarn for your Crochet Remote Control Covers – Pattern makes the finished product feel like a luxury accessory rather than just a functional sleeve.
The most common mistake when starting a Crochet Remote Control Covers – Pattern is not taking accurate measurements of the specific remote you intend to cover. Every brand—whether it’s Samsung, Apple, or Roku—has different dimensions, ranging from slim and long to short and chunky. Before you begin the first row of your Crochet Remote Control Covers – Pattern, use a flexible measuring tape to record the height, width, and depth (thickness) of the device.
To ensure your Crochet Remote Control Covers – Pattern fits like a glove, you actually want to aim for “negative ease.” This means the finished crochet piece should be slightly smaller than the remote itself, allowing the fabric to stretch and hug the device snugly. A loose Crochet Remote Control Covers – Pattern will slide around, making it difficult to find the buttons and potentially causing the remote to fall out of its protective sleeve.
When working with a Crochet Remote Control Covers – Pattern, you usually start at the bottom with a foundation chain that matches the width and depth combined. Many patterns use a “top-down” or “bottom-up” construction, working in a continuous spiral to avoid a visible seam. This seamless method in a Crochet Remote Control Covers – Pattern is ideal because it prevents any bulky ridges from irritating your hand while you are using the remote.
Don’t forget to account for the “sensor” or the infrared (IR) window at the top of the remote within your Crochet Remote Control Covers – Pattern. If you cover the IR window with thick yarn, the signal won’t reach your TV, and the remote won’t work. A well-designed Crochet Remote Control Covers – Pattern will include instructions on how to create a small “buttonhole” or a sheer mesh section at the top to allow the signal to pass through unimpeded.
The back of the remote often has a battery compartment that you may need to access, so consider if your Crochet Remote Control Covers – Pattern should be easily removable. Some designs feature a “flap and button” closure at the bottom, while others are simple sleeves that can be slid off. Deciding on the closure method early in the Crochet Remote Control Covers – Pattern process will save you from having to frog your work later on to make adjustments.
If your remote has a touch-sensitive pad or a voice-control microphone, your Crochet Remote Control Covers – Pattern must leave these areas exposed. You can achieve this by working back and forth in rows for a portion of the pattern to create a window, then returning to working in the round. Customizing a Crochet Remote Control Covers – Pattern in this way ensures that the smart features of your modern devices remain fully functional.
The single crochet (sc) is the most common stitch used in a Crochet Remote Control Covers – Pattern because it creates a flat, solid fabric that provides excellent protection. It is also a very easy stitch to count, which is helpful when you are trying to maintain symmetry on both sides of the device. When you follow a Crochet Remote Control Covers – Pattern using single crochet, the result is a classic, timeless look that fits any home style.
For those who want a bit more texture, the waistcoat stitch (also known as the knit stitch) is a brilliant variation for a Crochet Remote Control Covers – Pattern. This stitch looks exactly like a knitted “V” and produces a very thick, sturdy fabric that is less stretchy than regular crochet. Using this technique within your Crochet Remote Control Covers – Pattern makes the cover feel incredibly premium and offers the best protection against drops.
The half-double crochet (hdc) is another popular choice for a Crochet Remote Control Covers – Pattern when you want to finish the project a bit faster. It provides a slightly softer drape than the single crochet while still being dense enough to protect the remote. If you are making a Crochet Remote Control Covers – Pattern for a larger, older remote with many buttons, the hdc can help the fabric mold around the bulky shape more easily.
If you are a fan of intricate designs, you can incorporate tapestry crochet into your Crochet Remote Control Covers – Pattern. This allows you to work with two or more colors at once, creating patterns like chevrons, hearts, or even text. Adding a name or a “TV” icon using tapestry crochet techniques within the Crochet Remote Control Covers – Pattern makes the item a wonderful personalized gift for friends and family.
Creating a “ribbed” effect at the opening of your Crochet Remote Control Covers – Pattern is a great way to ensure a secure fit. By using front post and back post double crochet stitches, you create a stretchy band that functions like the cuff of a sweater. This technical addition to your Crochet Remote Control Covers – Pattern prevents the top from flaring out over time and keeps the device tucked safely inside.
Finally, consider using a transparent nylon thread if you want to create a “window” for the buttons within your Crochet Remote Control Covers – Pattern. You can alternate rows of yarn with rows of nylon thread, allowing the labels on the buttons to remain visible while still providing the structural benefits of the cover. This advanced modification to a standard Crochet Remote Control Covers – Pattern is perfect for remotes with complex layouts.
Once the main body of your Crochet Remote Control Covers – Pattern is complete, the finishing touches are what make it truly stand out. Weaving in your ends securely is paramount; since the remote will be slid in and out of the cover occasionally, loose tails can quickly become unraveled. Use a sharp tapestry needle to weave the ends through the densest part of the Crochet Remote Control Covers – Pattern to ensure they stay hidden.
Adding a small leather or faux-leather tag to the side of your Crochet Remote Control Covers – Pattern can give it a high-end, boutique feel. You can even stamp the tag with labels like “Living Room” or “Bedroom” to keep your remotes from migrating to different parts of the house. These small aesthetic details turn a simple Crochet Remote Control Covers – Pattern into a thoughtful piece of interior design.
For households with children or pets, you might want to consider adding a lanyard or wrist strap to your Crochet Remote Control Covers – Pattern. By crocheting a simple chain or a small cord and attaching it to the bottom of the cover, you can hang the remote on a hook on the side of the TV stand. This simple addition to the Crochet Remote Control Covers – Pattern ensures the remote never ends up lost in a toy box or chewed on by a dog.
Blocking is a step often skipped in small projects, but it can help your Crochet Remote Control Covers – Pattern look much more polished. Simply dampen the cover and insert the remote (wrapped in plastic wrap to protect it) into the sleeve, then let it dry. This helps the stitches settle into the shape of the remote, ensuring that the Crochet Remote Control Covers – Pattern looks perfectly tailored once it is fully dry.
Hygiene is a major benefit of using a Crochet Remote Control Covers – Pattern. Unlike the remote itself, which can be difficult to sanitize without damaging the electronics, the cover can be popped into a mesh laundry bag and washed. Regular maintenance of your Crochet Remote Control Covers – Pattern keeps your living space germ-free and ensures the yarn stays vibrant and fresh-smelling for years to come.
Ultimately, the best part of finishing a Crochet Remote Control Covers – Pattern is the satisfaction of seeing a once-boring piece of plastic transformed into a cozy accessory. Whether you make one for every device in your home or give them away as stocking stuffers, the Crochet Remote Control Covers – Pattern is a quick, rewarding project. It’s a perfect way to use up “scrap yarn” while solving a common household problem with style and grace.
1. Does a Crochet Remote Control Covers – Pattern interfere with the signal?
As long as you leave an opening or use a very loose stitch at the very top of the remote where the infrared sensor is located, it will not interfere. If your Crochet Remote Control Covers – Pattern covers the IR window entirely with thick yarn, the signal will be blocked, and you will have to point the remote very precisely or remove the cover to use it.
2. How do I know which hook size to use for my Crochet Remote Control Covers – Pattern?
The best way to decide is to make a small gauge swatch. If the fabric feels too holy or loose, move down a hook size. For a Crochet Remote Control Covers – Pattern, you want the fabric to be dense enough that you can’t see the remote’s color through the stitches, which usually requires a 2.0mm to 3.5mm hook depending on your yarn.
3. Can I make a Crochet Remote Control Covers – Pattern for a voice-activated remote?
Yes! You just need to identify where the microphone hole is on your device. When you reach that section in your Crochet Remote Control Covers – Pattern, you can create a small “eyelet” (chain one, skip one stitch) to ensure your voice can still reach the microphone clearly without being muffled by the yarn.
4. What is the best yarn for a Crochet Remote Control Covers – Pattern that won’t slip?
Cotton yarn is generally the best for grip. If you find your Crochet Remote Control Covers – Pattern is still too slippery, you can add a few dots of “puff paint” or clear silicone on the back of the cover. Once dry, these dots provide an anti-slip surface that keeps the remote securely in your hand.
5. How do I wash my finished Crochet Remote Control Covers – Pattern?
If you used cotton or acrylic, you can hand wash it in warm soapy water or put it in a delicate wash cycle. Always remove the remote before washing! Lay the Crochet Remote Control Covers – Pattern flat to air dry to prevent it from shrinking or stretching unevenly in the dryer.
6. Is there a Crochet Remote Control Covers – Pattern for remotes with touchscreens?
For remotes like the Apple TV remote with a touch surface, you should modify the Crochet Remote Control Covers – Pattern to have a large open window on the top half. This allows you to slide your thumb across the touch area while the rest of the device remains protected by the crochet sleeve.
In this article, we have thoroughly explored how a Crochet Remote Control Covers – Pattern serves as both a functional protector and a stylish home accessory. We discussed the importance of choosing the right materials, like mercerized cotton for durability, and how to measure your devices to ensure a perfect, snug fit with negative ease. We also covered essential stitches like the single crochet and more advanced techniques like tapestry crochet to help you personalize your Crochet Remote Control Covers – Pattern to match your unique home decor.
Beyond just the construction, we highlighted the practical benefits of using a Crochet Remote Control Covers – Pattern, such as improved hygiene through easy washing and better organization through color-coding. Whether you are a beginner looking for a quick weekend project or an expert looking to use up your yarn stash, a Crochet Remote Control Covers – Pattern is an excellent choice that brings a touch of handmade warmth to your digital life.


