
Patchwork Bird Tutorial

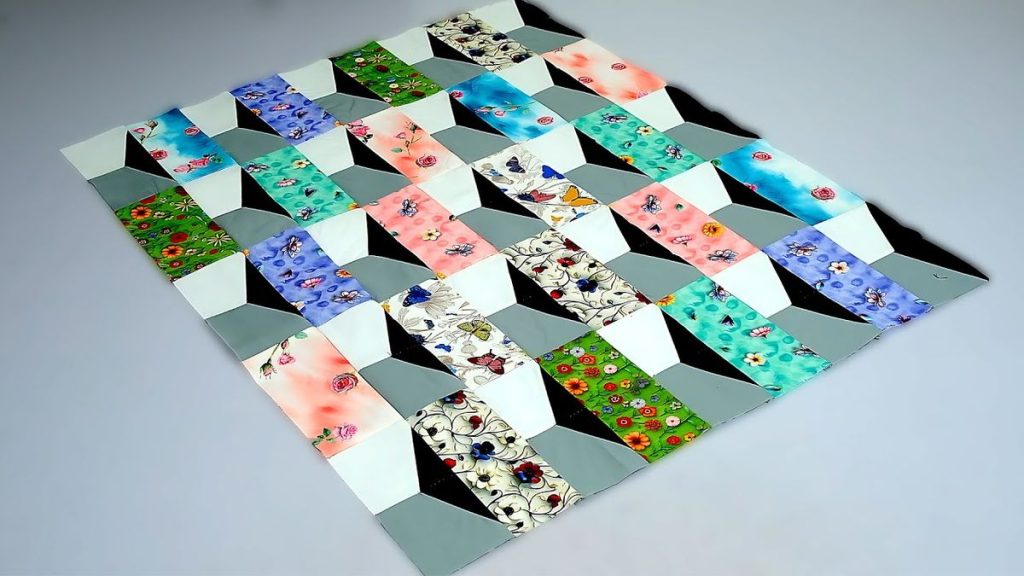
Mastering the 3D Fabric Block – Pattern is an exhilarating milestone for any sewing enthusiast or quilter looking to move beyond two-dimensional designs into the world of optical illusions. This specific technique uses clever placement of color and value to create a sense of depth, making flat fabric appear as though it is popping out of the quilt top. Whether you are aiming to create the classic “Tumbling Blocks” look or a modern architectural design, understanding the mechanics of a 3D Fabric Block – Pattern is essential for achieving that mesmerizing, three-dimensional effect.
The secret behind a successful 3D Fabric Block – Pattern lies in the strategic use of light, medium, and dark fabric tones to simulate highlights and shadows. When you follow a 3D Fabric Block – Pattern, you aren’t just sewing shapes together; you are essentially painting with textile pieces to fool the eye. This process requires a bit more planning than a traditional quilt block, as the orientation of each diamond or triangle must be precise to maintain the illusion of volume and structure throughout the entire project.
As you explore the possibilities of the 3D Fabric Block – Pattern, you will discover that it is a versatile foundation for pillows, wall hangings, and full-sized bed quilts. Many modern designers are taking the traditional 3D Fabric Block – Pattern and updating it with bold, solid colors or large-scale prints to create high-contrast statements. In this article, we will dive deep into the technical requirements, the importance of fabric value, and the best assembly methods to ensure your 3D Fabric Block – Pattern project is a stunning success that captures the imagination of everyone who sees it.
The most common shape used in a 3D Fabric Block – Pattern is the 60-degree diamond. When three of these diamonds are joined at a center point, they create a hexagon that looks like a three-dimensional cube. This geometric relationship is the “magic” behind the 3D Fabric Block – Pattern, as it mimics the way we perceive corners in real space. Understanding how these angles interact is the first step toward mastering the layout and ensuring your lines are sharp.
In a 3D Fabric Block – Pattern, the angle of each cut is non-negotiable. If your diamonds are off by even a single degree, the blocks will not nest together properly, and the 3D effect will be lost to puckered seams. This is why many quilters use specialized rulers designed specifically for a 3D Fabric Block – Pattern to ensure every 60-degree cut is identical. Consistency is the primary rule when you are dealing with such precise geometric interlocking.
The orientation of the shapes within the 3D Fabric Block – Pattern determines the “source” of the light in your design. By keeping the “light” fabric consistently on the top and the “dark” fabric on the right side, you create a uniform sense of depth. If you flip these positions randomly, the 3D Fabric Block – Pattern will lose its structural logic, resulting in a confusing jumble of shapes rather than a cohesive 3D landscape.
Y-seams are a hallmark of the traditional 3D Fabric Block – Pattern. Unlike standard straight-line quilting, a Y-seam requires you to stop your stitching exactly 1/4 inch before the edge of the fabric to allow a third piece to be inset. While some find this daunting, a well-written 3D Fabric Block – Pattern will provide clear markings to show you exactly where to start and stop your needle. Mastering this skill is a rite of passage for advanced quilters.
For those who want to avoid Y-seams, there are modern variations of the 3D Fabric Block – Pattern that use “half-rectangle triangles” or strip-piecing methods. These shortcuts allow you to achieve the same visual depth without the technical difficulty of inset seams. When selecting your 3D Fabric Block – Pattern, check the assembly instructions to see which method fits your current skill level and desired timeframe.
Ultimately, the goal of the 3D Fabric Block – Pattern is to create a rhythm. As you repeat the blocks across the surface of your quilt, the individual shapes disappear, and the eye begins to see a series of boxes or “steps.” This transition from individual pieces to a collective illusion is what makes the 3D Fabric Block – Pattern one of the most intellectually stimulating designs in the world of textile arts.
Value is more important than color when it comes to a 3D Fabric Block – Pattern. In quilting terms, “value” refers to how light or dark a fabric is in comparison to others. To make a 3D Fabric Block – Pattern work, you need three distinct values: a light (the highlight), a medium (the mid-tone), and a dark (the shadow). Without these three tiers, the three-dimensional illusion will simply fall flat, regardless of how well you sew.
When shopping for your 3D Fabric Block – Pattern, a helpful trick is to take a photo of your fabric choices and turn the filter to “Grayscale” on your phone. If the fabrics look distinct from one another in black and white, they will work perfectly for your 3D Fabric Block – Pattern. If two of the fabrics blend together in the grayscale image, they won’t provide enough contrast to define the edges of your “cubes.”
Solid fabrics are often the preferred choice for a 3D Fabric Block – Pattern because they don’t have distracting prints that can break the illusion. Bold, saturated solids allow the geometry of the 3D Fabric Block – Pattern to take center stage. However, “near-solids” or “blenders” with subtle textures can also add a beautiful, sophisticated touch without interfering with the perceived depth of the block.
If you choose to use prints in your 3D Fabric Block – Pattern, keep the scale in mind. Large, busy floral prints can camouflage the seams, which is exactly what you don’t want when the seams are the very things creating the 3D effect. Small-scale, non-directional prints are much safer for a 3D Fabric Block – Pattern as they allow the shape of the diamond to remain the dominant visual element.
Color temperature also plays a role in how the 3D Fabric Block – Pattern is perceived. Warm colors like red, orange, and yellow tend to “advance” or pop forward, while cool colors like blue and green “recede.” You can use this to your advantage in a 3D Fabric Block – Pattern to create even more extreme depth by using warm tones for the highlights and cool tones for the shadows.
Don’t forget the importance of the “background” or “negative space” around your 3D Fabric Block – Pattern. If you are creating a wall hanging, choosing a background fabric that contrasts with all three values of your blocks will help the 3D shapes stand out even more. A neutral grey or crisp white often serves as the perfect canvas for a vibrant 3D Fabric Block – Pattern project.
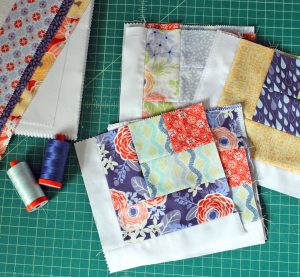
Precision begins at the cutting table when working with a 3D Fabric Block – Pattern. A sharp rotary cutter with a fresh blade is essential, as you will likely be cutting through multiple layers of fabric. Even a tiny “nick” in your fabric can lead to frayed edges that compromise the 1/4-inch seam allowance required for the 3D Fabric Block – Pattern to align perfectly.
Using a 60-degree triangle ruler or a specialized diamond ruler will save you hours of frustration. These tools are marked with specific lines that help you align the grain of the fabric with the edges of the 3D Fabric Block – Pattern. When your fabric grain is aligned correctly, the pieces are less likely to stretch or distort as you handle them, which is vital for the geometric accuracy of the project.
A high-quality cutting mat with clear grid lines is another “must-have” for the 3D Fabric Block – Pattern. You should use the lines on the mat only as a general guide, relying on your ruler for the actual measurement. Keeping your workspace clean and organized allows you to keep track of your “light,” “medium,” and “dark” stacks, preventing any accidental mix-ups during the 3D Fabric Block – Pattern assembly.
Pins or clips are indispensable when joining the diamonds of a 3D Fabric Block – Pattern. Because many of the seams meet at sharp points, you need to pin precisely at the intersection. Most 3D Fabric Block – Pattern experts recommend “nesting” the seams—pressing them in opposite directions so they lock together—to reduce bulk at the corners and ensure the points are as sharp as possible.
Starch is a secret weapon for the 3D Fabric Block – Pattern. By starching your fabric before you cut it, you give the cotton a paper-like stiffness. This prevents the bias edges (the diagonal cuts) of your diamonds from stretching. Since a 3D Fabric Block – Pattern involves many diagonal seams, starching ensures that your blocks stay the exact size intended by the pattern designer.
Finally, a reliable sewing machine with a dedicated 1/4-inch foot will make the construction of your 3D Fabric Block – Pattern much more enjoyable. Consistent seam width is the difference between a block that lies perfectly flat and one that “bubbles” in the center. Taking the time to test your seam allowance before starting your 3D Fabric Block – Pattern will ensure a professional-grade finish.
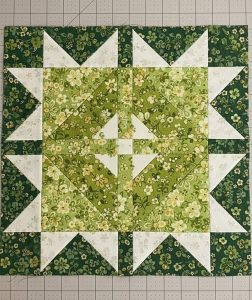
Once you have mastered the basic unit of the 3D Fabric Block – Pattern, you can begin to experiment with different layouts. The “Tumbling Blocks” arrangement is the most traditional, where the blocks are stacked in columns to create a honeycomb of cubes. However, you can also arrange a 3D Fabric Block – Pattern in a “star” configuration, where the blocks radiate from a central point for a dramatic, exploding effect.
Modern “Optical Art” or “Op-Art” quilts often use the 3D Fabric Block – Pattern to create the illusion of stairs or woven ribbons. By varying the placement of your dark and light values across the quilt top, you can make some areas of the 3D Fabric Block – Pattern look deeper than others. This advanced technique turns a standard quilt into a piece of fine art that demands a second look.
Borders play a significant role in the presentation of a 3D Fabric Block – Pattern. A dark, solid border can act like a “shadow box,” making the 3D elements look as though they are contained within a frame. Alternatively, you can have the 3D Fabric Block – Pattern bleed off the edges of the quilt for a “floating” look that feels modern and expansive.
Quilting the layers together (the actual stitching through the top, batting, and backing) should enhance the 3D Fabric Block – Pattern, not hide it. “Stitch-in-the-ditch” is a popular choice because it defines the edges of the blocks without adding extra visual noise. For a more creative approach, you could quilt geometric lines that follow the perspective of the 3D Fabric Block – Pattern.
Thread choice is also a factor in the final look of your 3D Fabric Block – Pattern. Many quilters use a fine, 50-weight thread in a neutral color so the stitches disappear into the fabric. If you want the “structure” of the 3D Fabric Block – Pattern to be the star, choose a thread that matches your medium-value fabric to keep the focus on the shapes themselves.
Finally, don’t forget to label your work. A 3D Fabric Block – Pattern project is an impressive feat of skill and patience. Adding a fabric label to the back with the name of the 3D Fabric Block – Pattern, your name, and the date ensures that your creative legacy is preserved. Whether it’s a gift or a personal treasure, your 3D masterpiece is a testament to your growth as a maker.
1. Is the 3D Fabric Block – Pattern too difficult for a beginner?
It is considered an intermediate-to-advanced technique due to the precision required. However, a beginner who is comfortable with their sewing machine and understands the importance of a 1/4-inch seam can succeed by starting with a small project, like a pillow cover, using a simplified 3D Fabric Block – Pattern.
2. Do I have to use Y-seams for every 3D Fabric Block – Pattern?
No! While the traditional “Tumbling Blocks” design uses Y-seams, there are many modern “no-Y-seam” versions of the 3D Fabric Block – Pattern available. These often use triangles or rectangles to build the block in rows, making them much more accessible for most quilters.
3. What kind of fabric is best for a 3D Fabric Block – Pattern?
High-quality, 100% quilting cotton is the best choice. It holds a crease well, is easy to cut accurately, and comes in an endless array of solid colors and “blenders” that are perfect for establishing the light, medium, and dark values needed for the 3D Fabric Block – Pattern.
4. How do I choose the “light,” “medium,” and “dark” colors for my pattern?
A good rule of thumb is to choose three shades of the same color (like sky blue, royal blue, and navy). Alternatively, you can use high-contrast colors, such as white (light), grey (medium), and black (dark), to make the 3D Fabric Block – Pattern look like architectural sketches.
5. Why is my 3D Fabric Block – Pattern not lying flat?
This is usually caused by either inconsistent seam allowances or stretching the bias edges of the fabric. Using starch and a dedicated 1/4-inch foot on your sewing machine are the two best ways to ensure your 3D Fabric Block – Pattern remains perfectly flat.
6. Can I make a 3D Fabric Block – Pattern using a regular ruler?
While you can use the 60-degree lines on a standard acrylic ruler, it is much easier to use a ruler specifically designed for diamonds or triangles. These specialized tools often have “blunted” corners that help you align the pieces of your 3D Fabric Block – Pattern without the guesswork of overlapping points.
In this article, we have explored the fascinating world of the 3D Fabric Block – Pattern, a technique that blends mathematical precision with artistic vision. We’ve learned that the success of a 3D Fabric Block – Pattern relies heavily on the “rule of three”—using light, medium, and dark fabric values to create the illusion of depth.
We also covered the essential tools, such as 60-degree rulers and starch, that help maintain the accuracy needed for these geometric shapes to fit together perfectly.


