
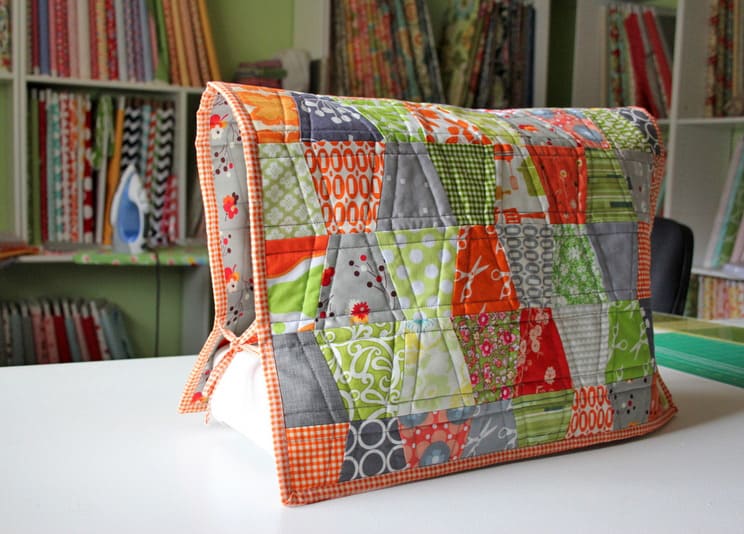
Patchwork Bird Tutorial

Creating a DIY Sewing Machine Cover – Pattern is one of the most rewarding projects for any sewing enthusiast, offering both a functional way to protect your equipment and a creative outlet to personalize your workspace. Whether you are a seasoned pro or a complete beginner, making your own sewing machine cover ensures that your machine stays free from dust, lint, and accidental scratches that can happen in a busy craft room. By following a dedicated DIY Sewing Machine Cover – Pattern, you can tailor the dimensions to fit your specific model perfectly, unlike generic store-bought versions that often feel loose or bulky.
The beauty of a DIY Sewing Machine Cover – Pattern lies in its versatility and the opportunity to use up your favorite fabric scraps or coordinated fat quarters. Beyond the aesthetic appeal, a custom-made sewing machine cover acts as a shield for the sensitive internal components of your machine, potentially extending its lifespan and reducing the need for frequent professional cleanings. This project is widely considered an essential “right of passage” for makers because it teaches fundamental skills like measuring, cutting straight lines, and finishing edges, all while resulting in a highly practical accessory.
In this comprehensive guide, we will dive deep into everything you need to know about the DIY Sewing Machine Cover – Pattern process, from selecting the right materials to mastering the assembly. We will explore various sewing patterns, discuss the importance of fabric choice, and provide step-by-step insights into making a quilted sewing machine cover or a simple heavy-duty canvas cover. By the end of this article, you will have the confidence to create a beautiful, protective piece that reflects your unique style and keeps your creative engine running smoothly for years to come.
When you start your DIY Sewing Machine Cover – Pattern, the first thing you need to consider is the fabric weight and durability. Since the primary goal of a sewing machine cover is protection, opting for sturdy materials like cotton canvas, denim, or upholstery fabric is usually a smart move. These fabrics provide a structured look and feel that holds its shape over the machine without sagging.
If you prefer a softer look, you can use quilting cotton paired with a layer of fusible fleece or batting. This adds a cushioned layer of protection, which is excellent for absorbing minor impacts if you move your machine around. Many popular DIY Sewing Machine Cover – Patterns recommend this “sandwich” method to give the cover a professional, high-end finish that stands up on its own.
Don’t forget about the lining fabric, which should be smooth to prevent snagging on any knobs or levers on your machine. A simple muslin or a slick polyester lining works wonders here, ensuring that you can slide the cover on and off with ease. Choosing a contrasting color for the lining can also add a fun “pop” of personality every time you lift the cover to start a new project.
Thread choice is equally important when working on your DIY Sewing Machine Cover – Pattern. Use a high-quality all-purpose polyester thread that matches or complements your fabric choice. Since the seams will experience some tension as you pull the cover over the machine, a strong thread ensures your handmade cover won’t fall apart after a few months of regular use.
Measuring tools are the backbone of a successful DIY Sewing Machine Cover – Pattern. You will need a flexible measuring tape, a clear acrylic ruler, and tailor’s chalk or a disappearing ink pen. Precision is key here; taking exact measurements of your machine’s height, width, and depth (including the handwheel and spool pins) ensures your custom pattern fits like a glove.
Lastly, consider adding notions like bias tape for finishing raw edges or interfacing for extra stability. If your DIY Sewing Machine Cover – Pattern includes pockets for your foot pedal or power cord, you might also need elastic or velcro to keep things secure. Gathering all these supplies beforehand makes the sewing process much smoother and more enjoyable from start to finish.
The secret to a professional-looking DIY Sewing Machine Cover – Pattern is all in the measurements. You cannot rely on “standard” sizes because every machine, from a vintage Singer to a modern Janome, has unique protrusions. Start by measuring the total width of your machine from the leftmost edge to the outer edge of the handwheel, adding at least an inch for “wiggle room.”
Next, measure the height of the machine from the base to the highest point, which is usually the top of the thread spool pin or the handle. It is vital to include these peaks in your DIY Sewing Machine Cover – Pattern calculations so the fabric doesn’t strain or pull at the top. Forgetting the height of a spool of thread is a common mistake that can lead to a cover that sits lopsided.
The depth of the machine is the third critical dimension, measured from the front face to the very back. When drafting your DIY Sewing Machine Cover – Pattern, you essentially need to create three main pieces: a long center panel that wraps over the top and two side panels. Ensure you account for seam allowances (typically 1/4 or 1/2 inch) on every single side of your fabric pieces.
If your machine has an extension table or a specific attachment you leave on, measure the machine with those items in place. A DIY Sewing Machine Cover – Pattern should accommodate the way you actually use your machine daily. If you plan on adding a handle opening at the top, measure the exact location and width of the machine’s built-in handle to ensure perfect alignment.
Once you have these numbers, it is helpful to sketch a rough pattern template on paper before cutting your expensive fabric. This allows you to visualize how the pieces will fit together and verify that your DIY Sewing Machine Cover – Pattern logic is sound. This “drafting” phase is where you can decide if you want a boxy shape or a more tapered, elegant silhouette for your cover.
Remember that fabric shrinkage can occur, so it is highly recommended to pre-wash and iron your fabric before taking measurements or cutting. This step ensures that your sewing machine cover doesn’t shrink and become too tight the first time you decide to give it a wash. Accuracy at this stage is what separates a homemade-looking project from a professional bespoke accessory.
With your fabric cut and your DIY Sewing Machine Cover – Pattern ready, the assembly begins with the side panels. If you are adding exterior pockets to hold your scissors or seam rippers, sew those onto the side panels first. Pockets are a fantastic addition to any sewing machine cover, keeping your most-used tools within arm’s reach while protecting the machine.
Next, you will pin the long center panel to one of the side panels, starting from the bottom front edge. Align the edges carefully, especially around the corners where you may need to clip the curves or pivot your needle. This step is where the DIY Sewing Machine Cover – Pattern starts to take its 3D shape, so take your time to ensure the fabric remains flat and wrinkle-free.
After the first side is attached, repeat the process with the second side panel. It is often helpful to use wonder clips instead of pins if you are using thicker fabrics or multiple layers of batting. Once both sides are sewn, you will have a “shell” that represents the main body of your DIY Sewing Machine Cover – Pattern, giving you the first real look at the final product.
If you are including a lining, you will repeat the entire assembly process with your lining fabric. Then, place the lining and the outer shell right sides together and sew around the bottom edge, leaving a small gap for turning. This “bagging out” technique is a favorite in many DIY Sewing Machine Cover – Patterns because it hides all raw seams inside for a clean finish.
For those who prefer a simpler approach, you can skip the lining and finish the bottom edge with a rolled hem or bias binding. Bias tape is an excellent choice for a DIY Sewing Machine Cover – Pattern because it adds a decorative element while reinforcing the bottom edge. Using a contrasting color of bias tape can make your sewing machine cover stand out and look intentionally designed.
The final step in the assembly is topstitching. This isn’t just for looks; topstitching the edges of your DIY Sewing Machine Cover – Pattern helps the cover hold its “box” shape and prevents the lining from rolling outward. A steady, slow stitch around the perimeter and the top handle opening provides that final touch of craftsmanship that makes your DIY project truly shine.
The best part of a DIY Sewing Machine Cover – Pattern is the ability to make it your own through embellishments. You can use embroidery, applique, or even fabric paint to label your cover or add floral designs. Many quilters use this project as a “mini-quilt” opportunity, practicing new free-motion quilting designs on the panels before moving on to larger blankets.
Adding functional features like a transparent vinyl pocket can be a game-changer for your DIY Sewing Machine Cover – Pattern. This allows you to store your machine’s manual or a reference sheet for needle sizes right where you can see it. It turns a simple protective cover into a high-functioning sewing room organizer that saves you time and frustration during complex projects.
If you have multiple machines, such as a serger or a coverstitch machine, you can adapt your DIY Sewing Machine Cover – Pattern to create a matching set. Using a consistent fabric collection across all your covers gives your sewing space a cohesive, “Pinterest-worthy” look. This level of organization can actually boost your productivity and make your creative space feel more inviting.
Maintenance for your sewing machine cover is relatively straightforward, but it depends on the materials you chose. If you used 100% cotton, a gentle machine wash on a cold cycle is usually safe. However, if your DIY Sewing Machine Cover – Pattern involved heavy interfacing or delicate embroidery, spot cleaning with a damp cloth is the better route to preserve the structural integrity.
To keep your cover looking crisp, give it a quick press with a steam iron every few months. Over time, the fabric might soften and lose some of its “stand-up” ability, but a bit of spray starch during ironing can revive that professional, stiff look. A well-maintained DIY Sewing Machine Cover can last for decades, protecting several generations of machines.
Ultimately, completing a DIY Sewing Machine Cover – Pattern is about more than just dust protection—it’s about celebrating your craft. Every time you walk into your room and see your beautiful, handmade cover, you’re reminded of your skills. It’s a small investment of time that pays off every single day by keeping your sewing machine safe and making your workspace look absolutely stunning.
1. What is the best fabric for a sewing machine cover?
The best fabrics are those with some weight, such as canvas, denim, or quilted cottons. These provide enough structure to stand up on their own and offer better protection against dust and light bumps.
2. Can a beginner make a DIY Sewing Machine Cover – Pattern?
Absolutely! It is an ideal beginner project because it mostly involves straight lines and basic 3D construction. It is a great way to learn how to manage bulk and turn corners.
3. Do I really need a lining for my cover?
While not strictly necessary, a lining hides raw edges and makes the cover more durable. If you choose not to use a lining, you should finish your seams with a zigzag stitch or a serger to prevent fraying.
4. How much extra space should I add to my measurements?
A general rule of thumb is to add 1 to 1.5 inches of “ease” to your width and depth measurements. This ensures the cover is easy to put on and take off without being too baggy.
5. How do I make a pattern for a machine with a handle on top?
The easiest way is to measure the distance of the handle from the sides and create a finished slit (like a large buttonhole) in the top panel of your DIY Sewing Machine Cover – Pattern.
6. Is a quilted cover better than a single-layer cover?
Quilted covers offer more “body” and protection. They are less likely to collapse and provide a padded layer that protects the machine’s plastic casing from scratches or UV light fading.
In this article, we have explored the essential steps to creating a professional and stylish DIY Sewing Machine Cover – Pattern. From selecting durable fabrics and taking precise measurements to the final topstitching and personalization, you now have the tools to protect your machine in style.
Remember that a custom sewing machine cover is not just a utility item; it is an extension of your creativity and a vital protector of your most important tool. By following these steps, you can ensure your machine stays clean, functional, and ready for your next big project.


