
Crochet Flower - Tutorial

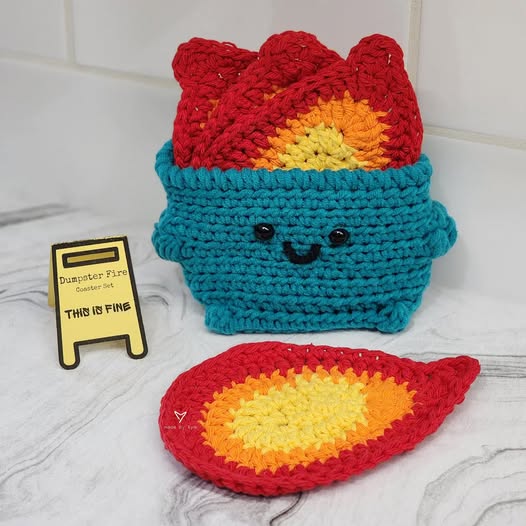
Creating a set of coasters shaped like burning trash cans – pattern is the ultimate way to blend quirky home decor with a genuine conversation starter that protects your furniture. If you have ever felt like the world is a bit chaotic, these DIY crochet coasters perfectly capture that “dumpster fire” energy in a fun, artistic way. Whether you are an experienced crafter or a beginner looking for a unique crochet project, this pattern offers a satisfying blend of structural design and vibrant color play.
Working on a set of coasters shaped like burning trash cans – pattern allows you to experiment with textures and layering to create a 3D effect on a flat surface. Using absorbent cotton yarn is essential for any functional drink coaster, ensuring that moisture from cold drinks doesn’t ruin your wooden tables. Beyond their utility, these handmade coasters serve as a humorous nod to modern life, making them excellent gifts for friends who appreciate a bit of dark humor and original fiber art.
By following this set of coasters shaped like burning trash cans – pattern, you are not just making a household item; you are mastering the art of thematic crochet design. The process involves creating a sturdy gray trash can base and topping it with flickering orange and yellow flames. This guide will walk you through the essential materials, the step-by-step construction, and the SEO-friendly crochet tips needed to ensure your final product looks professional, durable, and delightfully disastrous.
Before diving into the set of coasters shaped like burning trash cans – pattern, you need to gather high-quality mercerized cotton yarn. This specific type of yarn is preferred for crochet coasters because it is heat-resistant and maintains its shape even after getting wet. You will need colors like “Ash Gray” for the bin and “Sunset Orange” or “Fire Yellow” for the flame details.
Selecting the right crochet hook size is the next crucial step in your preparation. For a tight, stiff stitch that prevents liquid from seeping through, a 3.5mm (E) hook is usually the sweet spot for medium-weight yarn. A tighter gauge ensures your burning trash can design remains flat and doesn’t curl up at the edges over time.
Don’t forget the small but vital notions for crocheting that make the job easier. You will need a tapestry needle for weaving in ends and sharp scissors to trim your yarn. Since this trash can pattern involves several color changes between the “metal” and the “fire,” having stitch markers on hand will help you keep track of your increases.
The set of coasters shaped like burning trash cans – pattern also benefits from a bit of planning regarding the “trash” elements. You might want to use scrap yarn in various colors to simulate items peeking out from the flames. This adds an extra layer of customizable craft detail that makes each coaster in your set unique and visually engaging.
Environmental lighting and a comfortable workspace are often overlooked but essential for detailed crochet work. Since you will be working with gray yarn, which can sometimes be hard to see in dim light, ensure your station is well-lit. This prevents eye strain while you execute the intricate ribbing stitches that give the trash can its iconic corrugated look.
Finally, consider the final presentation of your handmade coaster set. If you are making these as a crochet gift, think about creating a small “dumpster” holder out of cardboard or extra yarn. This enhances the thematic appeal of the set of coasters shaped like burning trash cans – pattern and provides a professional touch to your finished DIY project.
The first stage of the set of coasters shaped like burning trash cans – pattern involves creating the rectangular or slightly tapered base. You will start by chaining a foundation row that determines the width of your trash bin. Most standard drink coasters are about 4 inches wide, so aim for a size that accommodates a variety of mugs and glasses.
To achieve the “metal” look, use a back loop only (BLO) crochet technique. This creates horizontal ridges that mimic the texture of a real galvanized steel trash can. This textural detail is what separates a generic gray square from a high-quality burning trash can coaster that looks realistic and professional to the naked eye.
Consistency in your stitch tension is vital during this phase of the construction. If your stitches are too loose, the coaster will be floppy; if they are too tight, the crochet fabric might buckle. Aim for a firm, even feel throughout the gray yarn section to ensure the base provides a level surface for your beverages.
As you build the height of the bin, you can incorporate tapering techniques by decreasing stitches slightly at the bottom. This gives the set of coasters shaped like burning trash cans – pattern a more dynamic, stylized silhouette. A slightly wider top makes it look like the “fire” is bursting out with more intensity, enhancing the visual storytelling of the piece.
Adding a “rim” to the top of the can provides a clean transition point for the fire embroidery. You can achieve this by working a row of slip stitches or crab stitches (reverse single crochet) across the top edge. This creates a sturdy border that helps the coaster maintain its structural integrity through daily use and frequent washing.
Once the base is complete, you should have a solid, ribbed rectangle that serves as the canvas for your creative crochet flames. This foundation is the “anchor” of your set of coasters shaped like burning trash cans – pattern. Make sure to secure your yarn with a strong knot before switching to your vibrant fire-colored yarns for the next exciting phase.
The “burning” aspect is the highlight of the set of coasters shaped like burning trash cans – pattern. To create realistic flames, you will use a variety of stitch heights, ranging from single crochet to double and triple crochet. This variation creates the jagged, flickering peaks that signify a raging trash fire in your artwork.
Start by joining your bright orange yarn to the top corner of the gray base. Work a series of picot stitches or pointed shells to simulate the unpredictable nature of fire. By mixing warm color palettes, such as reds, oranges, and yellows, you give the hand-stitched flames a sense of heat, depth, and three-dimensional movement.
To make the fire look “messy” and authentic, avoid making the flames symmetrical on every coaster in the handmade set. Each set of coasters shaped like burning trash cans – pattern should feel like a snapshot of a different moment in time. Some flames should lick higher than others, creating a varied visual rhythm when the set is displayed together.
For an advanced crochet texture, consider using the surface slip stitch technique to add “smoke” or “sparks.” You can use a thin black or dark gray thread to create swirls of smoke rising from the fire. These intricate embellishments elevate the set of coasters shaped like burning trash cans – pattern from a simple craft to a piece of folk art.
Don’t be afraid to overlap your colors using tapestry crochet methods. By carrying the yellow yarn behind the orange, you can pull up loops of “light” within the darker flames. This colorwork technique adds brilliance to the burning trash can aesthetic, making the colors pop against the neutral gray of the bin foundation.
The final row of the flames should be worked with a lightweight yarn or a single strand of embroidery floss for a sharper point. This ensures the tips of the fire don’t look bulky or rounded. Once the flames are finished, your set of coasters shaped like burning trash cans – pattern will finally take on its hilarious and recognizable identity.
After completing the main body of your set of coasters shaped like burning trash cans – pattern, it is time for the finishing touches. Blocking your crochet is a mandatory step for coasters to ensure they lay perfectly flat. Pin them down to a blocking board, spray them with water, and let them dry to set the geometric shape of the trash can.
To make your DIY coasters even more functional, consider adding a non-slip backing. You can cut pieces of felt or thin cork to match the shape of the gray base and glue them on using fabric adhesive. This provides extra protection for your table and gives the handmade coaster a premium, weighty feel that users will appreciate.
Weaving in your ends securely is particularly important for items that will be handled frequently. Use your yarn needle to hide the tails within the thickest part of the crochet stitches. For a set of coasters shaped like burning trash cans – pattern, hiding the bright orange tails inside the gray section is key to maintaining a clean, professional look.
If you want your “fire” to stay upright and stiff, you can apply a small amount of fabric stiffener or a water-glue mixture to the flame tips. This prevents the flames from flopping over when a glass is placed on the coaster. Maintaining the upright flame silhouette is essential for the visual joke of the burning trash can design to work effectively.
Consider the washability of your materials before finalizing the set. Since coasters often encounter coffee spills or condensation, using washable cotton allows the owner to toss them in a mesh laundry bag for a quick clean. Providing care instructions with the set makes it a much more thoughtful and professional crochet gift for friends.
The last step is to inspect your set of coasters shaped like burning trash cans – pattern for any loose loops or inconsistencies. Once satisfied, you have a completed set of humorous home decor that is ready for use. These coasters are not just protectors of wood; they are miniature sculptures that celebrate the chaotic beauty of a world that is sometimes, quite literally, a trash fire.
1. What is the best yarn for a set of coasters shaped like burning trash cans – pattern?
The best yarn is 100% cotton or a cotton-linen blend. Cotton is highly absorbent, heat-resistant, and doesn’t melt like acrylic if a hot mug is placed on it. It also holds the ribbed texture of the trash can better than softer, fuzzier fibers.
2. How long does it take to make a full set of four coasters?
For an intermediate crocheter, each coaster takes approximately 45 to 60 minutes. A full set of coasters shaped like burning trash cans – pattern can usually be completed in a single weekend afternoon, making it a perfect quick crochet project.
3. Can I sell the finished items made from this pattern?
Generally, most designers allow you to sell finished items as long as you give credit to the original pattern creator. These are very popular on platforms like Etsy because of their “meme-worthy” appeal and unique pop culture aesthetic.
4. Are these coasters machine washable?
Yes, if made with cotton. We recommend hand washing or using a delicate cycle in a mesh bag to prevent the “flames” from fraying. Always air dry your coasters to maintain their shape and prevent the colors from bleeding.
5. Is this pattern suitable for absolute beginners?
This project is best for “ambitious beginners” or intermediate crafters. While the base is simple, the flame shaping and color changes require some familiarity with different stitch heights and basic crochet colorwork.
6. How do I make the flames look more “chaotic”?
To achieve a chaotic look, use freeform crochet for the top section. Don’t follow a strict count for the flames; instead, vary the number of chains and double crochet clusters on each piece to make every “fire” in the set look slightly different.
In this article, we explored the creative process of making a set of coasters shaped like burning trash cans – pattern, from selecting the most durable cotton yarns to mastering the BLO stitch for a realistic metal texture.
We discussed how to create flickering, multi-colored flames using varied stitch heights and how to finish your project with non-slip backings for a professional touch. This project is the perfect intersection of functional home utility and hilarious, modern artistic expression.


