
Patchwork Bird Tutorial

The Block of Hearts – Pattern is one of the most beloved designs in the world of quilting and textile arts, offering a perfect blend of sentimental value and geometric precision. Whether you are a seasoned quilter or a beginner looking for your first meaningful project, this specific quilt block provides a versatile foundation for creating everything from Valentine’s Day throws to heirloom-quality nursery blankets. The beauty of the Block of Hearts – Pattern lies in its ability to be customized with various color palettes, making it a timeless choice for expressing love through handmade craftsmanship.
When we dive into the technical side of the Block of Hearts – Pattern, we discover a design that relies on the classic “flip and sew” method or traditional piecing techniques. By combining squares and rectangles with diagonal seams, makers can create the iconic rounded top and pointed bottom of a heart without needing complex curved templates. This accessibility is exactly why the Block of Hearts – Pattern remains a staple in the quilting community, as it allows for high-impact visual results with relatively straightforward construction steps.
Beyond just the aesthetic appeal, mastering the Block of Hearts – Pattern opens up a world of creative possibilities for textile enthusiasts. It serves as an excellent exercise in seam allowance accuracy and fabric coordination, helping crafters sharpen their skills while producing something beautiful. In the following guide, we will explore the essential materials, the step-by-step construction, and the creative variations that make the Block of Hearts – Pattern an essential addition to your digital library of sewing patterns.
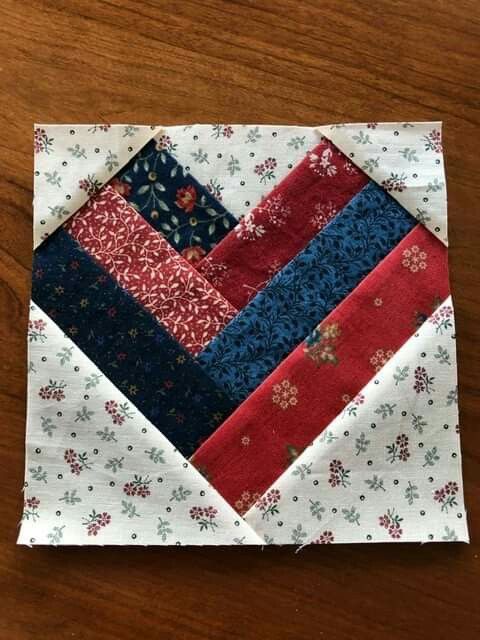
The Block of Hearts – Pattern is fundamentally a geometric representation of a universal symbol, typically constructed using a grid-based system. Most variations of this quilt design utilize a combination of larger fabric squares for the body of the heart and smaller “corner” squares to create the shaping. By mastering this foundation paper piecing or traditional piecing method, you ensure that every heart looks uniform across your entire project.
Choosing the right fabric selection is the first critical step in bringing your Block of Hearts – Pattern to life. While traditional reds and pinks are the most common choices, modern quilters often experiment with “scrappy” styles, using leftover fabric remnants to create a colorful, eclectic look. High-quality 100% cotton fabric is recommended to ensure the block remains crisp and durable over years of use and washing.
To begin the Block of Hearts – Pattern, you must be comfortable with the “snowballing” technique, which involves placing a small square on the corner of a larger one and sewing across the diagonal. This simple trick is what transforms a basic rectangle into the soft, angled shape of a heart. Accuracy in your quarter-inch seam allowance is vital here, as even a small deviation can result in a heart that looks slightly lopsided or off-center.
The versatility of the Block of Hearts – Pattern allows it to be scaled to almost any size, from tiny 4-inch blocks for pincushions to massive 24-inch blocks for statement pillows. When calculating your fabric requirements, always account for a little extra “buffer” material to handle any cutting errors. This preparation ensures that your creative process remains stress-free and enjoyable from the first cut to the final stitch.
One of the most rewarding aspects of the Block of Hearts – Pattern is its adaptability to different skill levels and machine types. Whether you are using a vintage sewing machine or a modern computerized model, the straight-line stitching required for this pattern makes it highly accessible. It is an ideal project for practicing chain piecing, a method that saves time and thread by sewing multiple blocks in a continuous sequence.
As you prepare your workspace for the Block of Hearts – Pattern, remember that pressing is just as important as sewing. Using a high-quality steam iron to press your seams—usually toward the darker fabric—will help the block lay flat and professional. This attention to detail is what separates a homemade project from a handcrafted masterpiece, ensuring your heart blocks look perfect when joined together.
Before you make your first cut for the Block of Hearts – Pattern, gathering the correct tools will significantly impact the quality of your finished work. You will need a rotary cutter, a self-healing cutting mat, and a clear acrylic ruler to ensure every piece is perfectly square. Precision is the backbone of the Block of Hearts – Pattern, and having sharp tools prevents fabric fraying and inaccurate measurements.
The color theory you apply to your Block of Hearts – Pattern can completely change the “mood” of the quilt. For a romantic aesthetic, monochromatic shades of crimson and burgundy work wonders; for a nursery, soft pastels or gender-neutral teals are popular. Don’t forget the background fabric, which acts as the negative space that makes the heart shapes pop—usually, a neutral cream, white, or light gray is the best choice.
Thread selection is another overlooked but crucial component of the Block of Hearts – Pattern. A 50-weight cotton thread in a neutral color like dove gray or tan usually blends perfectly with most fabrics, preventing the stitches from showing through the seams. Since the Block of Hearts – Pattern involves several diagonal seams, using a high-quality thread reduces the risk of breakage during the “pressing and nesting” phase of assembly.
Marking your diagonal lines is a step you shouldn’t skip when working on the Block of Hearts – Pattern. Use a water-soluble fabric pen or a Hera marker to draw a guide on the back of your corner squares. This ensures that when you sew the stitch-and-flip corners, your heart maintains its intended proportions. Many experts who regularly use the Block of Hearts – Pattern suggest “sewing a hair” to the outside of the line to account for the fabric fold.
Organization is key when dealing with the multiple small pieces required for a full Block of Hearts – Pattern quilt. Using design boards or small containers to keep your “top lobes” and “bottom points” separated will prevent confusion during the assembly line. Since the Block of Hearts – Pattern is often repeated dozens of times in a single quilt, staying organized is the best way to maintain your creative momentum.
Finally, always perform a “test block” before cutting into your most expensive fabric. A test run of the Block of Hearts – Pattern using scrap fabric allows you to verify that your measurements are correct and that your iron settings aren’t scorching the material. Once you have a perfect prototype heart, you can confidently move forward with the rest of your quilting journey, knowing the results will be consistent.
To start the actual assembly of the Block of Hearts – Pattern, you will typically begin with two identical rectangles that form the two halves of the heart. On the top of each rectangle, you will place smaller squares to create the rounded “lobes.” By sewing diagonally across these squares and trimming the excess, you instantly see the Block of Hearts – Pattern start to take its iconic form.
The bottom of the heart is created by joining these two halves and then applying the same “snowballing” technique to the bottom corners. This creates the sharp point that characterizes the Block of Hearts – Pattern. It is essential to ensure that the center seam where the two halves meet is perfectly aligned. Pinning this junction is highly recommended to prevent the fabric from shifting under the presser foot.
Once the main structure of the Block of Hearts – Pattern is sewn, it is time for the “big press.” Open the seams carefully and use a “clapper” or your hands to flatten them before applying the iron. This ensures that the quilt top remains flat, which is vital for the eventual quilting process. A flat Block of Hearts – Pattern is much easier to quilt over than one with bulky, uneven seams.
If you are looking to add a bit of flair to your Block of Hearts – Pattern, you can experiment with “fussy cutting.” This involves centering a specific motif from your fabric—like a small flower or a character—right in the middle of the heart. This technique turns the Block of Hearts – Pattern into a frame, adding a layer of storytelling and detail to your handcrafted project.
After completing several units, you can begin arranging your Block of Hearts – Pattern pieces on a design wall or a flat floor. This allows you to see how the colors interact across the entire surface. You might find that rotating some of the blocks or adding sashing and borders enhances the overall impact of the Block of Hearts – Pattern, giving the eyes a place to rest between the vibrant shapes.
The final step in the construction phase is squaring up your blocks. Even the most careful quilters might find that their Block of Hearts – Pattern is a fraction of an inch off. Using a square ruler to trim all blocks to the exact same size ensures that when you sew the rows together, the corners line up perfectly. This professional finish is what makes the Block of Hearts – Pattern look truly spectacular in a finished quilt.
Once you are comfortable with the basic Block of Hearts – Pattern, you can start exploring advanced variations like the “Log Cabin Heart” or the “Wonky Heart.” These variations take the core concept of the Block of Hearts – Pattern and add improvisational elements, making each block unique. Experimenting with asymmetrical designs can give your quilt a modern, artistic edge that stands out from traditional patterns.
Another way to elevate your Block of Hearts – Pattern is through the use of applique. Instead of piecing the heart into the block, you can cut the heart shape out and sew it onto a background square using a blanket stitch or a satin stitch. This method allows for more rounded curves and can be a great way to use up very small scraps of favorite fabrics within the Block of Hearts – Pattern framework.
For those who love a challenge, try incorporating the Block of Hearts – Pattern into a “Medallion Quilt” setting. This involves placing one large, intricate heart in the center and surrounding it with smaller, simpler hearts or star blocks. This hierarchical structure makes the Block of Hearts – Pattern the star of the show, creating a powerful visual focal point for a wall hanging or a bedspread.
Don’t overlook the power of quilting textures to enhance your Block of Hearts – Pattern. When it comes time to finish the quilt, following the outline of the heart with “echo quilting” can make the shape appear to radiate outward. Alternatively, filling the heart with dense “pebble quilting” and the background with loose “stippling” creates a beautiful 3D effect that makes the Block of Hearts – Pattern physically stand out.
Adding personalized touches like embroidery can turn a standard Block of Hearts – Pattern into a cherished gift. Stitching a name, a date, or a short message like “Made with Love” inside the heart adds an emotional layer to the physical object. This is particularly popular for wedding quilts or anniversary gifts where the Block of Hearts – Pattern serves as a literal symbol of the couple’s bond.
Finally, remember that the Block of Hearts – Pattern is a community favorite for a reason—it’s about connection. Many quilters use this pattern for “charity quilts,” donating finished blankets to hospitals or shelters. The universal language of the Block of Hearts – Pattern provides comfort and warmth to those who need it most, proving that a simple sewing project can have a significant impact on the world.
Is the Block of Hearts – Pattern suitable for absolute beginners?
Yes! Because it relies on straight seams and the “flip and sew” method, it is one of the best patterns for beginners to practice their accuracy.
What is the best fabric to use for this pattern?
High-quality quilting cotton is the standard. It has the right weight and “grip” to hold its shape during the many diagonal seams required for the heart.
Can I make the Block of Hearts – Pattern without a sewing machine?
Absolutely. While a machine is faster, this pattern can be sewn by hand using a simple running stitch. It just requires more patience and a steady hand for the seams.
How do I prevent the points of my hearts from being cut off?
The key is to sew exactly 1/4 inch away from the point. When joining blocks, ensure your needle enters right at the “V” where the seams intersect to keep the points sharp.
How much fabric do I need for a standard throw quilt?
Usually, 3 to 5 yards of total fabric (including background and hearts) is enough for a medium-sized throw using this pattern, but always check your specific measurements first.
Can I use this pattern for things other than quilts?
Yes, the Block of Hearts – Pattern is perfect for tote bags, table runners, pot holders, and even clothing embellishments.
The Block of Hearts – Pattern is more than just a decorative arrangement of fabric; it is a versatile, beginner-friendly, and deeply symbolic design that has stood the test of time in the crafting world. Throughout this article, we have explored the foundational techniques of “snowballing” corners, the importance of precise material selection, the step-by-step assembly process, and the various ways you can customize the design to fit your unique style.
By mastering this quilt block, you gain a skill that can be used for countless future projects, from charitable donations to personal family heirlooms. We hope this guide inspires you to pick up your rotary cutter and start your own Block of Hearts – Pattern journey.


