
Patchwork Bird Tutorial

Finding the perfect Friendship Quilt Pattern is more than just a search for a craft project; it is an exploration into a rich history of community, connection, and shared creativity. For centuries, these quilts have served as physical manifestations of the bonds between people, often created to commemorate significant life events like weddings, departures, or milestones. Whether you are an experienced quilter or a novice picking up a needle for the first time, understanding the nuances of a Friendship Quilt Pattern allows you to weave your own personal story into a fabric masterpiece that can last for generations.
In the world of modern quilting, the Friendship Quilt Pattern remains a favorite because of its inherent flexibility and the emotional weight it carries. Unlike a solo project where one person chooses every scrap of fabric, this style often involves a group of friends or family members contributing individual blocks. Each person brings their own unique flair, colors, and textures to the table, resulting in a vibrant, eclectic design that represents the diverse personalities within a social circle. This collaborative spirit is what makes the Friendship Quilt Pattern stand out in an era of mass-produced home decor.
To create a truly successful project, one must understand that the Friendship Quilt Pattern is defined by its structure as much as its sentiment. By using specific quilting techniques and fabric selection strategies, you can ensure that the final product is not only beautiful but also durable. This article will dive deep into the essential elements of this craft, providing you with the knowledge to select the right sewing supplies, master block construction, and understand the historical significance of these quilts. Let’s explore how you can turn simple pieces of cloth into a lasting legacy of companionship.
Choosing a Friendship Quilt Pattern is the foundational step that determines the visual rhythm of your final piece. You want to select a design that allows for individual expression while maintaining a sense of visual harmony. Popular choices include the Signature Block, where contributors sign their names in the center, or the Album Block, which provides more space for intricate designs or personalized embroidery.
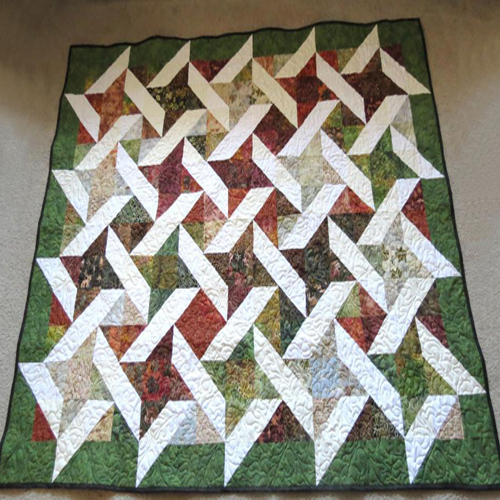
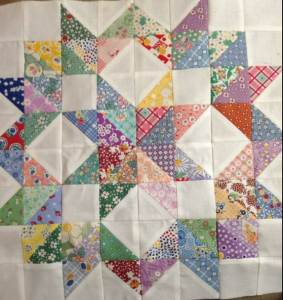
When selecting your Friendship Quilt Pattern, consider the skill level of all participants involved in the project. If you are working with a group of beginners, a Simple Square or Half-Square Triangle design might be the best route to ensure consistency across the quilt top. On the other hand, more advanced quilters might enjoy the challenge of a Stars and Pinwheels motif, which adds a dynamic energy to the overall layout.
The aesthetic appeal of your Friendship Quilt Pattern can be enhanced by establishing a color palette beforehand. While the beauty of a friendship quilt lies in its variety, providing participants with a specific range of colors (like “autumn tones” or “shades of blue”) helps the finished quilt look intentional rather than chaotic. This balance of creative freedom and structured guidelines is key to a professional-looking result.
Another important factor in your Friendship Quilt Pattern selection is the final size of the quilt. Are you aiming for a small wall hanging, a cozy lap quilt, or a full-sized queen bedspread? The size will dictate how many blocks you need to collect from your friends and how large each individual quilt block should be to fit the dimensions perfectly.
Don’t forget that a Friendship Quilt Pattern can also incorporate modern digital elements. Many contemporary quilters use quilt design software to map out how different blocks from different people will look together before a single stitch is made. This “pre-visualization” step can save a lot of time and fabric, ensuring that the quilt layout is balanced and aesthetically pleasing.
Finally, remember that the Friendship Quilt Pattern you choose should reflect the occasion. For a wedding, perhaps a Double Wedding Ring variation is appropriate, while a “going away” gift might benefit from a Compass or Map-themed block design. The pattern is the blueprint for your memories, so take the time to pick one that truly resonates with the group’s shared history.
Before you dive into your Friendship Quilt Pattern, you must gather the right tools to ensure your seams are straight and your fabric stays crisp. A high-quality rotary cutter and a self-healing cutting mat are non-negotiable for achieving the precision required in modern quilting. These tools allow you to cut multiple layers of fabric with millimeter accuracy, which is vital when fitting different blocks together.
The choice of thread is equally important when working on a Friendship Quilt Pattern. Most experts recommend a 50wt cotton thread because it is strong yet thin enough to prevent bulky seams. Choosing a neutral color like dove gray or tan can help the stitches blend into various fabric colors, ensuring that the focus remains on the textile design rather than the construction.
When it comes to the quilt fabric, 100% high-quality quilter’s cotton is the gold standard. This material is easy to handle, doesn’t stretch excessively, and holds a crease well when pressed. If your Friendship Quilt Pattern involves multiple contributors, it is often a good idea to provide the background fabric to everyone so that the individual blocks have a unifying element.
A reliable sewing machine with a consistent quarter-inch seam foot will make the assembly of your Friendship Quilt Pattern much smoother. Precision is everything in quilting; even a tiny deviation in seam allowance can cause the blocks to misalign by the time you reach the end of a row. Regular machine maintenance and using fresh sewing needles will prevent skipped stitches and fabric snagging.
Marking tools are also essential, especially if your Friendship Quilt Pattern includes signatures or specific embroidery. Use water-soluble pens or tailor’s chalk that can be easily removed once the quilt is finished. For signature quilts, ensure that contributors use permanent fabric markers that won’t bleed or fade when the quilt is eventually laundered.
Lastly, never underestimate the power of a good steam iron. In quilting, “pressing” is just as important as sewing. Pressing your seams flat (usually toward the darker fabric) ensures that your Friendship Quilt Pattern lies perfectly flat. A well-pressed quilt top is much easier to sandwich with the batting and backing, leading to a much higher quality finished product.
Once all the blocks for your Friendship Quilt Pattern have been collected, the assembly phase begins, which is often called “setting” the quilt. This is where you arrange the individual contributions on a design wall or a large floor space to find the most pleasing arrangement. This stage is crucial for balancing colors and ensuring that no two similar blocks are placed directly next to each other.
To join the blocks of your Friendship Quilt Pattern, you will likely use sashing, which refers to the strips of fabric sewn between the blocks. Sashing acts as a frame for each individual piece of art, providing “breathing room” for the eyes and helping to unify the different styles. You can even add cornerstones (small squares at the intersections of sashing) for extra visual interest.
The next step in completing your Friendship Quilt Pattern is adding the borders. Borders serve as the final frame for your work and can help stabilize the edges of the quilt. You might choose a simple single border or a more complex pieced border that echoes the design elements found within the blocks themselves. Proper measurement is key here to avoid “wavy” borders.
After the top is finished, you will create the “quilt sandwich,” which consists of the quilt top, the batting (the middle insulating layer), and the backing fabric. Secure these layers together using basting pins or temporary spray adhesive. This prevents the layers from shifting while you perform the actual quilting—the process of stitching through all three layers.
Whether you choose hand quilting or machine quilting, the goal is to follow the lines of your Friendship Quilt Pattern or create a new decorative layer of stitching. Popular techniques include stippling, echo quilting, or “stitching in the ditch.” This step not only adds beauty but also provides the structural integrity needed to keep the batting from shifting over time.
The final touch to your Friendship Quilt Pattern is the binding. This is the strip of fabric that wraps around the raw edges of the quilt to seal them. A double-fold bias binding is the most durable method. Once the binding is hand-stitched or machine-sewn into place, your quilt is ready to be gifted, displayed, or snuggled under, marking the successful completion of a group journey.
A finished Friendship Quilt Pattern is a treasure, and proper care will ensure it remains a family heirloom for decades. One of the most important tips is to avoid direct sunlight, which can fade the vibrant dyes in the fabric over time. If you display your quilt on a wall, try to choose a spot away from windows or use UV-filtering glass if it is framed.
When it comes to cleaning a quilt made from a Friendship Quilt Pattern, less is often more. If the quilt is just dusty, a gentle vacuuming using a nylon screen over the nozzle can remove debris without stressing the fibers. If washing is necessary, use a gentle, fragrance-free detergent and a cold-water cycle, or better yet, wash it by hand in a clean bathtub.
To prevent permanent creasing, avoid folding your Friendship Quilt Pattern the same way every time. Instead, try rolling the quilt on a large cardboard tube or refolding it periodically in different directions. Using acid-free tissue paper in the folds can also help protect the fabric from “shattering” or breaking along the crease lines as it ages.
If you are storing your quilt, never put it in a plastic bin or a sealed plastic bag. Fabrics need to “breathe” to prevent the growth of mold or mildew. Instead, wrap your Friendship Quilt Pattern in a clean, white cotton sheet and store it in a cool, dry place like a linen closet. Avoid attics or basements where temperature and humidity fluctuations are extreme.
Occasional airing out of your quilt is also beneficial. On a dry, overcast day, lay your quilt flat on a clean sheet outdoors for an hour or two. This helps refresh the fibers and remove any lingering odors. However, keep a close eye on the weather and local wildlife to ensure your Friendship Quilt Pattern remains safe and clean during its “spa day.”
Finally, documenting the story of your Friendship Quilt Pattern is a vital part of its preservation. Attach a quilt label to the back corner including the date, the names of all the contributors, and the occasion for which it was made. This ensures that the history of the Friendship Quilt Pattern is never lost, allowing future generations to appreciate the hands and hearts that went into its creation.
1. What is the best fabric for a Friendship Quilt Pattern?
The best fabric is 100% cotton, specifically “quilter’s cotton.” It is durable, easy to sew, and comes in a vast array of colors and prints. Avoid stretchy fabrics like jersey or slippery fabrics like silk if you are a beginner.
2. How many people should contribute to one quilt?
There is no set rule! Some quilts have as few as 4 large blocks, while others might have 50 or more small blocks. It depends on the Friendship Quilt Pattern you choose and the desired final size of the quilt.
3. Can I make a Friendship Quilt Pattern by myself?
Absolutely! While the tradition is rooted in group work, many people use a Friendship Quilt Pattern to create a “scrappy” look using fabrics from their own collection that remind them of different friends and family members.
4. What is the difference between a Signature Quilt and a Friendship Quilt?
A Signature Quilt is a specific type of friendship quilt where the primary focus is the written signatures of the participants. A friendship quilt is a broader term that includes any quilt made by a group, whether signed or not.
5. How do I ensure all the blocks are the same size?
The best way is to provide a template or specific cutting instructions to all participants. Stressing the importance of a consistent 1/4 inch seam allowance is also vital for the blocks to fit together during assembly.
6. Is it okay to use different fabric weights in one quilt?
It is generally discouraged. Using different weights (like mixing heavy denim with thin cotton) can cause the quilt to pucker and make it very difficult to get the Friendship Quilt Pattern to lie flat.
In this article, we have explored the beautiful world of the Friendship Quilt Pattern, covering everything from the initial selection of a design to the final steps of preservation. We’ve learned that these quilts are more than just blankets; they are collaborative works of art that symbolize the connections between us. By following the tips on material selection, precise assembly, and proper maintenance, you are now equipped to start your own quilting journey.
Creating a quilt using a Friendship Quilt Pattern is a labor of love that rewards you with a tangible piece of history. Whether you are honoring a friend or building a family legacy, the process of sewing together different pieces of fabric into a unified whole is a powerful metaphor for community.


