
Patchwork Bird Tutorial

The Plaited Quilt Block – Pattern is a timeless favorite for quilters who love the look of woven textures and intricate geometry without the headache of overly complex assembly. If you have ever stared at a finished quilt and wondered how the maker managed to weave strips of fabric together so perfectly, you were likely looking at a variation of this stunning design. This pattern creates a beautiful visual illusion of interlacing bands, making it a perfect project for those who want to elevate their quilting game while keeping the process enjoyable and systematic.
Finding a reliable Plaited Quilt Block – Pattern is the first step toward creating a masterpiece that looks professional and high-end. Whether you are planning to make a full-sized bedspread or a simple decorative pillow, this specific block offers a versatile foundation that works well with modern solids, vintage florals, or even scrappy leftovers from your stash. Because the “plaiting” effect relies on contrast and placement, it allows you to play with color theory in a way that most traditional blocks simply don’t permit.
In this comprehensive guide, we are going to dive deep into everything you need to know about the Plaited Quilt Block – Pattern. We will explore the essential materials, the step-by-step logic of the layout, and the little-known tips that ensure your corners stay crisp and your “woven” sections look authentic. By the time you finish reading, you will have the confidence to tackle this quilt design and produce a piece of textile art that will be the envy of your local quilting guild.
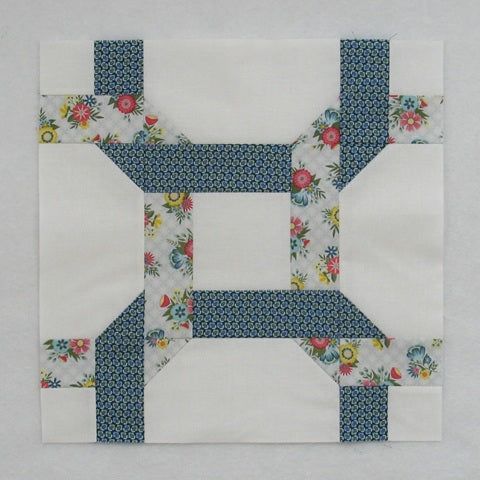
The core of the Plaited Quilt Block – Pattern lies in its clever use of rectangular strips and square units to mimic a braided or woven appearance. Unlike a standard Nine-Patch or Log Cabin, the plaited style focuses on directional flow, where each “strand” of the braid seems to tuck under the next. This is achieved through careful fabric selection and a specific sewing sequence that maintains the illusion across the entire quilt top.
To master this quilt block, you must first understand the importance of seam allowance. Because there are many intersecting lines, even a slight deviation from the standard quarter-inch seam can throw off the alignment of your “braids.” Consistency is your best friend here; using a specialized quilting foot on your sewing machine can make a world of difference in keeping those lines straight and the final block square.
When looking at a Plaited Quilt Block – Pattern, you will notice that it often utilizes a “light, medium, and dark” value system. This contrast is what defines the “over-under” look of the plait. If the colors are too similar in value, the weaving effect gets lost, and the block becomes a blur of shapes. Choosing high-contrast textiles ensures that the architectural beauty of the pattern really pops.
Another key aspect of this pattern is the rotary cutting process. Accuracy starts at the cutting mat, not the sewing machine. For a standard Plaited Quilt Block – Pattern, you will be cutting several strips of uniform width. Ensuring these strips are cut perfectly on the grain will prevent stretching and warping, which is vital when you start joining the long edges together to form the “plaits.”
Many quilters find that using fussy cutting techniques can add an extra layer of charm to this pattern. By centering a specific motif from your fabric—like a small flower or a geometric shape—within the squares of the Plaited Quilt Block, you create a secondary design element that draws the eye. It turns a standard geometric pattern into a personalized story told through fabric.
Finally, the Plaited Quilt Block – Pattern is highly scalable. You can create large, bold plaits using 4-inch strips for a fast-moving project, or you can go miniature with 1-inch strips for a delicate, intricate look. Regardless of the size, the mathematical logic remains the same, making it a fantastic template for quilters who like to experiment with different proportions and project scales.
Choosing the right materials is the soul of any Plaited Quilt Block – Pattern project. Since the goal is to simulate a physical weave, you want fabrics that have a clear identity. Many experts recommend using 100% cotton fabric because of its stability and ease of pressing. Cotton holds a crease well, which is essential for those crisp, flat seams that make the “woven” effect look believable and professional.
When picking your palette for the Plaited Quilt Block – Pattern, consider using a gradient. A gradient of blue, from navy to sky blue, can create a “shadow” effect that makes the braids look three-dimensional. This color theory application is one of the easiest ways to make a simple pattern look like a complex work of art. Always check your fabrics under different lighting to ensure the contrast remains visible.
Don’t shy away from using batiks or hand-dyed fabrics in your Plaited Quilt Block – Pattern. The organic, mottled texture of batiks adds a sense of movement that complements the “weaving” perfectly. Since batiks usually have a tighter weave than standard calico, they fray less and provide a very sturdy structure for the many seams involved in this specific patchwork style.
Pre-washing your fabric is a debated topic, but for a Plaited Quilt Block – Pattern, it is often recommended. Since you are dealing with dark and light strips side-by-side, you want to ensure the dark dyes won’t bleed into the light ones during the first wash of the finished quilt. Using color catchers in the laundry is a great safety measure, but pre-shrinking your fabric also ensures the block stays the size you intended.
The interfacing or stabilizer is rarely needed for this block, but if you are using very thin fabrics, a light starching can be a lifesaver. Spraying your fabric with fabric starch before cutting makes the cotton feel like paper, which allows for much higher precision when sewing the long, narrow strips of the Plaited Quilt Block – Pattern. It prevents the fabric from shifting under the needle.
Think about the backing and the batting as well. A low-loft batting will keep the quilt flat, highlighting the intricate piecing of the Plaited Quilt Block – Pattern. If you choose a high-loft batting, the quilt will be poofier, which might obscure some of the fine detail in the “weave.” Most modern quilters prefer a cotton or bamboo blend to maintain that classic, crisp look.
To successfully execute the Plaited Quilt Block – Pattern, you need more than just a sewing machine; you need the right precision tools. A high-quality rotary cutter with a fresh blade is non-negotiable. Because this pattern relies on multiple strips of the exact same width, a dull blade that skips threads will lead to uneven edges, ultimately ruining the “plait” alignment during assembly.
A large acrylic quilting ruler is your best friend when working on this Plaited Quilt Block – Pattern. Look for one with clear 45-degree and 60-degree markings, as some variations of the plaited block involve diagonal cuts. Using the lines on the ruler rather than the lines on your cutting mat will provide a much higher level of accuracy, ensuring your quilt units fit together like a glove.
The quarter-inch seam allowance is the golden rule of quilting, and it is especially critical for the Plaited Quilt Block – Pattern. If your seams are too wide, your block will end up smaller than intended; if they are too thin, the block will be too large and the seams may pull apart. Using a seam guide or a piece of painter’s tape on your machine bed can help you maintain total consistency.
Pressing is just as important as sewing when it comes to the Plaited Quilt Block – Pattern. You aren’t just “ironing”; you are setting the seams. Using a dry iron (no steam) at first helps prevent the fabric from stretching. Pressing the seams toward the darker fabric—a technique known as “pressing to the dark side”—prevents the seam allowance from showing through the lighter strips of your woven design.
To keep track of your pieces, many quilters use design boards. These are simple boards covered in flannel where you can “stick” your fabric pieces in the order they will be sewn. For the Plaited Quilt Block – Pattern, laying out your strips on a design board before you start sewing helps you catch any mistakes in the “over-under” sequence before it’s too late to fix them.
Lastly, don’t forget the importance of pinning. While experienced quilters sometimes skip pins for simple squares, the Plaited Quilt Block – Pattern involves long seams and intersecting points that must match up perfectly to maintain the illusion. Using fine, glass-headed pins allows you to pin close to the seam and even iron over them if necessary, ensuring everything stays perfectly aligned.
The assembly of the Plaited Quilt Block – Pattern usually happens in sections or “sub-units.” You will typically start by joining two or three strips together and then cutting those into smaller segments. This strip-piecing technique is a massive time-saver and actually increases accuracy because it reduces the number of individual tiny pieces you have to handle.
One common issue when sewing the Plaited Quilt Block – Pattern is the “bowing” of long strips. This happens when you pull on the fabric as it goes through the machine. To avoid this, let the feed dogs do the work. Your job is simply to guide the fabric, not pull it. If your strips are bowed, the “plait” will look curved rather than straight and woven.
If you find that your Plaited Quilt Block – Pattern isn’t laying flat, it’s usually a pressing issue. Check to see if any of your seams are twisted or if you’ve pressed some in the wrong direction. Sometimes, a tailor’s clapper—a heavy block of wood—can be used to flatten stubborn seams. Simply steam the seam, then press the wood block over it until it cools to get the flattest finish possible.
Another frequent hurdle is “lost points.” This is when the tip of a triangle or the corner of a square gets cut off by a seam. In a Plaited Quilt Block – Pattern, this happens if your seam allowance isn’t a “scant” quarter-inch. A scant quarter-inch is just one or two threads narrower than a full quarter-inch, which accounts for the space the fabric takes up when it folds over the seam.
Squaring up the block is the final, vital step. Even the most careful quilters might find their finished Plaited Quilt Block – Pattern is a tiny bit wonky. Use a square quilting ruler to trim the block to its final “unfinished” size. Make sure you leave a quarter-inch of fabric beyond the “points” of the plait so that they don’t get cut off when you sew the blocks together into a quilt top.
Once your blocks are complete, you have to decide on the sashing. Sashing is the fabric that goes between the blocks. For a Plaited Quilt Block – Pattern, using a solid, neutral sashing can act like a frame, giving the eye a place to rest and making the individual “weaves” stand out even more. It’s the final touch that turns a collection of blocks into a cohesive, professional quilt top.
1. Is the Plaited Quilt Block – Pattern suitable for beginners?
Yes, it is! While it looks complex, it is mostly composed of straight lines and strips. If you can sew a consistent seam and use a rotary cutter, you can definitely handle this pattern. It’s a great “level-up” project for someone who has mastered basic squares.
2. How much fabric do I need for a standard-sized quilt?
This depends on the size of your blocks and the quilt. Generally, for a throw-sized quilt using the Plaited Quilt Block – Pattern, you’ll need about 5 to 7 yards of fabric total, split between your different colors/values. Always buy an extra half-yard for mistakes!
3. Can I use scraps for this pattern?
Absolutely. A “Scrappy Plaited Quilt” looks incredible. The key is to still group your scraps by “light” and “dark” values so that the woven effect is maintained even with a variety of prints and colors.
4. Why does my “weave” look messy?
The most common culprit is a lack of contrast. If your fabrics are too similar in color or “value,” the eye can’t distinguish where one strand starts and another ends. Try taking a black-and-white photo of your fabrics; if they look like the same shade of gray, you need more contrast.
5. Do I need a special ruler for this?
While a standard long ruler works, a square-up ruler (like a 12.5″ square) is very helpful for ensuring each Plaited Quilt Block – Pattern is perfectly square before you assemble the quilt.
6. How should I quilt the finished top?
“Stitch in the ditch” is a popular choice to emphasize the woven strips. Alternatively, a simple diagonal grid or “echo quilting” (following the lines of the plait) can enhance the movement of the design.
The Plaited Quilt Block – Pattern is a rewarding project that combines the logic of geometry with the beauty of textile art.
Throughout this article, we’ve covered the importance of fabric contrast, the necessity of precision cutting, and the assembly techniques that make the “woven” illusion come to life. By focusing on your seam allowance and using the right quilting tools, you can create a sophisticated design that looks far more difficult than it actually is to sew.


