
Patchwork Bird Tutorial

The Heart and Star Quilt – Pattern represents a masterful blend of two of the most iconic symbols in textile history, offering quilters a unique way to combine sentimentality with celestial geometry. While many traditional designs focus on a single motif, integrating both hearts and stars into a unified layout creates a visual narrative that is both romantic and aspirational. This specific pattern is highly sought after because it allows for immense creativity in color placement, making it suitable for everything from nursery decor to commemorative heirloom pieces that celebrate milestones like weddings or anniversaries.
Designing a project around the Heart and Star Quilt – Pattern requires a thoughtful approach to balance and symmetry, as the curves of the heart must harmonize with the sharp, crisp points of the stars. For many enthusiasts, the challenge lies in selecting a color palette that allows both shapes to shine without one overpowering the other. Whether you prefer a primitive folk-art aesthetic with deep reds and navys or a modern minimalist look with soft pastels and grey tones, this pattern provides the perfect canvas for your artistic expression and technical skill development.
In this comprehensive guide, we will explore the nuances of the Heart and Star Quilt – Pattern, breaking down the essential steps from fabric selection to the final quilting stitches. We will look at how to manage the different piecing techniques required for each shape and offer professional tips on how to maintain accuracy throughout the assembly process. By the end of this article, you will have a deep understanding of why this design remains a staple in the quilting community and how you can successfully bring your own version to life with confidence and precision.
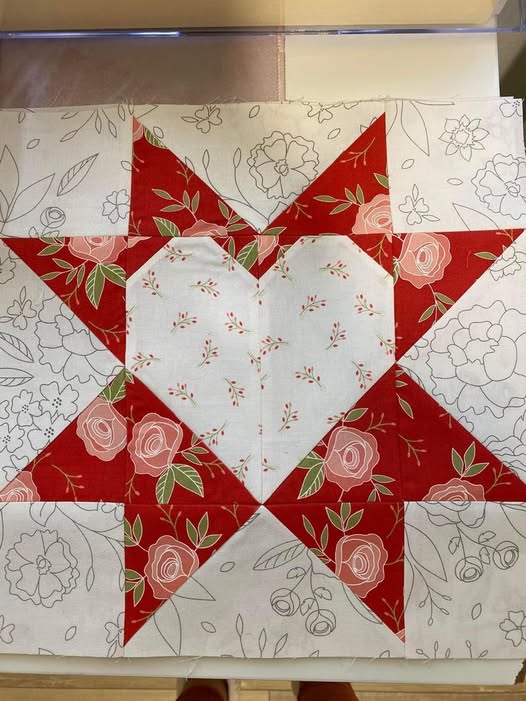
The architecture of a Heart and Star Quilt – Pattern usually relies on a grid system, where alternating blocks feature either a heart or a star. To make the design feel cohesive rather than cluttered, quilters often use a consistent background fabric, such as a crisp white or a subtle cream. This “negative space” is what allows the individual motifs to stand out, ensuring that the intricate work you put into the points and curves is clearly visible from a distance.
When working with the star elements of the Heart and Star Quilt – Pattern, most designers opt for the classic Sawtooth Star or the Ohio Star. These styles provide a sturdy, geometric contrast to the softer lines of the heart blocks. The mathematical precision of the star points serves as a wonderful counterpoint to the organic, emotive feel of the hearts, creating a balanced composition that feels complete and well-thought-out.
The heart blocks in this quilt design are typically constructed using the “stitch and flip” method, which avoids the need for difficult curved piecing. By placing small squares on the corners of larger rectangles and sewing diagonally, you can create the illusion of a curve. This makes the Heart and Star Quilt – Pattern accessible even to those who are relatively new to quilting but want to move beyond basic squares and triangles into more representational art.
One of the most important aspects of mastering this pattern is maintaining a consistent seam allowance. Because you are dealing with many diagonal seams—both in the stars’ flying geese units and the hearts’ rounded tops—even a tiny error can multiply across the quilt top. Using a specialized quilting foot and a “scant” quarter-inch seam will help ensure that your stars keep their sharp points and your hearts remain perfectly symmetrical throughout the construction.
Fabric value is another critical component of a successful Heart and Star Quilt – Pattern. If your fabrics are too similar in brightness or saturation, the shapes will “bleed” into each other and the pattern will lose its impact. Using a color value scale to check your choices—ensuring a clear distinction between light, medium, and dark tones—will help the stars look like they are twinkling and the hearts look like they are popping off the surface.
Finally, the scale of the blocks within the Heart and Star Quilt – Pattern can drastically change the finished look. Large 12-inch blocks result in a bold, graphic quilt that comes together quickly and highlights large-scale fabric prints. Conversely, smaller 6-inch blocks create a more intricate, mosaic-like appearance that showcases your technical precision and ability to handle small-scale patchwork with expert care and attention to detail.
To achieve professional results with your Heart and Star Quilt – Pattern, start with high-quality 100% cotton quilting fabric. Cotton is the preferred choice because it has a stable weave that doesn’t stretch excessively, which is vital when you are sewing the many diagonal seams required for both heart and star motifs. Using high-thread-count fabric also prevents the “shadowing” effect where dark seam allowances show through lighter background fabrics.
A sharp rotary cutter and a high-quality self-healing mat are indispensable when prepping pieces for the Heart and Star Quilt – Pattern. Accuracy in the cutting phase is 50% of the battle; if your initial squares and rectangles are even a fraction of an inch off, the star points will not align, and the hearts will look lopsided. Always replace your blade before starting a new large project to ensure clean, effortless cuts every time.
Acrylic quilting rulers with clear 45-degree markings are particularly helpful for this pattern. Since both the hearts and the stars involve diagonal lines, having a ruler that helps you check your angles will save you from the frustration of “lost points.” Many quilters also find that using a square-up ruler specifically for the finished blocks ensures that the entire quilt top remains flat and square during the final assembly.
Don’t underestimate the power of fabric starch when working on the Heart and Star Quilt – Pattern. Because this pattern uses many bias edges (the diagonal cut of the fabric), the material can easily become distorted during handling or sewing. Lightly starching your fabric before you cut it gives it a paper-like crispness that holds its shape beautifully, resulting in much more accurate piecing and flatter seams.
Thread choice also matters when sewing a complex Heart and Star Quilt – Pattern. A fine, 50-weight cotton thread is ideal because it is strong but thin, meaning it doesn’t take up too much space within the seam. This allows your fabric to fold over more accurately, preserving the intended dimensions of your blocks. Neutral colors like grey or tan are usually best as they blend into almost any color palette without standing out.
Lastly, a high-quality iron and pressing mat are your best friends. In quilting, we “press” rather than “iron”—moving the iron up and down rather than side to side. For the Heart and Star Quilt – Pattern, pressing your seams open or toward the darker fabric will minimize bulk at the intersections. A flat, well-pressed block is much easier to join to its neighbor, ensuring the final quilt top is free of waves or puckers.
When piecing the stars for your Heart and Star Quilt – Pattern, the “Flying Geese” unit is likely the most common component you will encounter. To prevent losing the tips of your star points when you sew the blocks together, always ensure your seam passes exactly through the “X” created by previous stitches. This small detail is the hallmark of an advanced quilter and makes the geometric precision of the star truly stand out.
For the heart components of the Heart and Star Quilt – Pattern, the “Snowballing” technique is often used for the top curves. This involves placing small squares on the upper corners of a larger rectangle and sewing across the diagonal. To ensure these look uniform across all your heart blocks, try using seam tape on your sewing machine’s throat plate as a guide, which allows you to sew perfect diagonals without having to mark every single piece.
Managing the “bulk” at the center of the stars is a common challenge in the Heart and Star Quilt – Pattern. When eight points meet in the middle, the fabric can become quite thick. To solve this, some quilters “spin” their seams at the intersection, which flattens the center and makes it much easier to quilt over later. This technique involves slightly opening the last few stitches of the seam allowance to let the fabric lay in a circular pattern.
Symmetry is the soul of the heart block. If one side of your heart looks different than the other, it usually stems from inconsistent diagonal sewing. When working on your Heart and Star Quilt – Pattern, consider sewing your heart units in “pairs”—doing the left sides all at once and then the right sides. This repetitive motion helps maintain a consistent rhythm and ensures that both halves of the heart are mirror images of each other.
To add extra flair to your Heart and Star Quilt – Pattern, you can experiment with fussy cutting. This means centering a specific motif from your fabric—like a small bird or a flower—directly in the center of the star or the middle of the heart. This adds a “hidden” layer of detail to the quilt that rewards the viewer for looking closely, turning a standard pattern into a customized work of art.
If you find that your blocks are coming out slightly different sizes, don’t panic. The “trimming” method is a great safety net for the Heart and Star Quilt – Pattern. You can intentionally cut your initial pieces slightly larger and then trim each finished block down to the exact same size using a squaring ruler. This ensures that when you go to sew the rows together, everything lines up perfectly with minimal effort and no stretching.
Once all your individual heart and star blocks are complete, the final assembly of the Heart and Star Quilt – Pattern begins. Many quilters choose to use “sashing”—strips of fabric between the blocks—to give each motif its own frame. Sashing not only makes the quilt larger but also provides a buffer that can hide small inconsistencies in block size, ensuring a professional and polished appearance for the final quilt top.
Choosing a border fabric is the next step in completing your Heart and Star Quilt – Pattern. A dark, solid border can act like a frame for a painting, drawing the eye inward toward the hearts and stars. Alternatively, a busy floral or geometric print that incorporates all the colors used in the blocks can tie the entire project together. Double borders, featuring a thin “stop” border and a wider outer border, often add a sophisticated touch.
The “quilting” itself—the stitches that hold the three layers together—can truly transform the Heart and Star Quilt – Pattern. For a romantic look, you might choose to quilt “feathers” inside the hearts and “straight lines” or “rays” radiating out from the stars. This contrast in quilting textures reinforces the difference between the soft heart shapes and the sharp star points, adding a tactile dimension to the visual design.
If you prefer Free Motion Quilting (FMQ), you can create a “stipple” or “meander” pattern in the background spaces. This flattens the background and makes the heart and star motifs puff up slightly, creating a beautiful 3D effect. For those using a standard domestic machine, “walking foot quilting” in a simple grid or diagonal pattern is a classic choice that never goes out of style and complements the Heart and Star Quilt – Pattern perfectly.
Don’t forget the importance of the quilt binding. For a Heart and Star Quilt – Pattern, a striped binding cut on the bias can add a playful, “candy cane” edge that frame the hearts beautifully. If you want the focus to remain strictly on the internal design, use the same fabric as your outer border for the binding, which creates a clean, “infinite” edge that doesn’t distract the eye.
Finally, always add a quilt label to the back of your finished masterpiece. Document the date, the name of the Heart and Star Quilt – Pattern, and the name of the maker. This pattern is often used for “memory quilts,” and having that information attached ensures that future generations will know the story behind the hearts and stars that kept their ancestors warm.
1. Is the Heart and Star Quilt – Pattern suitable for beginners?
Yes, it is considered an “advanced beginner” project. While it requires more precision than a simple patchwork quilt, the use of “stitch and flip” methods for hearts and standard star units makes it very achievable if you take your time and follow the measurements carefully.
2. How much fabric do I need for a lap-sized Heart and Star Quilt?
Generally, you will need about 4 to 5 yards of various fabrics for the quilt top, including the background. This allows for several different colors for the hearts and stars. Always check the specific requirements of your chosen Heart and Star Quilt – Pattern version before shopping.
3. Can I make this quilt using “Fat Quarters”?
Absolutely! The Heart and Star Quilt – Pattern is very fat-quarter friendly. Since the individual pieces for the hearts and stars are usually small, a bundle of fat quarters can provide a wide variety of colors and prints, giving the quilt a beautifully coordinated yet scrappy look.
4. What is the best way to ensure my star points don’t get cut off?
The secret is to always leave a 1/4 inch of space between the point of the star and the edge of the block. When you sew the blocks together, your seam should land exactly in that 1/4 inch margin. If you sew too close to the point, it will disappear into the seam.
5. How do I choose colors for a Heart and Star Quilt – Pattern?
A popular method is to pick one “main” color for the hearts (like red) and a “secondary” color for the stars (like yellow or gold), then use a neutral background. Using a color wheel to find complementary colors is a great way to ensure your quilt has a vibrant, professional feel.
6. Can this pattern be used for a baby quilt?
It is one of the most popular patterns for baby quilts! The hearts represent love and the stars represent “reaching for the stars.” It creates a meaningful gift that is both decorative and functional for a nursery.
In summary, the Heart and Star Quilt – Pattern is a versatile and deeply symbolic design that offers a rewarding challenge for quilters of all levels. We have discussed the importance of fabric contrast, the precision needed for star points, and the simple techniques used to create beautiful heart motifs.
By focusing on accurate cutting, consistent seam allowances, and thoughtful quilting, you can create a textile piece that is as sturdy as it is beautiful. This pattern bridges the gap between traditional craft and modern art, making it a timeless addition to any home.


