
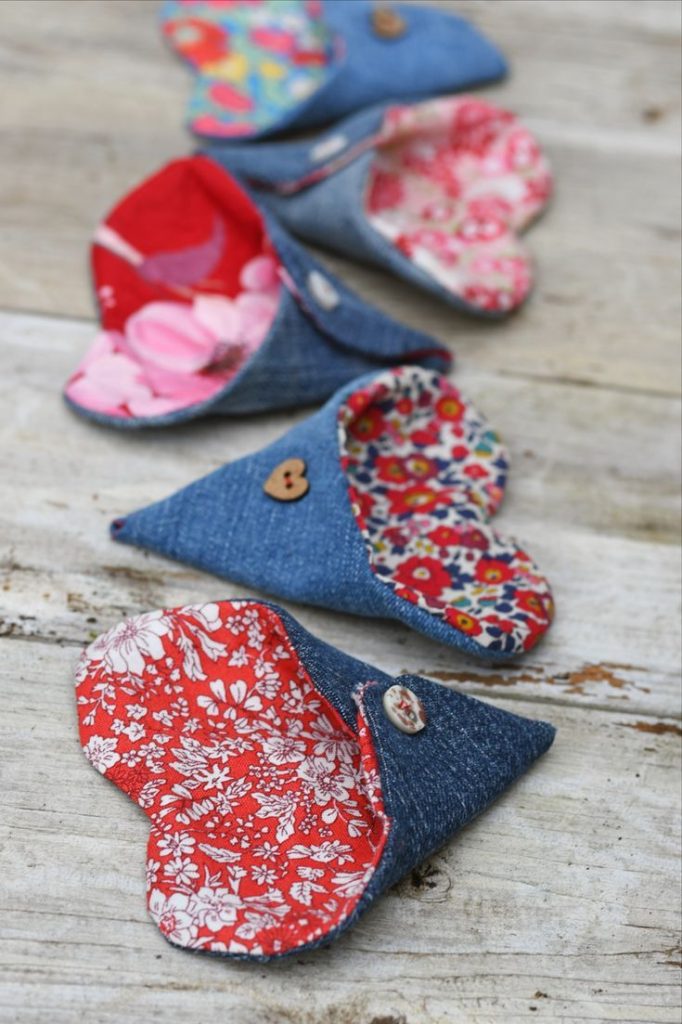
Patchwork Bird Tutorial

Creating Heart-shaped pockets made from fabric scraps – Pattern projects is one of the most rewarding ways to breathe new life into your sewing room leftovers while adding a touch of whimsy to your wardrobe. Many sewists find themselves with piles of beautiful fabric remnants that are too small for a garment but too precious to throw away. By focusing on a specialized sewing pattern, you can transform these colorful bits of cotton, linen, or denim into functional and decorative elements that celebrate sustainability and heartfelt design.
The beauty of a Heart-shaped pockets made from fabric scraps – Pattern lies in its incredible versatility and the emotional connection it brings to a piece of clothing. Whether you are adding a secret pocket to the inside of a coat, a visible decorative feature on a child’s apron, or a charming addition to a simple tote bag, the heart shape resonates with everyone. This project is perfect for beginners because it involves manageable curves and small-scale sewing, yet it offers enough creative room for advanced makers to experiment with embroidery, quilting, and lace overlays.
In this comprehensive guide, we will walk through the entire process of mastering the Heart-shaped pockets made from fabric scraps – Pattern. We will discuss how to select the best scraps from your stash, how to ensure the symmetry of your heart shape, and the best techniques for attaching these pockets to various types of fabric. By the time you finish reading, you will have a clear roadmap for creating these eco-friendly embellishments, helping you turn “waste” into a signature style statement that is both practical and beautiful.
Before you dive into the Heart-shaped pockets made from fabric scraps – Pattern, the first step is a thorough audit of your scrap bin. You want to look for fabrics that have enough structural integrity to hold items like a phone, a key, or a small coin purse. Woven fabrics like quilting cotton, canvas, or lightweight denim are ideal because they don’t stretch out of shape when you are sewing the curved edges of the heart.
When working with a Heart-shaped pockets made from fabric scraps – Pattern, consider the weight of the scrap in relation to the garment it will be attached to. If you are putting a heavy denim heart onto a lightweight silk blouse, the pocket will sag and distort the garment’s drape. Try to match the weight and fiber content as closely as possible, or use a lightweight fusible interfacing to give your thinner fabric scraps the body they need to function as a pocket.
Color coordination is where the fun truly begins with the Heart-shaped pockets made from fabric scraps – Pattern. You can go for a monochromatic look by choosing a scrap that is just a few shades darker than the main fabric, or you can opt for high-contrast “pop” by using vibrant florals or geometric prints. Since these are small pieces, don’t be afraid to use those “loud” patterns that might be overwhelming in a full dress but look absolutely charming as a small accent.
Another essential part of the preparation is ensuring you have enough fabric for both the front and the lining of the pocket. While some people prefer a raw-edge look, a professional-grade Heart-shaped pockets made from fabric scraps – Pattern usually involves a lined pocket for durability and a clean finish inside. If your main scrap is very small, you can use a plain, neutral fabric for the lining to save your “pretty” fabric for the visible exterior.
Ironing your scraps is a non-negotiable step before you even lay down your pattern template. Small scraps are often wrinkled or creased from being tucked away in bins, and even a tiny fold can result in an asymmetrical heart once the fabric is cut. Use a hot iron and perhaps a bit of fabric starch to make the material crisp and easy to handle, ensuring that your cutting is precise and your seams are straight.
Lastly, think about the orientation of the print on your scraps. If your fabric has a directional motif—like little birds or stripes—make sure they are facing the right way when you pin your Heart-shaped pockets made from fabric scraps – Pattern to the cloth. A heart with upside-down flowers might look intentional to some, but usually, a well-aligned print is the hallmark of a high-quality, thoughtful sewing project.
The most critical part of the Heart-shaped pockets made from fabric scraps – Pattern is the symmetry of the heart itself. To achieve this, it is always best to fold your fabric scrap in half and cut only one side of the heart. This classic technique ensures that the left and right lobes are identical, which is much more pleasing to the eye than a free-hand heart that might look slightly lopsided once sewn onto a garment.
When you are ready to cut, use a pair of sharp fabric shears or a small rotary cutter. Since heart pockets usually involve tight curves, a smaller blade often provides better control than a large one. If you are following a specific Heart-shaped pockets made from fabric scraps – Pattern, leave a standard quarter-inch seam allowance around the entire perimeter to ensure the finished pocket doesn’t end up smaller than you intended.
If your fabric scraps are prone to fraying, like linen or loose-weave wool, consider using pinking shears for the edges or applying a thin layer of fray check solution. Because a heart pocket has many “bias” edges (areas where the fabric is cut on a diagonal), it is naturally more delicate and prone to stretching. Handling the cut pieces as little as possible before sewing will help maintain the integrity of the shape.
For a more decorative version of the Heart-shaped pockets made from fabric scraps – Pattern, you can try a “fussy cutting” approach. This involves centering a specific detail of the fabric—such as a single large rose or a specific character—right in the center of the heart. This technique uses a bit more fabric but results in a pocket that looks like a custom-designed piece of art rather than a random scrap.
Once your pieces are cut, it is helpful to stay-stitch around the curves. Stay-stitching is a line of regular-length stitches sewn just inside the seam allowance. This acts as a “skeleton” for the fabric, preventing the round parts of your Heart-shaped pockets made from fabric scraps – Pattern from distorting as you handle them during the lining and attachment phases. It’s a small step that makes a huge difference in the final look.
Don’t forget to mark the “pivot point” at the bottom of the heart and the “dip” at the top. Using a tailor’s chalk or a water-soluble pen to mark these two points will help you know exactly where to stop and turn your fabric under the sewing machine needle. Precision at these two points is what defines the difference between a vague blob and a crisp, recognizable heart shape.
To sew the Heart-shaped pockets made from fabric scraps – Pattern, place your exterior fabric and lining fabric right sides together. Start sewing from the side, moving up toward the top lobes. When you reach the “dip” in the center of the heart, leave your needle down, lift the presser foot, and pivot the fabric. This ensures a sharp V-shape at the top that looks intentional and clean.
The bottom point of the heart requires similar care. As you approach the tip of your Heart-shaped pockets made from fabric scraps – Pattern, slow down your machine speed. If you over-shoot the point, the heart will look blunt. A perfect, sharp point is achieved by taking one tiny stitch across the very tip rather than trying to pivot on a single needle point, which helps the fabric turn more smoothly when flipped right-side out.
After sewing around the perimeter, you must clip your curves. Use small scissors to make tiny snips into the seam allowance all around the rounded parts of the heart, being careful not to cut the stitches. This allows the fabric to expand and lay flat when turned. For the center dip of the Heart-shaped pockets made from fabric scraps – Pattern, make one straight clip down toward the needle point to prevent the fabric from bunching.
Turn the heart right-side out through a small opening you left on the straight side. Use a point turner or a dull knitting needle to gently push out the bottom point and the rounded lobes. Don’t push too hard, or you might pop a stitch! Once the shape is turned, give it a very good press with plenty of steam to set the edges and make the heart lay perfectly flat.
The final step before attaching is to top-stitch the top edge of the pocket. Since this is where hands or items will be entering, the top of your Heart-shaped pockets made from fabric scraps – Pattern needs extra reinforcement. A double row of top-stitching not only looks professional but also prevents the lining from peeking out or the fabric from stretching over time with use.
If you want to add an extra layer of “handmade” charm, you can hand-sew a decorative blanket stitch or a running stitch around the edge with embroidery floss. This looks particularly beautiful on felt or wool scraps and adds a “cottagecore” aesthetic to the project. It’s a great way to personalize the Heart-shaped pockets made from fabric scraps – Pattern even further before it is permanently joined to your garment.
Placement is everything when it comes to the Heart-shaped pockets made from fabric scraps – Pattern. Before you sew, pin the heart onto your garment and try it on (if possible) or lay it flat to check the alignment. Pockets that are too high or too low can look awkward. For a chest pocket, the general rule is to place it about 7 to 9 inches down from the shoulder seam, but feel free to adjust based on your personal preference.
Use a wash-away adhesive tape or a fabric glue stick to hold the heart in place instead of just pins. Pins can cause the fabric to shift or pucker, especially on a curved shape. By using a temporary adhesive, you ensure that the Heart-shaped pockets made from fabric scraps – Pattern stays perfectly flat against the garment while you navigate the curves under your sewing machine.
When you begin sewing the pocket onto the garment, start at the top corner and use a backstitch or a small triangle stitch for reinforcement. The top corners of pockets take the most stress, so they are the most likely to rip. A reinforced “bar tack” or a tiny stitched triangle ensures your Heart-shaped pockets made from fabric scraps – Pattern will stay attached even with heavy use.
Sew slowly around the curves, using an edge-stitch foot if you have one. This foot has a small guide that runs along the edge of the pocket, helping you maintain a perfectly even distance from the edge. For the Heart-shaped pockets made from fabric scraps – Pattern, keeping your stitches about 1/8th of an inch from the edge creates a clean, professional look that mimics high-end ready-to-wear clothing.
If you are attaching the pocket to a stretchy fabric like a t-shirt, you must use a ballpoint needle and a stabilizer on the back of the garment. Without a stabilizer, the weight of the pocket and the sewing process will cause the jersey fabric to “wave” or ripple. A piece of tear-away stabilizer ensures the Heart-shaped pockets made from fabric scraps – Pattern remains crisp and the t-shirt stays flat.
Once the sewing is complete, pull your thread tails to the back of the garment and tie them off by hand. This prevents the stitching from unraveling and leaves the front of your Heart-shaped pockets made from fabric scraps – Pattern looking flawless. Give the entire area one final press with the iron to meld the stitches into the fabric, and your custom-upcycled garment is ready to wear!
1. Can I make these pockets without a sewing machine?
Absolutely! You can use a backstitch for the main construction and a hidden ladder stitch to attach it to the garment. Hand-sewing gives you even more control over the tight curves of the heart.
2. What is the best size for a heart pocket?
For an adult garment, a heart that is about 5 inches wide and 5 inches tall is usually perfect. For children’s clothing, 3.5 inches is a standard size. Always check that your hand can actually fit inside if you want it to be functional!
3. Do I have to line the pocket?
While you don’t have to, lining the Heart-shaped pockets made from fabric scraps – Pattern makes it much more durable and prevents the raw edges of your scraps from fraying inside the pocket. It also makes the “turning” process much easier.
4. Can I use stretchy scraps on a woven garment?
It is generally not recommended. If you use a knit scrap on a woven jacket, the pocket will stretch out and look saggy. If you must use a knit scrap, interface it heavily with a non-stretch woven interfacing first.
5. How do I make the point at the bottom really sharp?
The secret is clipping the seam allowance and using a point turner. Also, when sewing, stop exactly at the tip, leave the needle down, and pivot. Taking one single stitch “across” the point instead of a sharp 180-degree turn can also help the fabric lay better.
6. Is this project suitable for kids to learn to sew?
Yes! It is a fantastic beginner project. It teaches curve control, pivoting, and the concept of upcycling. Kids love choosing their own “special” scraps to make hearts for their jeans or bags.
Mastering the Heart-shaped pockets made from fabric scraps – Pattern is a wonderful way to combine practical sewing skills with creative upcycling. Throughout this article, we’ve explored how to select the right fabric remnants, the importance of symmetry in your cutting, and the technical steps like clipping curves and reinforcing corners that result in a professional finish.
By turning your scraps into these charming accents, you are not only reducing waste but also adding a unique, “made with love” element to your wardrobe or home decor.


