
Crochet Flower - Tutorial

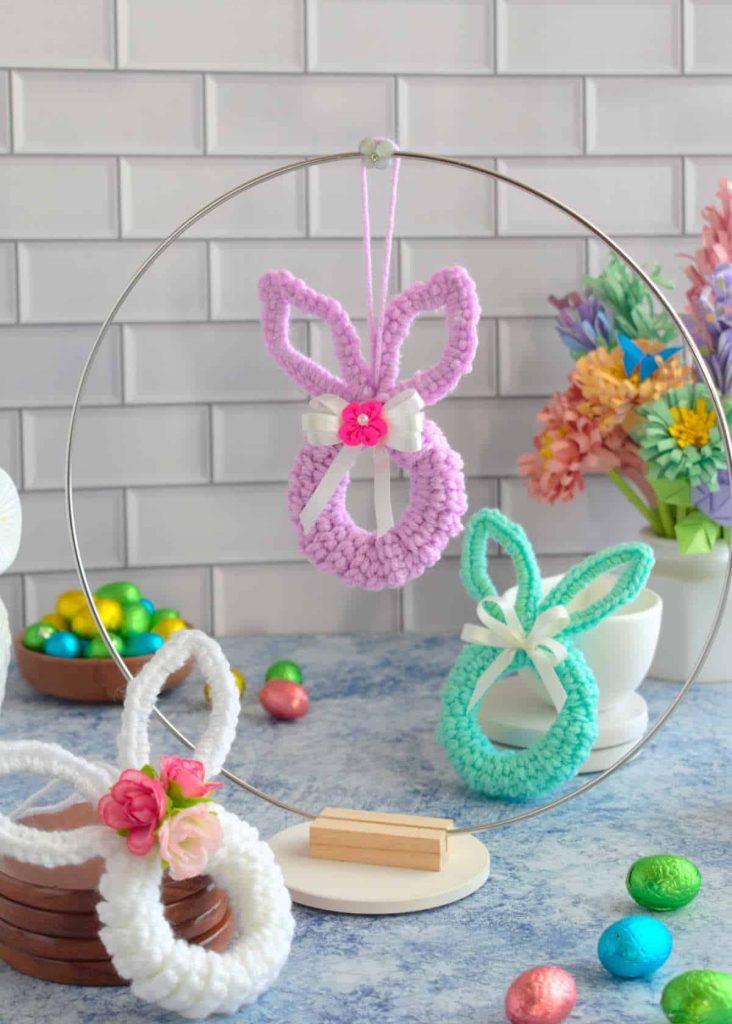
The Mini Crochet Bunny Wreath – Pattern is one of the most adorable ways to bring a touch of handmade charm to your seasonal home decor, especially during the spring and Easter months. Crafting small-scale items has become a massive trend in the fiber arts community because they allow for quick gratification and the ability to use up leftover yarn scraps. This specific pattern combines the circular elegance of a wreath with the whimsical appeal of a tiny bunny, creating a finished piece that works perfectly as a Christmas tree ornament, a door hanger, or a unique gift topper for someone special.
Creating a Mini Crochet Bunny Wreath – Pattern is not just about following steps; it is about mastering the art of “amigurumi” on a miniature scale. Working with smaller hooks and finer yarn can be a relaxing challenge that improves your hand-eye coordination and tension control. Because this design is compact, every stitch counts, and the way you shape the bunny ears or the roundness of the wreath base will define the personality of your final creation. It is a wonderful project for those who want to practice sculptural crochet without committing to a massive, months-long blanket or sweater project.
In the following sections, we will break down every aspect of the Mini Crochet Bunny Wreath – Pattern, from selecting the right materials to finishing your project with professional-looking details. Whether you are a beginner looking to expand your skills or an expert seeking a fast and fun project, this guide is designed to walk you through the process with ease. By focusing on the structural integrity of the wreath and the expressive features of the bunny, you will be able to produce a high-quality handmade crochet piece that looks like it came straight from a boutique craft fair.
The success of your Mini Crochet Bunny Wreath – Pattern starts with the type of yarn you choose. For miniature work, a lightweight cotton yarn (Category 2 or 3) is usually the best choice because it offers excellent stitch definition. Cotton yarn is less “fuzzy” than wool, which means the tiny features of the bunny and the texture of the wreath will be crisp and easy to see. If you want a softer, more rustic look, a bamboo blend can also provide a beautiful sheen and a gentle touch.
Pairing your yarn with the correct hook is the next essential step in the Mini Crochet Bunny Wreath – Pattern. Generally, you should use a hook that is slightly smaller than what the yarn label suggests. For example, if the yarn calls for a 3.5mm hook, try using a 2.5mm or 2.75mm hook. This ensures that your stitches are tight and dense, which is vital for preventing the stuffing from showing through the bunny’s head or the wreath’s padding.
For the base of your Mini Crochet Bunny Wreath – Pattern, you have two main options. You can crochet a long tube and stuff it to form a circle, or you can crochet around a pre-made plastic or wooden ring. Using a ring provides a much firmer structure and ensures your wreath remains a perfect circle regardless of how it is hung. If you choose the stuffed tube method, make sure to use high-quality polyester fiberfill to keep the shape consistent throughout the year.
Color palettes can make or break the aesthetic of your Mini Crochet Bunny Wreath – Pattern. While traditional white or cream bunnies are classic, don’t be afraid to experiment with soft pastels like lavender, mint, or peach for the wreath base. Using a variegated yarn for the wreath can simulate the look of spring flowers or foliage, providing a beautiful backdrop for a solid-colored bunny. Consistency in color value helps the tiny bunny remain the focal point of the entire crochet design.
Small details require specialized tools, so make sure you have a sharp pair of embroidery scissors and a fine-tipped tapestry needle ready. Since the Mini Crochet Bunny Wreath – Pattern involves sewing small parts together, a needle with a large eye but a thin body will make it much easier to weave through tight stitches. You might also want to have some fabric glue on hand for attaching tiny embellishments like bows or beads that are too small to sew securely.
Safety is also a consideration if your Mini Crochet Bunny Wreath – Pattern is intended for a child’s room. Instead of using plastic safety eyes, which can still be a choking hazard on very small items, consider embroidering the eyes with black thread. Embroidered eyes often give the bunny a more “kawaii” or soulful expression, and they allow you to customize the face with eyelashes or different eye shapes that plastic pieces simply cannot replicate.
The bunny is the star of the Mini Crochet Bunny Wreath – Pattern, and its construction usually involves working in continuous rounds. This technique, common in amigurumi, prevents a visible “seam” from appearing on the back of the bunny’s head. Using a stitch marker is absolutely essential here; in such a small project, losing track of your starting point by even one stitch can result in a lopsided bunny that doesn’t sit right on the wreath.
When shaping the ears for the Mini Crochet Bunny Wreath – Pattern, you will often use a combination of single crochet and half-double crochet stitches. The ears need to be tall enough to be recognizable but not so heavy that they flop over (unless that is the “lop-ear” look you are going for). To make the ears stand upright without wire, you can sew the base of the ear into a slightly curved “C” shape when attaching it to the head, which provides natural structural support.
The body of the bunny in a Mini Crochet Bunny Wreath – Pattern is often simplified to keep the weight low. Sometimes, the bunny is just a head and front paws peeking over the edge of the wreath, while other designs feature a full seated bunny. If you are making a full bunny, ensure the “decreases” used to shape the neck are worked as “invisible decreases.” This technique involves only using the front loops of the stitches, resulting in a much smoother surface that looks professional.
Stuffing is an art form in itself when it comes to the Mini Crochet Bunny Wreath – Pattern. It is tempting to overstuff to make the bunny firm, but this can stretch the stitches and create gaps. The goal is to use enough stuffing so the bunny holds its shape when squeezed, but not so much that the fabric feels hard. Pro-tip: use a chopstick or a stuffing tool to push tiny bits of fiberfill into the very tips of the ears or the nose area for perfect definition.
Facial embroidery is the moment your Mini Crochet Bunny Wreath – Pattern truly comes to life. A simple pink “Y” shape makes for a perfect bunny nose, and placing the eyes lower on the head (roughly level with the nose) often results in a cuter, more youthful appearance. Take your time with this step; even a millimeter of difference in eye placement can change the bunny’s expression from “happy” to “surprised.”
Attaching the bunny to the wreath base is the final structural step. Instead of just sewing one point, try to anchor the bunny at multiple points—usually the back of the head and the bottom of the body or paws. This prevents the bunny from wobbling or sagging over time. Use a “ladder stitch” to join the pieces, as this will hide the joining thread inside the crochet fabric, making the Mini Crochet Bunny Wreath – Pattern look like it was made as one single piece.
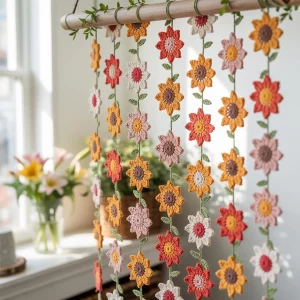
Once the basic structure of your Mini Crochet Bunny Wreath – Pattern is complete, it is time to add the decorative flourishes that make it unique. Tiny crochet flowers are a popular addition. You can make simple five-petal blossoms by working into a magic ring, and these can be scattered around the wreath to give it a “spring garden” vibe. Small leaves in various shades of green can add depth and realism to these floral accents.
Another way to elevate the Mini Crochet Bunny Wreath – Pattern is by adding ribbons or lace. A small gingham bow tied around the bunny’s neck or at the bottom of the wreath adds a touch of “shabby chic” charm. If you are handy with a needle, you can even sew a small piece of lace behind the bunny to act as a decorative doily. These mixed-media elements provide a beautiful contrast to the texture of the yarn.
Seasonality is a great way to adapt the Mini Crochet Bunny Wreath – Pattern for different times of the year. While bunnies are associated with Easter, you can turn this into a winter wreath by using a white and silver color scheme and adding tiny “snowballs” made of white pom-poms. For autumn, use orange and brown yarns and replace the flowers with tiny crochet pumpkins or acorns to sit alongside your bunny.
Beads and sequins can add a bit of sparkle to your Mini Crochet Bunny Wreath – Pattern. If this is a decorative piece for an adult or a teenager’s room, sewing small pearls into the center of the crochet flowers can make the wreath look very elegant. Just remember to keep the scale in mind; the beads should be small enough that they don’t overwhelm the delicate crochet stitches.
Don’t forget the hanging loop for your Mini Crochet Bunny Wreath – Pattern. You can crochet a simple chain of 20-30 stitches and attach it to the top of the wreath, or you can use a piece of twine or satin ribbon for a more polished look. If you want the wreath to hang flat against a wall, make sure the loop is centered perfectly behind the bunny’s head or the top-center of the ring.
Personalization makes the Mini Crochet Bunny Wreath – Pattern a wonderful gift. You can embroider a tiny initial on the bunny’s tummy or add a small wooden heart with a name on it. These small gestures turn a simple craft project into a cherished keepsake. The versatility of the mini wreath format means you can create a whole “family” of wreaths, each with a different bunny color or flower arrangement to represent different people.
To make your Mini Crochet Bunny Wreath – Pattern look its best, you should consider the “blocking” process. While you don’t block amigurumi in the traditional way you block a sweater, you can use a handheld steamer to gently relax the stitches of the wreath and flowers. This helps the petals lay flat and removes any minor wrinkles or distortions that occurred while you were handling the piece during assembly.
Starch can be a secret weapon for a Mini Crochet Bunny Wreath – Pattern. If your bunny ears or floral petals are looking a bit limp, a light spray of fabric starch can help them hold their shape indefinitely. Be careful not to over-saturate the yarn; a light misting followed by a few minutes of air-drying is usually all you need to give the piece a “crisp” and professional feel.
Properly weaving in your ends is vital for the longevity of the Mini Crochet Bunny Wreath – Pattern. Because these are small items that might be handled or moved frequently, a loose end can quickly lead to a unraveling disaster. Use the “rule of three” for weaving: go through the stitches in one direction, turn and go back the other way, and then turn one last time. This creates enough friction that the yarn tail will stay hidden forever.
If you are planning to sell your finished Mini Crochet Bunny Wreath – Pattern at craft fairs or online shops like Etsy, presentation is key. Cardboard backing or a small windowed gift box can protect the delicate ears and flowers during shipping. Including a small “Care Instructions” card—noting that the item is decorative and should be spot-cleaned only—adds a professional touch that customers truly appreciate.
Cleaning your Mini Crochet Bunny Wreath – Pattern should be done with care. Since it contains stuffing and potentially a structural ring, machine washing is not recommended. Instead, use a soft-bristled brush (like a clean toothbrush) to gently whisk away dust. If a stain occurs, a damp cloth with a tiny amount of mild soap should be used to “blot” the area rather than rubbing it, which could cause the yarn to pill.
Finally, take high-quality photos of your completed Mini Crochet Bunny Wreath – Pattern. Using natural, indirect sunlight will show off the texture of your stitches and the accuracy of your color choices. Whether you are sharing your work on Instagram or keeping a digital portfolio of your crochet journey, a good photo captures the “soul” of your handmade creation and allows you to inspire other crafters in the community.
1. Is the Mini Crochet Bunny Wreath – Pattern suitable for total beginners?
Yes, but it helps if you have practiced basic stitches like the single crochet and the magic ring first. Because it is a small project, mistakes are easy to see and fix, making it a great learning tool for those new to amigurumi-style crochet.
2. How long does it take to complete one wreath?
Depending on your speed and the number of decorations you add, a Mini Crochet Bunny Wreath – Pattern usually takes between 2 to 4 hours. It is the perfect project for a rainy afternoon or a weekend crafting session.
3. What size is the finished wreath?
Typically, these mini wreaths are between 3 to 5 inches in diameter. This size makes them perfect for ornaments, though you can scale the pattern up by using bulkier yarn and a larger hook if you want a full-sized door wreath.
4. Do I need to use a specific brand of yarn?
No, any yarn that matches the weight recommended in your Mini Crochet Bunny Wreath – Pattern will work. However, mercerized cotton is highly recommended for its durability and the way it resists pilling over time.
5. Can I use safety eyes on such a small bunny?
You can, but you must ensure they are the very small size (usually 4mm or 5mm). Always remember that safety eyes are not recommended for items intended for children under 3 years old; embroidery is a safer and often cuter alternative.
6. How do I make the wreath base look more like real foliage?
Try using a “bobble stitch” or “popcorn stitch” in green yarn for the wreath base. This creates a bumpy, textured surface that mimics the look of a boxwood or evergreen wreath, providing a lovely contrast to the smooth bunny.
In this article, we have journeyed through the delightful process of creating a Mini Crochet Bunny Wreath – Pattern, from the initial selection of high-quality cotton yarns to the final, delicate embroidery of the bunny’s face. We’ve learned that the secret to a professional-looking miniature lies in tight tension, careful stuffing, and the addition of thoughtful decorations like tiny flowers and ribbons. This project is a testament to how small-scale crochet can yield incredibly high-impact results, offering a versatile template for seasonal decor and heartfelt gifts.
The Mini Crochet Bunny Wreath – Pattern is more than just a craft; it’s a way to bring a little bit of handmade joy into your home or the lives of your loved ones. By mastering these techniques, you’ve added a valuable set of skills to your crochet repertoire, particularly in the realm of miniature assembly and sculptural shaping. We hope this guide has inspired you to experiment with your own color combinations and embellishments to create a wreath that is uniquely yours.


