
Crochet Flower - Tutorial

Finding the perfect Round crocheted coasters – Pattern is a fantastic way to blend home utility with artistic flair, offering a quick and satisfying project for crafters of all skill levels. These small but mighty kitchen accessories do more than just protect your wooden surfaces from unsightly water rings; they serve as a canvas for color experimentation and stitch practice. Whether you are a seasoned pro looking for a “palette cleanser” project between larger blankets or a complete novice eager to finish your first functional item, this specific design provides the ideal balance of simplicity and elegance.
The beauty of a Round crocheted coasters – Pattern lies in its circular geometry, which relies on the mathematical principles of “flat circle” increases to prevent curling or ruffling. Mastering this rhythm is a fundamental milestone in the journey of any fiber artist, as it opens the door to creating hats, rugs, and mandalas. Beyond the technical side, these coasters make incredibly thoughtful, handmade gifts for housewarming parties, weddings, or holiday stocking stuffers, allowing you to customize the color palette to match any recipient’s home decor.
In this comprehensive exploration, we will dive into the nuances of the Round crocheted coasters – Pattern, covering everything from the best yarn choices to the finishing touches that ensure a professional look. We will discuss how to achieve a perfectly flat finish, how to handle seamless color transitions, and how to protect your finished work from the wear and tear of daily use. By the time you reach the end of this guide, you will be equipped with the knowledge to churn out dozens of these charming accents, turning your yarn stash into a collection of practical art.
When you begin working on a Round crocheted coasters – Pattern, the fiber content of your yarn is the most critical decision you will make. Most experts recommend using 100% cotton yarn because it is highly absorbent, heat-resistant, and durable. Unlike acrylic, which can melt if a hot mug is placed on it or simply repel water instead of absorbing it, cotton thirsty fibers will soak up condensation and protect your furniture effectively.
The weight of the yarn also dictates the final size and texture of your Round crocheted coasters – Pattern. A standard Category 4 (Worsted Weight) cotton is the most common choice, as it provides enough thickness to cushion a heavy glass while remaining easy to manipulate with a 3.5mm or 4mm hook. If you prefer a more delicate, lace-like appearance, you might opt for a mercerized cotton thread, which has a beautiful sheen and resists fraying over time.
Selecting the right crochet hook is the next step in ensuring your pattern turns out as expected. For coasters, you generally want a slightly tighter tension than you would use for a scarf or a garment. Using a hook size that is half a millimeter smaller than what the yarn label suggests can help create a dense, sturdy fabric. This ensures that the Round crocheted coasters – Pattern maintains its structural integrity even after being soaked with moisture or tossed in the washing machine.
Don’t forget about the importance of stitch markers when working in the round. Since many coaster patterns use continuous spirals to avoid a visible seam, it is incredibly easy to lose track of where a new row begins. Placing a small clip or a scrap of contrasting yarn at the first stitch of each round will save you from the frustration of having to recount your increases constantly. This small habit is what separates a relaxing afternoon of crafting from a stressful “frogging” session.
Color theory can elevate a simple Round crocheted coasters – Pattern from basic to breathtaking. Consider using variegated yarns for a self-striping effect that requires no extra work, or choose a set of monochromatic shades for a modern, sophisticated gradient look. Since coasters are small, they are the perfect medium for testing out bold, “risky” colors that you might be hesitant to use in a larger project like a full-sized afghan.
Lastly, consider the “finish” of your materials. Some quilters and crocheters like to incorporate metallic threads or hemp cord into their Round crocheted coasters – Pattern for added grit or sparkle. While these can look stunning, always prioritize functionality; if the surface is too bumpy or uneven due to decorative elements, a wine glass might tip over. Aim for a flat, stable surface that provides a secure base for whatever drink it is meant to hold.
The magic of any Round crocheted coasters – Pattern begins at the very center, typically with a Magic Ring (also known as a Magic Circle). This technique allows you to pull the center hole completely shut, creating a seamless and professional-looking start. If the magic ring feels too finicky, a classic “Chain 2 and work into the first chain” method works just as well, though it may leave a tiny opening in the middle of your work.
To ensure your Round crocheted coasters – Pattern lays perfectly flat, you must follow the “Golden Rule of Increases.” Generally, this involves adding the same number of stitches in each round as you started with in the first. For example, if you start with 12 double crochets, you will add 12 more in each subsequent round. This mathematical progression provides just enough circumference for the circle to grow outward without waving or “bowing” into a bowl shape.
Understanding the difference between Single Crochet (SC), Half Double Crochet (HDC), and Double Crochet (DC) is vital for this pattern. A coaster made entirely of single crochet will be very dense and firm, perfect for heavy mugs. On the other hand, using double crochet will make the project move faster and create a slightly more flexible, open texture. Most classic Round crocheted coasters – Pattern designs utilize the HDC for a “best of both worlds” result that is both sturdy and quick to finish.
One common struggle when working in the round is the “seam” that forms when you join rounds with a slip stitch. To avoid this, you can learn the invisible join technique. Instead of slip stitching, you cut the yarn and use a tapestry needle to mimic the top of a stitch. This makes the edge of your Round crocheted coasters – Pattern look perfectly continuous, which is especially important if you are selling your crafts at local markets or giving them as high-end gifts.
As you progress through the rounds of your Round crocheted coasters – Pattern, you might notice the circle looking slightly hexagonal. This happens when increases are stacked directly on top of each other. To achieve a “true” circle, try staggering your increases. By shifting the location of the two-stitch clusters in each row, you break up the corners and create a smooth, rounded edge that looks much more organic and polished.
Tension control is the silent partner in a successful Round crocheted coasters – Pattern. If you find that your coaster is curling upward like a saucer, your tension is likely too tight, or you aren’t increasing enough. Conversely, if the edges look like a ruffled skirt, you have too many stitches. Regular “flat tests”—where you place the coaster on a table and press it down—will help you catch these issues early on before you’ve invested too much time in the project.
Once you have mastered the basic flat circle of the Round crocheted coasters – Pattern, you can begin to experiment with decorative borders. A simple Crab Stitch (Reverse Single Crochet) creates a beautiful, corded edge that adds a layer of sophistication and extra durability to the rim. It is a subtle touch that makes the coaster feel more substantial and helps it hold its shape over years of use and washing.
For a more whimsical or bohemian vibe, you can add a Scalloped Edge or a “Shell Stitch” border to your Round crocheted coasters – Pattern. This involves working multiple tall stitches into one space, skipping a stitch, and then anchoring it with a slip stitch. These little “petals” transform a utilitarian item into a decorative piece of art that looks wonderful on a summer patio table or in a cozy sunroom.
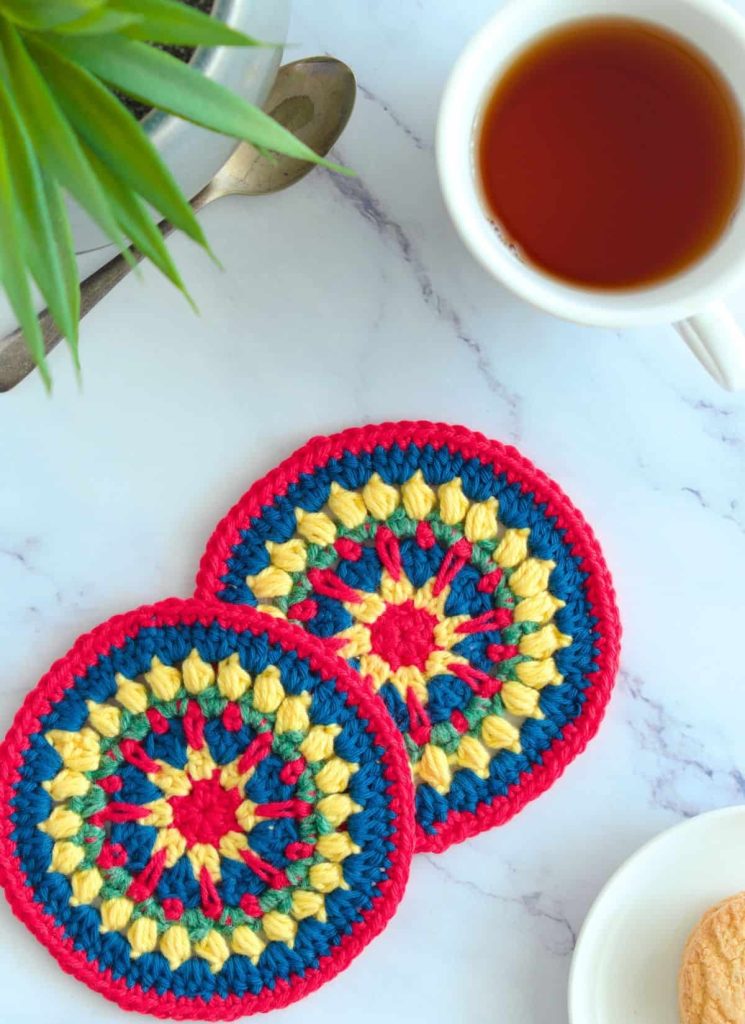
Another popular variation is the Mandala Style coaster. By changing colors every single round and incorporating “post stitches” (stitches worked around the stem of the row below), you can create incredible 3D textures within your Round crocheted coasters – Pattern. This approach turns each coaster into a miniature masterpiece of intricate geometry, though it does result in more ends to weave in at the end of the day.
If you enjoy a more rustic or farmhouse aesthetic, try working the Round crocheted coasters – Pattern with two strands of yarn held together. This “bulky” method results in a thick, chunky coaster that provides excellent insulation for hot tea or coffee. It also makes the project incredibly fast—sometimes taking only three or four rounds to reach the desired diameter of 4 to 5 inches.
Don’t be afraid to incorporate embroidery on top of your finished crochet. Once the Round crocheted coasters – Pattern is complete, you can use a contrasting thread to sew on small stars, initials, or even a tiny heart. This personalization makes the coasters feel bespoke and is a great way to use up those last few inches of scrap yarn that are too small for anything else.
Finally, consider the “Picot” border for a touch of elegance. A picot is a small loop made of chains that creates a pointed, lace-like tip on the edge of your Round crocheted coasters – Pattern. It is the perfect finish for a formal dining set or for coasters that will sit under delicate glassware. No matter which border you choose, ensure it doesn’t add too much bulk that might interfere with the stability of the drink.
The final step in any Round crocheted coasters – Pattern is the “finishing” process, which often includes blocking. Because crochet can naturally twist or pull, pinning your coasters to a foam mat and lightly spraying them with water (or steam) helps them find their permanent, flat shape. Once they dry, they will look significantly more professional and will “sit” better on flat surfaces.
To enhance the moisture protection of your Round crocheted coasters – Pattern, some makers like to add a felt backing. By cutting a circle of felt slightly smaller than the coaster and sewing it to the bottom with a blanket stitch, you create a double barrier for your furniture. This also adds a nice weight to the coaster, making it feel more like a premium home accessory than a simple yarn craft.
Care and cleaning are essential topics for something meant to hold liquids. If you used 100% cotton for your Round crocheted coasters – Pattern, they are likely machine washable. However, to keep them looking new for as long as possible, it is often better to hand wash them in cool water with a mild detergent and lay them flat to dry. This prevents the fibers from “pilling” or becoming fuzzy over time.
Stiffening is another option for those who want their Round crocheted coasters – Pattern to stay rigid. You can use a commercial fabric stiffener or a simple mixture of white glue and water. Dipping the coasters in the solution and allowing them to dry on a flat surface will make them hard and durable, though they may lose some of their soft “yarn feel.” This is a great trick for coasters that are primarily decorative.
If you find that your coasters are slipping on smooth glass tables, you can apply a few dots of puffy paint or clear silicone to the bottom. Once dry, these dots act as “non-slip” feet, ensuring that the Round crocheted coasters – Pattern stays exactly where it’s put. This is a small safety feature that adds a lot of value to the final product, especially in households with children or pets.
Finally, remember to store your coasters in a way that preserves their shape. A small crocheted basket or a wooden holder designed specifically for the Round crocheted coasters – Pattern set keeps them organized and prevents them from getting crushed in a drawer. Presenting a set of four or six in a matching holder also makes for a stunning presentation when giving them away as a handcrafted gift.
1. What is the standard size for a round coaster?
Most Round crocheted coasters – Pattern designs aim for a diameter between 4 and 5 inches (10-12 cm). This size is large enough to accommodate everything from a standard soda can to a wide-bottomed coffee mug.
2. Can I use acrylic yarn if I don’t have cotton?
While you can use it, it’s not recommended for hot drinks. Acrylic is essentially plastic and can melt or deform under high heat. Additionally, it won’t absorb the “sweat” from cold drinks, which might lead to water pooling on top of the coaster.
3. How do I stop my coaster from curling?
Curling usually means you aren’t increasing enough in each round or your tension is too tight. If your Round crocheted coasters – Pattern looks like a bowl, try using a larger hook or adding more increase stitches in the outer rounds.
4. How many coasters can I make from one ball of yarn?
With a standard 50g ball of cotton yarn, you can typically make 4 to 6 coasters, depending on the complexity of the Round crocheted coasters – Pattern and the thickness of the stitches used.
5. Is this pattern suitable for complete beginners?
Absolutely! Coasters are often the very first project recommended to beginners because they use basic stitches, work up quickly, and teach the essential skill of working in the round.
6. Do I need to weave in the ends as I go?
It is highly recommended! The Round crocheted coasters – Pattern involves a lot of circular work, and weaving in the center tail early helps secure the “magic ring.” Weaving as you go makes the final finish much faster.
Mastering the Round crocheted coasters – Pattern is a delightful journey into the heart of functional crafting. In this article, we’ve covered the vital importance of material selection, the mathematical beauty of the flat circle technique, and the creative joy of adding decorative borders.
We also touched on the essential “aftercare” steps like blocking and stiffening that elevate a simple craft into a professional home accessory. These coasters are more than just protectors of furniture; they are small expressions of care and creativity that brighten up any room.


