
Crochet Flower - Tutorial

The Crochet Heart- Pattern is one of the most beloved designs in the crafting community, offering a perfect blend of simplicity, symbolism, and artistic expression. Whether you are a seasoned pro or a complete novice picking up a hook for the first time, learning how to create a heart-shaped motif is a rite of passage that opens the door to endless creative possibilities. This specific design is not just a project; it is a versatile building block that can be used for everything from holiday decorations and fashion embellishments to heartfelt, handmade gifts for loved ones.
Mastering the Crochet Heart- Pattern allows you to tap into the emotional side of fiber arts, turning simple strands of yarn into a physical representation of affection. The beauty of this pattern lies in its adaptability; you can make a tiny heart to use as a button or a giant plush heart to serve as a decorative pillow. Because the geometry of a heart is symmetrical yet organic, it provides an excellent lesson in stitch height and shaping, helping you understand how different crochet stitches work together to create curves and points.
In this comprehensive guide, we will delve deep into the mechanics of the Crochet Heart- Pattern, ensuring you have all the tools and knowledge necessary to succeed. We will explore the best materials to use, the technical secrets behind achieving a perfect “dip” at the top and a sharp point at the bottom, and how to troubleshoot common mistakes. By the time you finish reading, you will be equipped to tackle this crochet design with confidence, producing beautiful, professional-looking results that look like they came straight from a boutique.
Before you dive into the first loop of your Crochet Heart- Pattern, gathering the right materials is the foundation of your success. For most heart projects, a medium-weight (worsted) yarn is the ideal starting point because it offers excellent stitch definition, allowing you to see exactly where your hook needs to go. Cotton yarns are particularly popular for hearts intended as appliqués or coasters because they hold their shape exceptionally well and don’t fray easily during the frequent turns required for this shape.
Choosing the correct hook size is the next critical step in executing a perfect Crochet Heart- Pattern. If your hook is too large, the heart will be “holy” and loose; if it is too small, the fabric will be stiff and the heart might curl uncomfortably at the edges. A 4.0mm or 5.0mm hook is generally recommended for worsted yarn, but you should always check the yarn label for the manufacturer’s suggestion to ensure your tension remains consistent throughout the process.
Color choice is where the Crochet Heart- Pattern truly comes to life. While red and pink are the traditional favorites, don’t be afraid to experiment with modern aesthetics like sage green, mustard yellow, or even variegated yarns that change colors as you work. The key is to choose a color that makes you happy and fits the intended use of the heart. For beginners, using a light-colored yarn is often better because it makes it much easier to identify the stitch anatomy as you build the rounds.
In addition to yarn and hooks, you will need a few essential notions to finish your Crochet Heart- Pattern professionally. A sharp pair of embroidery scissors and a high-quality tapestry needle are non-negotiable for weaving in your ends securely. You might also want to keep some stitch markers nearby, especially if you are working on a larger version of the heart where keeping track of the center point is vital for maintaining the symmetry of the “over-under” curves.
Preparing your workspace is an often-overlooked part of the Crochet Heart- Pattern experience. Since shaping a heart requires a bit of focus on stitch counts, find a comfortable spot with good lighting where you won’t be easily distracted. Many crafters find that using a project bag to keep all their heart-making supplies in one place prevents small items like needles and markers from getting lost, making the creative process much more organized and enjoyable.
Finally, consider the concept of “blocking” as part of your preparation. Blocking is the process of wetting or steaming your finished Crochet Heart- Pattern to set its final shape. If you plan on making many hearts for a garland or a blanket, having a blocking board ready will ensure that every heart is uniform in size and looks crisp. This small extra step is what separates an amateur project from a high-end, artisan piece of handmade decor.
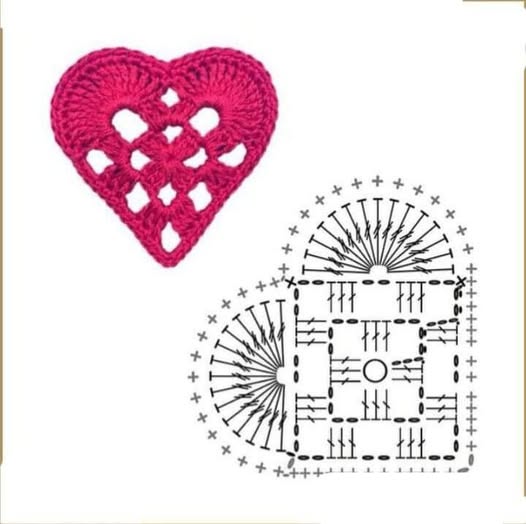
The core logic of the Crochet Heart- Pattern is based on the clever use of different stitch heights to create the distinctive “lobes” and “points.” To get that classic rounded top, you will typically use taller stitches like the treble crochet (tr) or double crochet (dc) in the center of the lobes. These tall stitches provide the volume needed to push the fabric outward, while shorter stitches like the single crochet (sc) or slip stitch (sl st) are used to create the “dip” in the middle.
Starting your Crochet Heart- Pattern with a “magic ring” (also known as a magic circle) is a game-changer for this specific design. Unlike a traditional chain loop, a magic ring can be pulled tight, completely closing the hole in the center of your heart. This creates a much cleaner look, especially if you are making small hearts where a gap in the center would be very noticeable. It is the secret weapon of professional crochet designers worldwide.
As you work your way through the Crochet Heart- Pattern, the placement of your increases is what defines the sharpness of the bottom point. Usually, you will work three or more stitches into a single space at the very bottom of the heart. This creates a “pivot point” that allows the fabric to turn a sharp corner without bunching up. Maintaining a tight gauge at this specific point is essential for ensuring the heart looks like a heart and not just a rounded triangle.
Symmetry is the biggest challenge when following a Crochet Heart- Pattern. If you do three trebles on the left lobe, you must do three trebles on the right lobe in the exact mirrored position. A helpful tip is to think of the heart as two halves divided by a vertical line. If you find your heart looks lopsided, it’s usually because a stitch was skipped or an extra one was added on one side of this invisible axis.
The “slip stitch” is your best friend for the final round of the Crochet Heart- Pattern. Adding a border of slip stitches all the way around the edge of the heart provides a finished, “piped” look that reinforces the shape. It also helps to smooth out any minor irregularities in the stitch heights, giving the heart a more polished and professional appearance. This technique is often used in luxury crochet patterns to add durability and aesthetic appeal.
For those who want to create a 3D effect, the Crochet Heart- Pattern can be worked in two identical pieces and then crocheted together around the edges. Before you close the last few stitches, you can add a bit of polyester fiberfill (stuffing). This transforms a flat appliqué into a “puffy heart,” which is perfect for keychains, ornaments, or even catnip toys. Understanding how to transition from 2D to 3D is a vital skill in amigurumi and advanced pattern design.
Once you have mastered the basic Crochet Heart- Pattern, you can start exploring advanced variations like the “lace heart” or the “granny heart.” A lace heart uses chain spaces and picot stitches to create a delicate, airy feel that is perfect for bridal accessories or vintage-style decor. These variations require a bit more attention to stitch placement, but the results are incredibly elegant and look much more complex than they actually are.
The “Filet Crochet” version of the Crochet Heart- Pattern is another fascinating avenue to explore. This involves creating a grid of open and closed squares to reveal a heart silhouette. It is a more mathematical approach to crochet, often used for table runners, curtains, or decorative wall hangings. Mastering filet crochet allows you to “draw” with your yarn, using the heart as your primary subject matter in a sophisticated, minimalist way.
You can also incorporate different textures into your Crochet Heart- Pattern by using specialty stitches like the bobble, puff, or popcorn stitch. A “Bobble Heart” features raised bumps that form the heart shape, providing a wonderful tactile experience. This is especially popular for baby blankets, as the texture is stimulating for infants and adds a modern, “boho” look to the overall blanket design.
Size customization is incredibly easy with the Crochet Heart- Pattern. To make a larger heart, you can simply add more rounds, following the logic of the previous row’s increases. Alternatively, you can use “super bulky” yarn and a giant hook to create a floor pouf or a chunky decorative pillow. This scalability makes the heart one of the most functional crochet templates you can have in your digital or physical library.
For a truly unique look, try the “Mosaic Crochet” method for your Crochet Heart- Pattern. This technique uses two contrasting colors to create intricate, geometric heart designs that look like they were woven. While it requires a bit more focus on color changes and chart reading, mosaic crochet produces a dense, warm fabric that is perfect for winter garments and sturdy home accessories.
Don’t forget the power of embellishment on your finished Crochet Heart- Pattern. You can sew on beads, embroider initials with a contrasting thread, or add a fringe to the bottom point. These personal touches turn a standard pattern into a one-of-a-kind heirloom. Learning how to combine embroidery and crochet is a fantastic way to elevate your work and make your heart patterns stand out in a crowded marketplace.
One of the most common issues with the Crochet Heart- Pattern is the “curling” effect, where the edges of the heart roll inward. This is almost always caused by tension that is too tight or not enough increases in the curved sections. If your heart won’t lay flat, try using a hook one size larger for the final round, or add an extra stitch to the “lobes” to give the fabric enough room to expand around the curve geometry.
If the “dip” at the top of your Crochet Heart- Pattern looks more like a flat line, you need to emphasize the height difference between your stitches. Make sure your center stitch is a very tight slip stitch or even a “stitch in the row below” to pull the center down. Conversely, make sure your treble crochets are nice and tall. This dramatic contrast is what creates the “M” shape at the top of the iconic heart silhouette.
Another frequent hurdle is the “disappearing point.” If the bottom of your heart looks rounded like a circle, you likely missed the increase at the tip. To fix this in your Crochet Heart- Pattern, ensure you are placing a “chain 1” or “chain 2” between your point stitches. This small gap provides the extra space needed for the tip to protrude, giving the heart its classic, sharp geometric finish.
Managing yarn tails can be a nuisance, especially if you are making many small hearts. A pro tip for the Crochet Heart- Pattern is to crochet over your starting tail as you work the first round. This “locks” the tail in place and eliminates the need to weave it in later with a needle. For the ending tail, use the “invisible finish” technique to create a seamless edge that is impossible to detect, even upon close inspection of your handicraft.
If your hearts are coming out different sizes even though you are using the same Crochet Heart- Pattern, check your “mood.” Believe it or not, your emotional state affects your crochet tension. If you are stressed, your stitches will be tighter; if you are relaxed, they will be looser. Consistency is key, so try to work on a set of hearts in one sitting to ensure they all match perfectly for your assembly project.
Finally, if you are struggling to read the stitches in your Crochet Heart- Pattern, especially when using dark or fuzzy yarn, use stitch markers liberally. Place a marker in the first stitch of the lobe and the center “dip” stitch. This visual guide will prevent you from getting lost in the texture and ensure that your increases and decreases are perfectly aligned for a symmetrical result.
1. Is the Crochet Heart- Pattern suitable for absolute beginners?
Yes! There are very simple versions of the Crochet Heart- Pattern that only use one round. As long as you know the basic stitches (single, double, and treble), you can successfully complete a heart in under ten minutes.
2. How much yarn do I need for one heart?
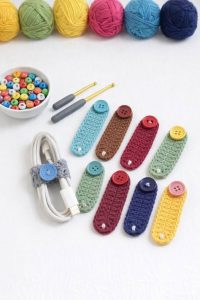
A small heart usually requires less than 5 yards of yarn. This makes the Crochet Heart- Pattern the ultimate “scrap-buster” project. You can use up all those tiny leftover balls of yarn in your stash to create a colorful bucket of hearts.
3. Can I use this pattern to make a heart-shaped blanket?
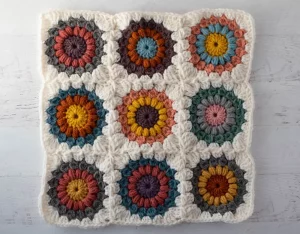
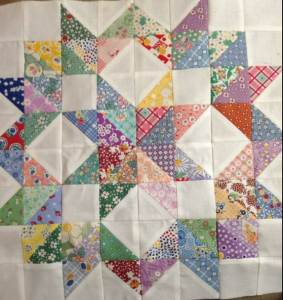
Absolutely. You can either make many small squares with hearts in the middle (granny squares) and join them, or you can follow a “large-scale” Crochet Heart- Pattern that grows round by round until it reaches blanket size.
4. Why does my heart have a hole in the middle?
If you started with a chain loop instead of a magic ring, you might have a small hole. To fix this, use your tapestry needle to sew the center hole shut using the starting yarn tail before you weave it in.
5. What is the best way to attach these hearts to clothing?
The best way to attach a Crochet Heart- Pattern appliqué to clothing is using a “blind stitch” with matching sewing thread. This ensures the heart stays secure through washes without the stitches showing on the front of the heart.
6. Can I sell items I make using this pattern?
Generally, yes! Most designers allow you to sell finished items made from their Crochet Heart- Pattern, though it is always polite to credit the pattern source if you are using a specific designer’s unique variation.
The Crochet Heart- Pattern is a versatile and joyful addition to any crafter’s skill set. In this article, we have explored the essential materials needed, the geometric secrets of shaping curves and points, and the various ways you can customize the design to fit your unique style.
We’ve also addressed common troubleshooting tips to ensure your hearts lay flat and look professional every time. From the magic ring start to the invisible finish, every step of the Crochet Heart- Pattern is an opportunity to practice precision and creativity.


