
Patchwork Bird Tutorial

The Dervish Star Quilt Block- Pattern is a mesmerizing geometric design that captures the essence of movement and grace within the traditional world of quilting. Inspired by the circular, rhythmic motion of a spinning top or a dancer in mid-twirl, this specific block offers a sophisticated visual appeal that can transform a simple quilt into a museum-worthy masterpiece. It is an excellent choice for quilters who have mastered the basics and are now looking to explore more complex quilt construction that challenges their precision and eye for symmetry.
When you first encounter the Dervish Star Quilt Block- Pattern, you might be intimidated by its intricate lines and the way the “stars” seem to explode outward from the center. However, the beauty of this design lies in its mathematical harmony; once you break down the block into its individual components, the process becomes much more manageable. This pattern relies heavily on the interaction between light and shadow, making it a perfect playground for those who love to experiment with high-contrast fabrics and bold, modern color palettes.
In this comprehensive guide, we are going to dive deep into the technicalities and the artistry of the Dervish Star Quilt Block- Pattern. We will discuss how to achieve those sharp, needle-point corners, the best ways to select fabrics that enhance the “spinning” effect, and the organizational strategies that keep your pieces in order. Whether you are aiming to create a striking wall hanging or a large heirloom-quality bedspread, mastering this quilt block will undoubtedly elevate your sewing skills and provide a deep sense of creative accomplishment.
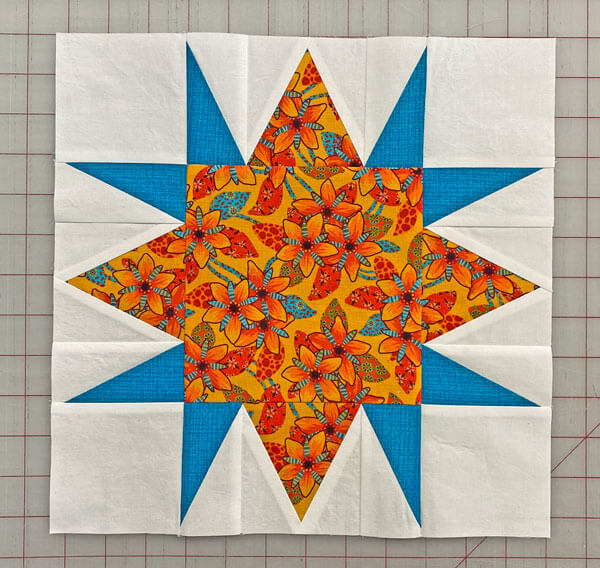
The structural foundation of the Dervish Star Quilt Block- Pattern is typically rooted in a grid system, often a 4×4 or 8×8 layout depending on the complexity of the specific variation you are following. At its core, the star is formed by a series of triangles and diamonds that radiate from a central point, creating the illusion of a whirling motion. To succeed with this quilt design, you must pay close attention to the “points” of the star, as they are the focal points that draw the eye and define the overall success of the block.
Precision cutting is the absolute starting point for the Dervish Star Quilt Block- Pattern. Because many of the pieces are cut on the bias—meaning the diagonal grain of the fabric—they are prone to stretching. Using a high-quality rotary cutter and a non-slip ruler is essential to ensure every triangle is identical. If your pieces are even a fraction of an inch off, the center of the star will not lay flat, leading to the dreaded “volcano” effect where the middle of the block puffs up awkwardly.
Color placement is what truly brings the Dervish Star Quilt Block- Pattern to life. To achieve the “dervish” effect, you should use fabrics that create a gradient or a “spinning” color wheel. For example, using a dark fabric on one side of each star point and a lighter shade on the other creates a three-dimensional look that mimics a shadow. This technique is often referred to as color value mapping, and it is the secret weapon of professional quilters who want their work to look intricate and expensive.
Many versions of the Dervish Star Quilt Block- Pattern utilize “Half-Square Triangles” (HSTs) and “Flying Geese” units. These are the building blocks of most star patterns, but in the Dervish variation, they are often arranged in a pinwheel formation. Mastering these sub-units independently before attempting to assemble the entire block will make your life much easier. Practice sewing your HSTs with a scant quarter-inch seam to ensure that after you trim them, they are perfectly square and ready for the final assembly.
Another critical element of this pattern is the use of negative space. The “background” fabric of your Dervish Star Quilt Block- Pattern isn’t just a filler; it is the frame that allows the star to shine. Using a solid, neutral color for the background can help the intricate shapes of the star stand out. Alternatively, using a subtle print can add texture without distracting from the geometric lines of the spinning star motif.
Finally, consider the scale of your Dervish Star Quilt Block- Pattern. If you are a beginner, starting with a 12-inch or 14-inch block is usually easier because the individual pieces are larger and more forgiving. As you gain confidence, you can move down to 6-inch blocks, which require a much higher level of finesse and accuracy. Regardless of the size, the mathematical principles remain the same, providing a consistent framework for your creative exploration.
To achieve professional results with the Dervish Star Quilt Block- Pattern, you need to invest in a few specialized tools. A “Creative Grids” ruler or a similar high-precision measuring tool is indispensable for trimming your units to the exact size. Since this block has many intersecting seams, any excess fabric will create bulk that makes quilting the layers difficult later on. A sharp seam ripper is also a friend, not an enemy; it is better to fix a misaligned point early than to regret it when the quilt is finished.
Fabric choice is where the Dervish Star Quilt Block- Pattern becomes personal. Most experts recommend using 100% high-quality quilting cotton because it has the right amount of “grip” and doesn’t slip under the presser foot. Avoid stretchy fabrics like knits or very slippery fabrics like silk for this specific pattern, as the geometric precision required is nearly impossible to maintain with unstable fibers. Starching your fabric before cutting can also provide extra stability, making the pieces feel more like paper.
When planning your palette for the Dervish Star Quilt Block- Pattern, think about the “temperature” of the colors. Warm colors (reds, oranges, yellows) will seem to “advance” or come forward, while cool colors (blues, greens, purples) will “recede.” By strategically placing warm colors at the tips of the star and cool colors in the center, you can enhance the feeling of a spinning vortex. This clever use of color psychology is a great way to add depth to your textile art.
Don’t overlook the importance of your sewing machine needle. For the Dervish Star Quilt Block- Pattern, a fresh 80/12 or 75/11 “Microtex” or “Sharp” needle is ideal. These needles have a very slim point that can pierce through multiple layers of fabric and seams without pushing the fabric down into the throat plate. This is especially helpful when you are sewing the “center intersection” where eight or more points of the star block might meet.
Thread choice is also a factor in the Dervish Star Quilt Block- Pattern. A fine, 50-weight cotton thread is preferred because it is strong but thin. Thicker threads can take up too much room in the seam allowance, which might not seem like a lot, but when multiplied by twenty seams across a block, it can make the quilt block significantly smaller than intended. Choose a neutral color like gray or tan that will blend into both your light and dark fabrics.
Lastly, a dedicated pressing station is a must. You will be spending almost as much time at the ironing board as you do at the sewing machine when working on a Dervish Star Quilt Block- Pattern. Using a wool pressing mat can be a game-changer; the wool reflects the heat back into the fabric, effectively pressing both sides of the seam at once. This results in incredibly flat seams, which are the hallmark of a master quilter’s work.
The assembly of a Dervish Star Quilt Block- Pattern usually happens in quadrants. By breaking the block down into four identical squares, you can focus on the details of one section at a time. This method also allows you to “chain piece,” which is a quilting technique where you sew pieces one after another without cutting the thread in between. This not only saves time but also helps you maintain a consistent rhythm and seam allowance throughout the project.
As you join your triangles to form the star points, the most common pitfall is losing your “points.” This happens when your seam crosses through the very tip of the triangle. To avoid this in your Dervish Star Quilt Block- Pattern, look for the “X” created by previous seams on the back of your fabric. If you sew exactly through the center of that “X,” your points will be perfectly sharp on the front. This level of seam precision is what separates a novice quilt from an award-winning one.
Pressing is the next vital step. In the Dervish Star Quilt Block- Pattern, there is a lot of debate about whether to press seams open or to the side. Pressing to the side allows for “nesting” seams, which helps align the pieces perfectly. However, because this block has so many layers meeting in the middle, many quilters prefer to press the final seams open to reduce bulk. Whichever method you choose, be consistent across all your quilt units.
Once your four quadrants are complete, it is time for the “big join.” This is when you sew the top two quadrants together, then the bottom two, and finally join the two halves. For the Dervish Star Quilt Block- Pattern, the center point is the most difficult part. Use a pin to “stab” through the exact center of all four quadrants to align them before sewing. This “pin-registration” technique ensures that the heart of your spinning star is perfectly centered.
If you find that your block is slightly “wonky” after assembly, don’t panic. You can often “square up” the Dervish Star Quilt Block- Pattern by trimming the outer edges slightly. Use a large square ruler and align the center of the ruler with the center of the star. Trimming even an eighth of an inch can make the block look much cleaner and ensure it fits perfectly with the other blocks in your quilt top.
Finally, give your finished block a good “burst” of steam (if your fabric allows) and let it cool completely on a flat surface before moving it. This “sets” the fibers in their new shape. A well-made Dervish Star Quilt Block- Pattern should lay as flat as a pancake. If it does, you have successfully conquered one of the most beautiful and challenging designs in the quilting world, and you are ready to move on to the final quilting stages.
One common issue with the Dervish Star Quilt Block- Pattern is the “shadowing” of dark fabrics behind light ones. If you have a dark navy star point next to a white background, the seam allowance of the navy might show through the white. To prevent this, you can trim the dark seam allowance slightly shorter than the light one, or use a “batiste” or “flannelette” layer behind the light fabric to add opacity. This attention to detail is essential for high-contrast quilting.
If your block is coming out the wrong size, the culprit is almost always the “quarter-inch seam.” Most modern sewing machines have a specific quilting foot designed for this. To test yours, sew three 2.5-inch strips together and measure the middle one; it should be exactly 2 inches wide. If it’s not, you need to adjust your needle position. For the Dervish Star Quilt Block- Pattern, even a hair’s breadth of difference can accumulate into a major sizing error.
For those who want to take the Dervish Star Quilt Block- Pattern to the next level, consider “fussy cutting.” This involves choosing a specific motif on your fabric—like a flower or a bird—and centering it within one of the star’s triangles. This adds a layer of “hidden detail” that rewards the viewer for looking closely. It requires more fabric and more time, but the artistic impact is undeniable and makes each block a unique work of art.
Another advanced variation is the use of “Foundation Paper Piecing” (FPP). This technique involves sewing the fabric directly onto a paper pattern. For the Dervish Star Quilt Block- Pattern, FPP can be a lifesaver because it guarantees perfect points and eliminates the risk of fabric stretching. Many modern designers offer FPP templates for this specific block, making it accessible even for those who struggle with traditional piecing methods.
You can also experiment with “Bordered Stars.” By adding a thin frame or a “flange” around each Dervish Star Quilt Block- Pattern, you create a secondary geometric effect when the blocks are joined together. This can make the stars look like they are floating in a lattice. It’s a great way to use up smaller scraps of fabric while adding a sophisticated architectural element to your finished quilt design.
Lastly, think about the quilting itself—the stitching that holds the three layers together. For the Dervish Star Quilt Block- Pattern, “echo quilting” is particularly effective. By stitching lines that follow the shape of the star, moving outward in concentric circles, you emphasize the “dervish” movement. Whether you do this by hand or with a long-arm machine, the goal is to complement the geometry of the piecing, not distract from it.
1. Is the Dervish Star Quilt Block- Pattern suitable for beginners?
It is generally considered an intermediate-level pattern. While a dedicated beginner could certainly complete it with patience and careful measuring, it is helpful to have experience with Half-Square Triangles and basic seam alignment first.
2. How many different fabrics do I need for this block?
To get the best effect, you should use at least three: a background, a light star color, and a dark star color. However, many people use 5 or 6 different fabrics to create a more complex, scrappy look.
3. What is the standard size for a Dervish Star block?
The most common size is 12.5 inches (which becomes 12 inches when sewn into a quilt). This is a standard size that fits well with most other traditional quilt patterns.
4. Why is my block “puckering” in the center?
This usually happens because there are too many seams meeting in the middle. Try pressing your seams open or “swirling” the center seam (pressing it in a circular motion) to distribute the bulk. This is a common quilting fix for star patterns.
5. Can I make this quilt using a Jelly Roll?
Yes! A Jelly Roll (2.5-inch strips) is perfect for many star patterns. You can cut your squares and triangles directly from the strips, which saves time on initial fabric preparation.
6. Do I need to pre-wash my fabric for this pattern?
Because you are often using high-contrast colors (like red and white), pre-washing is highly recommended to prevent the darker dyes from bleeding into the lighter areas. Always use a color catcher if you are unsure.
The Dervish Star Quilt Block- Pattern is a spectacular journey into the world of geometric precision and artistic expression. In this article, we have explored the anatomy of the star, the essential tools required for success, and the advanced techniques that ensure your points are sharp and your blocks lay flat.
We’ve learned that the secret to a beautiful Dervish Star lies in the balance of color value, the accuracy of the quarter-inch seam, and the patience to press every single fold with care.Quilting is a labor of love, and this pattern is a perfect example of how simple triangles can be transformed into something that feels alive with motion. Whether you are a traditionalist or a modern maker, the Dervish Star Quilt Block- Pattern offers endless opportunities for customization and growth. We hope this guide has given you the confidence to start your own “spinning” project and discover the joy of this timeless design.


