
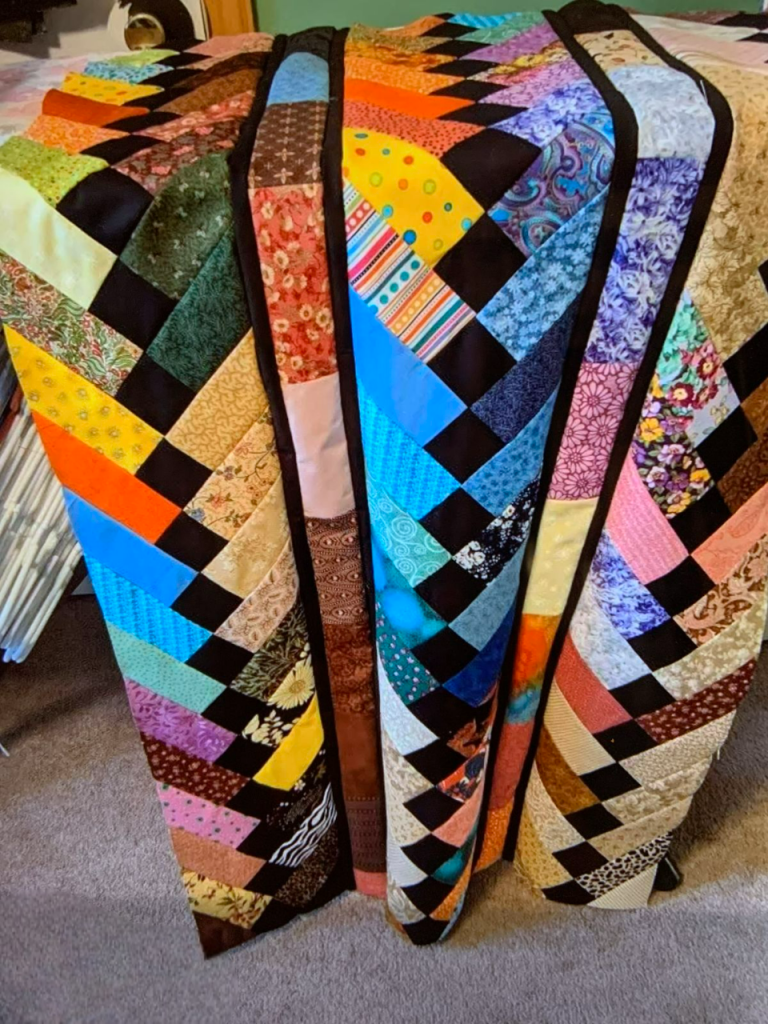
Patchwork Bird Tutorial

This Patchwork Ladder with Strips – Tutorial is your gateway to mastering a visually striking and geometrically satisfying quilting design that breathes new life into your fabric stash. Whether you are an experienced quilter or a curious beginner, the “ladder” effect created by offset fabric strips offers a modern twist on traditional patchwork techniques. By strategically placing contrasting colors and varied widths, you can create an optical illusion of depth and movement that makes this handmade quilt pattern a standout piece in any home.
In this comprehensive Patchwork Ladder with Strips – Tutorial, we will dive into the mechanics of strip piecing, a method that saves time while maintaining the high level of precision required for professional results. Using cotton quilting fabric ensures that your strips stay crisp and aligned, preventing the “wavy” seams that can sometimes plague large-scale patchwork projects. This guide is designed to be human-friendly and easy to follow, ensuring that your journey from cutting mat to finished quilt top is as smooth and enjoyable as possible.
The beauty of a Patchwork Ladder with Strips – Tutorial lies in its incredible versatility, as it works perfectly with pre-cut fabrics like Jelly Rolls or your own custom-cut scrap fabric. We will focus on creating a balanced composition that highlights the “rungs” of the ladder through smart color theory and value placement. By the end of this article, you will have the confidence to tackle this geometric quilt design, transforming simple strips of cloth into a complex-looking masterpiece that reflects your unique creative voice and technical skill.
The first step in a successful Patchwork Ladder with Strips – Tutorial is selecting a cohesive color palette that allows the ladder structure to pop. To achieve the best visual contrast, you should choose at least two dominant colors: a “background” neutral and a “ladder” accent. Using high-quality mercerized cotton is highly recommended because it has minimal shrinkage and holds its shape during the heavy pressing required for this specific patchwork style.
Before you make a single cut, always pre-wash and starch your fabric to ensure the grainline is straight and the fibers are stable. Starching is a “pro-tip” for any Patchwork Ladder with Strips – Tutorial because it gives the thin strips a paper-like stiffness, making them much easier to sew without stretching. This preparation stage is vital for maintaining the geometric accuracy of the ladder rungs as they climb across the quilt top.
In this Patchwork Ladder with Strips – Tutorial, we recommend using a rotary cutter and a long acrylic ruler to ensure every strip is exactly the same width. For a standard ladder effect, cutting your strips at 2.5 inches is a popular choice, as it aligns with industry-standard pre-cuts. Accuracy at the cutting table translates directly to success at the sewing machine, so take your time to align the fabric edges perfectly before pressing down with your blade.
Organization is your best friend when working with multiple fabric strips. Label your piles based on their color value—light, medium, and dark—to avoid confusion during the assembly phase of the Patchwork Ladder with Strips – Tutorial. If you are using scraps, try to group them by “temperature” (cool blues versus warm reds) to create a more harmonious quilting transition. This level of detail is what separates a standard blanket from a gallery-quality textile art piece.
Don’t forget the importance of your sewing thread choice; a 50-weight cotton thread in a neutral grey or beige will blend seamlessly into most fabric colors. In a Patchwork Ladder with Strips – Tutorial, you want the focus to be on the fabric shapes, not the stitching lines. Ensure your bobbin is full before you start, as strip piecing involves long, continuous runs of sewing that can consume thread much faster than you might expect.
Lastly, set up your workspace for efficiency by placing your ironing board close to your sewing station. The “ladder” effect relies on crisp, flat seams that are pressed in alternating directions to “nest” the joins. Following this Patchwork Ladder with Strips – Tutorial means committing to the “sew, then press” rhythm, which ensures that your quilt blocks remain perfectly square and lie flat once they are joined together.
The core of our Patchwork Ladder with Strips – Tutorial involves sewing long strips together into “strata” or strip sets before cutting them into smaller segments. This method is significantly faster than sewing individual squares and ensures that the seam alignment remains consistent across the entire project. Align two long strips right sides together and sew a precise quarter-inch seam along the entire length to begin your first set.
To maintain the straightness of the strips in this Patchwork Ladder with Strips – Tutorial, try sewing in alternating directions for each new strip you add to the set. For example, if you sew the first pair from top to bottom, sew the third strip from bottom to top. This prevents the fabric from “bowing” or curving due to the natural pull of the presser foot, keeping your ladder rungs perfectly horizontal.
Once your strip sets are sewn, it is time to press the seams carefully. In this Patchwork Ladder with Strips – Tutorial, we suggest pressing seams toward the darker fabric to prevent “shadowing,” where the seam allowance shows through a lighter fabric. A hot, dry iron is usually best, as steam can sometimes distort the fabric bias, leading to an uneven quilt top that is difficult to quilt later on.
Now comes the “magic” part of the Patchwork Ladder with Strips – Tutorial: sub-cutting the strip sets into vertical segments. Using your quilting ruler, cut the sewn sets at 90-degree angles into units that match the width of your original strips. These units now contain the pre-aligned “rungs” of your ladder, and when you flip or offset them in the next step, the ladder pattern will instantly begin to emerge.
Precision at this stage of the Patchwork Ladder with Strips – Tutorial is non-negotiable for a professional result. If your sub-cuts are even slightly off-angle, the “ladder” will look crooked or tilted. Always check that the horizontal seam lines of your strip set are perfectly aligned with the grid lines on your acrylic ruler before you make each cut with the rotary blade.
As you finish sub-cutting, keep your segments organized in the order they will be sewn back together. This Patchwork Ladder with Strips – Tutorial relies on a specific “step-down” or “step-up” sequence to create the ladder’s diagonal movement. Keeping a small design board or a piece of flannel nearby to layout your pieces will help you visualize the final patchwork design before you commit to the final rows of stitching.
To achieve the iconic look described in this Patchwork Ladder with Strips – Tutorial, you must offset the segments you just cut. This is done by shifting each vertical unit up or down by one “square” relative to the unit next to it. This “stair-step” alignment is what creates the visual ladder effect, making the strips look like they are climbing or descending across the surface of the fabric.
When you begin pinning these offset segments together, the concept of nesting seams becomes vital. Because you pressed your seams in alternating directions in the previous step of this Patchwork Ladder with Strips – Tutorial, the seam allowances should lock together like puzzle pieces. This mechanical lock ensures that your patchwork corners meet exactly, creating sharp, clean intersections that are a hallmark of high-quality quilting.
If you find that your segments are not aligning perfectly, don’t panic. Sometimes fabric stretch occurs despite our best efforts. In this Patchwork Ladder with Strips – Tutorial, we recommend using “pinning for success”—place a pin directly through the intersection of the seams to hold them in place as you sew. This prevents the fabric from shifting at the last second under the sewing machine needle.
As you sew the vertical segments together, the Patchwork Ladder with Strips will start to form long rows. You may notice that the top and bottom edges of your quilt top are now “jagged” due to the offsetting. This is perfectly normal! Later in the tutorial, we will “square up” the edges by trimming the excess fabric, but for now, focus on the integrity of the internal ladder rungs.
One variation to consider in this Patchwork Ladder with Strips – Tutorial is using a “gradient” effect. By choosing fabrics that transition from dark to light, you can make the ladder look like it is emerging from a shadow or receding into the distance. This artistic quilting technique adds a layer of sophistication to the project and is a great way to practice your eye for color value.
Once all your segments are joined into a single panel, give the entire piece a thorough press. This is the moment where the Patchwork Ladder with Strips – Tutorial truly comes to life, as the flat, pressed surface reveals the full scale of the geometric pattern. It is a deeply satisfying moment for any crafter to see individual strips of fabric transformed into a unified, intricate design.
The final technical step in the Patchwork Ladder with Strips – Tutorial is “squaring up” the quilt top. Use your largest square ruler to trim away the “steps” at the top and bottom edges, creating straight, 90-degree corners. This prepares the piece for the addition of borders, which frame the ladder design and provide a visual resting place for the eye.
Choosing the right border for your Patchwork Ladder with Strips can drastically change the final mood of the piece. A solid, dark border will make the “ladder” appear more modern and bold, while a scrappy border made from leftover strips will give it a cozy, traditional farmhouse feel. Make sure to measure through the center of your quilt to determine the border length, preventing wavy edges.
In this Patchwork Ladder with Strips – Tutorial, we also suggest considering the quilting motif you will use to finish the piece. Simple “stitch-in-the-ditch” or straight-line quilting following the lines of the ladder will emphasize the geometric structure. Alternatively, free-motion quilting with swirls or feathers can provide a beautiful, organic contrast to the sharp lines of the patchwork strips.
Don’t forget the quilt binding, which is the final “frame” of your project. For a Patchwork Ladder with Strips, a striped binding cut on the bias can add an extra touch of whimsy and professional flair. Hand-sewing the binding to the back of the quilt provides a clean, invisible finish, while machine-sewing is faster and more durable for utility quilts that will be washed frequently.
As you finish your handmade quilt, take a moment to add a quilt label to the back. Recording the date, your name, and the fact that you used this Patchwork Ladder with Strips – Tutorial turns the item into a piece of history for future generations. It is the final “human” touch that makes DIY projects so much more meaningful than store-bought items.
Congratulations! You have successfully completed a project that requires patience, precision, and a bit of creative courage. This Patchwork Ladder with Strips – Tutorial has given you the skills to play with lines and colors in a new way. Whether you turn this into a wall hanging, a lap quilt, or a full-sized bed cover, you have created something truly unique and beautiful with your own two hands.
1. Can I use different strip widths in the same ladder design?
Yes! While this Patchwork Ladder with Strips – Tutorial focuses on uniform widths for a classic look, using “wonky” or varied widths can create a very modern, “improv” style quilt that is full of character.
2. How do I prevent my long strips from curving while sewing?
The best way is to alternate the direction of your sewing for every seam and avoid pulling or pushing the fabric through the machine. Let the feed dogs do the work to keep the tension even.
3. Is this pattern suitable for “Jelly Rolls”?
Absolutely. In fact, this Patchwork Ladder with Strips – Tutorial is one of the best ways to use a 2.5-inch pre-cut roll, as it minimizes cutting time and maximizes the variety of prints in the final design.
4. What if my seams don’t nest perfectly?
If the seams are only off by a tiny bit, you can often “ease” them together with careful pinning. If they are far off, it’s best to re-measure your seam allowance to ensure it is a true quarter-inch.
5. How much fabric do I need for a lap-sized ladder quilt?
Usually, about 15 to 20 strips (width of fabric) and an equal amount of background fabric will yield a generous lap quilt. Always check your specific quilt math before purchasing yardage.
6. Can I make this with just two colors?
Yes, a two-color version of the Patchwork Ladder with Strips creates a very bold, graphic look that resembles a architectural drawing or a minimalist art piece.
In this Patchwork Ladder with Strips – Tutorial, we have journeyed through the essential steps of creating a dynamic and modern quilt top using the efficient strip piecing method. We discussed the importance of fabric preparation, the technical details of offsetting rows to create the “ladder” illusion, and the finishing touches that turn a project into a masterpiece.
This pattern is a fantastic way to experiment with color theory and value while honing your precision sewing skills. By mastering the “nesting” of seams and the art of the offset, you have added a versatile tool to your quilting repertoire that can be adapted for countless future projects.


