
Crochet Flower - Tutorial

In this detailed Crochet shorts – Tutorial, we are exploring how to create the ultimate summer staple that combines bohemian flair with personalized comfort. Crochet fashion has taken the world by storm, moving from vintage runways to modern street style, and making your own pair of shorts is the perfect way to join this sustainable movement. Whether you are heading to a music festival, a beach day, or just lounging at home, a handmade crochet garment offers a level of breathability and style that store-bought synthetic fabrics simply cannot match.
Creating a Crochet shorts – Tutorial is an exciting challenge for both intermediate and ambitious beginner crafters because it introduces essential garment-making concepts. Unlike flat projects like blankets or scarves, making shorts requires an understanding of body measurements, crotch depth, and shaping techniques. By following this guide, you will learn how to build a garment that fits your specific curves, ensuring that your DIY fashion project is as comfortable as it is aesthetically pleasing.
Throughout this Crochet shorts – Tutorial, we will focus on using high-quality materials and smart construction methods to ensure your shorts are durable and not see-through. We will cover everything from choosing the right cotton yarn to mastering the waistband ribbing and joining the leg panels. Get your favorite crochet hook ready and let’s dive into the world of wearable art, where every stitch brings you one step closer to a custom-made wardrobe that reflects your unique personality and creative spirit.
The most important decision in this Crochet shorts – Tutorial is selecting a yarn that feels good against the skin and holds its shape over time. For wearable items like shorts, 100% mercerized cotton or a cotton-bamboo blend is the gold standard because these fibers are breathable and have excellent stitch definition. Avoid using heavy wool or low-quality acrylics, as they can become too hot during the summer or sag significantly after just one or two wears.
When it comes to yarn weight, a Category 3 (DK) or Category 4 (Worsted) yarn is ideal for maintaining a balance between speed and delicacy. If the yarn is too thick, the shorts will look bulky; if it is too thin, the project will take an eternity to finish. Using a vibrant summer color like turquoise, coral, or a classic cream can make your crochet shorts pop, but always check the dye lot on the labels to ensure color consistency throughout the project.
To accompany your yarn, you will need a 4.0mm (G/6) or 5.0mm (H/8) crochet hook, depending on your personal tension. In this Crochet shorts – Tutorial, we recommend making a gauge swatch before you start the main project. A gauge swatch is a small square of your chosen pattern that helps you determine if your stitches are the right size; if your swatch is too small, your shorts will be too tight, so you would need to move to a larger hook.
In addition to the basics, you will need a few specialized notions such as elastic cord or a drawstring for the waistband. Because crochet fabric tends to stretch, an elasticized waist ensures the shorts stay securely in place throughout the day. You will also need locking stitch markers to identify the front and back of the garment, as well as a tapestry needle for weaving in your ends securely so they don’t pop out during movement.
Measuring tools are also non-negotiable for a successful Crochet shorts – Tutorial. You will need a flexible measuring tape to take accurate hip and waist measurements. It is a good idea to measure a pair of your favorite non-stretch shorts and use those dimensions as a reference guide. This “humanized” approach to sizing ensures that your handmade clothing fits your actual body shape rather than a generic size chart.
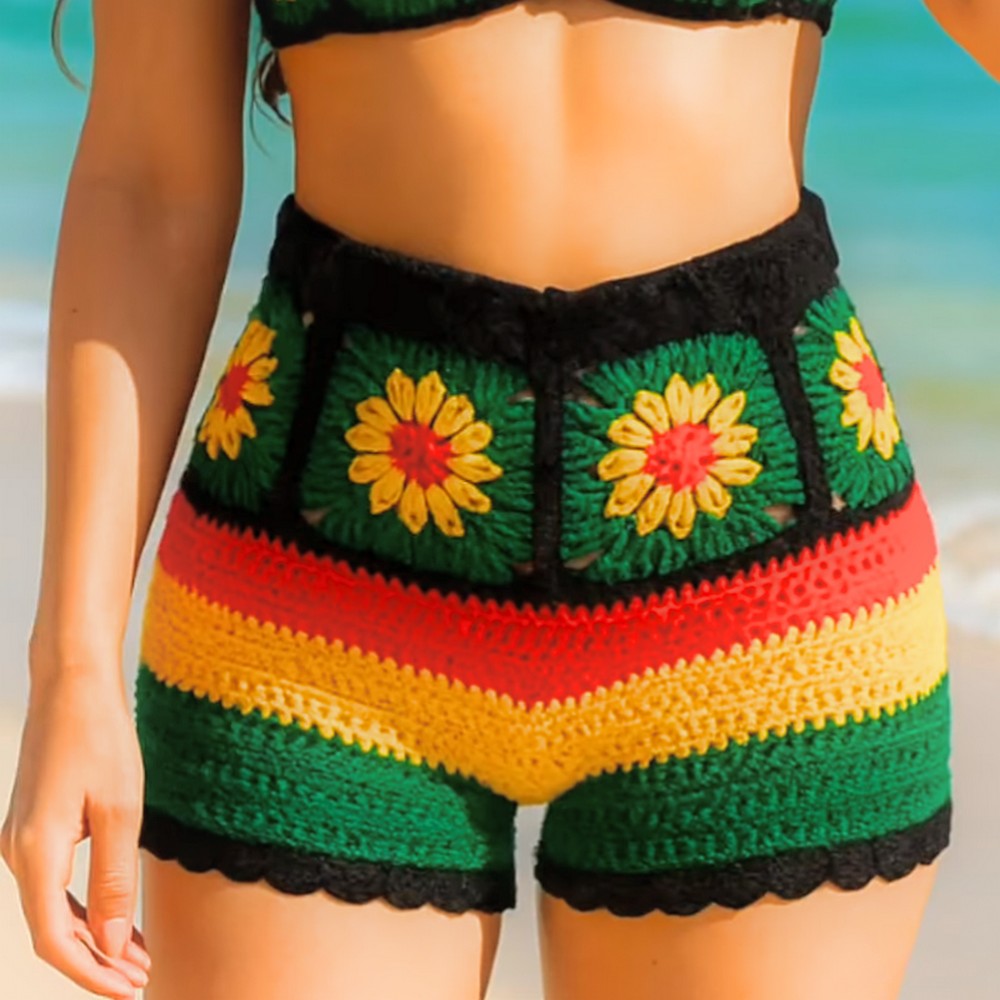
Lastly, consider the opacity of your stitches. If you choose a very “holy” pattern like the granny stitch or mesh stitch, you may want to plan for a lining or wear them over swimwear. In this Crochet shorts – Tutorial, we prioritize a solid stitch pattern like the half-double crochet (HDC) for the seat area. This provides maximum coverage while still allowing the legs to feature more decorative, airy designs if you desire.
The technical foundation of our Crochet shorts – Tutorial begins with the waistband. There are two popular ways to start: top-down or bottom-up. For this guide, we are focusing on the top-down method because it allows you to try on the garment as you go and adjust the length easily. Start by measuring the widest part of your hips, then subtract about two inches to account for the natural “give” or stretch of the crochet fabric.
To create a professional-looking ribbed waistband, you will work a long, narrow strip of single crochet in the back loop only (SCBLO). The length of this strip should match your hip measurement when slightly stretched. Once finished, you will join the ends with a slip stitch to form a large circle. This ribbing mimics the look of knitwear and provides a snug fit that prevents the crochet shorts from sliding down during wear.
Once your waistband circle is complete, you will begin working in rounds along the edge of the ribbing. This is where you establish the main body of the shorts. In this Crochet shorts – Tutorial, we recommend using a simple stitch like the double crochet (DC) for the first few rows to build height quickly. Ensure your stitch count is even and that you are placing stitch markers at the exact center-front and center-back points.
As you move down from the waist toward the hips, you will likely need to perform increases. An increase involves placing two stitches into one, allowing the fabric to widen to accommodate the curve of the hips. This is a critical stage in the Crochet shorts – Tutorial because failing to increase enough will result in a garment that is difficult to pull on, while too many increases can cause the fabric to ruffle or “wave” unnaturally.
The height of this section is known as the rise or the crotch depth. To measure this, sit on a flat chair and measure from your waist down to the chair’s surface. This number tells you exactly how many rounds you need to work before you split the fabric to create the leg holes. A “high-waisted” look will require more rounds, while a “low-rise” look will require fewer, making this a highly customizable crochet pattern.
Consistency is key during these rounds. Check your work every few rows to ensure the fabric is lying flat and that your stitch markers are still aligned. If the seam starts to slant, you may need to adjust your slip stitch join or work in continuous spirals. This stage of the Crochet shorts – Tutorial builds the “trunk” of your shorts, setting the stage for the legs and the crotch gusset.
Now we reach the most technical part of the Crochet shorts – Tutorial: creating the crotch join. To turn the “trunk” into two separate legs, you will create a chain bridge between the center-front and center-back markers. This bridge, often called a gusset, provides the necessary room for movement and ensures the shorts don’t feel restrictive when you sit or walk.
The length of this chain depends on your size, but typically ranges from 5 to 10 chains. Once you connect the front and back with this chain, you will have two large openings. These are your new leg holes. In the next round of your Crochet shorts – Tutorial, you will work all the way around one leg hole, including across the new chain bridge, to begin building the first leg of your shorts.
Working the legs individually allows you to decide on the inseam length. If you want “booty shorts,” you may only need 2 or 3 rounds; for “mid-thigh” shorts, you might work 10 to 15 rounds. It is vital to keep track of exactly how many stitches and rounds you use for the first leg so that the second leg is an identical match. Nothing ruins a handmade garment faster than uneven leg lengths!
During the leg rounds, you can introduce decorative stitches to give your project some personality. Consider adding a few rows of shell stitches or v-stitches near the hem for a feminine, lacy finish. This is the part of the Crochet shorts – Tutorial where you can truly let your creativity shine, mixing textures and even colors to create a “boho-chic” aesthetic that is entirely your own.
If you find that the legs are too wide, you can perform a few decreases on the inner thigh area (near the gusset). This helps taper the shorts for a more tailored fit. Always try the shorts on after finishing the first leg to check the comfort and drape. Crochet fabric can behave differently depending on the yarn weight, so these mid-project fittings are essential for a professional garment construction.
Once the first leg is finished, simply join your yarn at the gusset on the opposite side and repeat the process for the second leg. Ensure your tension remains the same throughout both legs. If you get tired and come back to the project a few days later, your tension might change, so try to finish both legs within a similar timeframe to maintain the symmetrical balance of your crochet shorts.
The final phase of our Crochet shorts – Tutorial is adding the finishing touches that elevate the piece from a DIY project to a high-end fashion item. To finish the leg hems, we recommend a row of reverse single crochet (crab stitch) or a simple picot border. This creates a clean, sturdy edge that prevents the legs from curling upward and adds a professional weight to the hem of the garment.
Next, you must address the waistband security. Even with a good ribbed waist, crochet tends to stretch out after an hour of wear. Threading a round elastic cord through the stitches of the waistband is a great “pro secret.” Alternatively, you can crochet a long i-cord or a simple chain of yarn to act as a functional drawstring, which adds to the sporty or beachy look of the shorts.
Weaving in ends is often the least favorite task, but in this Crochet shorts – Tutorial, it is crucial for longevity. Because shorts are high-friction items (especially in the inner thigh and seat area), use a weaving method that goes in three different directions to “lock” the yarn in place. This ensures that your hard work doesn’t unravel after a trip to the beach or a session in the laundry.
Speaking of laundry, caring for your handmade crochet shorts requires a gentle touch. Always wash them in a mesh laundry bag on a delicate cycle, or better yet, hand-wash them in cool water. Lay them flat on a towel to dry; never hang them, as the weight of the water will stretch the stitches and ruin the fit. Proper care ensures your custom crochet shorts will last for many summers to come.
If you are making these shorts for sale or as a gift, consider adding a fabric lining. A simple jersey knit lining can be hand-sewn into the interior to provide 100% opacity and a soft feel against the skin. While this Crochet shorts – Tutorial focuses on the crochet aspect, adding a lining is a great way to increase the market value of your work on platforms like Etsy or at local craft fairs.
Congratulations! You have successfully completed a complex garment using your own two hands. This Crochet shorts – Tutorial has given you the skills to measure, shape, and finish a wearable piece of art. Whether you wear them over a swimsuit or as part of a stylish summer outfit, your new shorts are a testament to your patience, skill, and creative vision in the world of modern crochet.
1. How do I make sure my crochet shorts are not see-through?
To ensure opacity, use a solid stitch like the half-double crochet and a slightly smaller hook than what is recommended on the yarn label. This creates a tighter fabric. You can also wear a pair of nude-colored seamless underwear or sew in a fabric lining for extra security.
2. How much yarn do I need for a standard pair of shorts?
For a medium-sized pair of shorts, you will typically need between 600 to 900 yards of DK or Worsted weight yarn. If you are making them longer or adding a lot of decorative lace, it is always safer to have an extra skein of the same dye lot on hand.
3. Can I use acrylic yarn for this project?
While you can use acrylic, it is not recommended for summer wear because it doesn’t breathe well and can make you sweat. Cotton or bamboo is much more comfortable for skin-contact garments. If you do use acrylic, choose a high-quality “anti-pilling” variety to prevent fuzzing.
4. My shorts fit perfectly at first but stretched out after an hour. What happened?
Crochet fabric naturally has a lot of “stretch and recovery” issues. This is why a drawstring or elastic waistband is vital. You can also try using a yarn with a small percentage of nylon or elastic, which helps the garment snap back into its original shape.
5. How do I adjust the rise for a more comfortable fit?
The rise is determined by the number of rounds you work before the crotch split. If you have a longer torso, add more rounds to the body section. If you prefer a “low-cut” look, start the crotch split sooner. Always measure your seated crotch depth for the best results.
6. Is this Crochet shorts – Tutorial suitable for beginners?
If you know the basic stitches (CH, SC, DC, HDC) and are comfortable working in rounds, you can definitely tackle this project! The “squaring of the crotch” is the only tricky part, but if you follow the stitch marker instructions, you will be successful.
In this Crochet shorts – Tutorial, we have covered the essential journey of creating a stylish, custom-fit garment from scratch. From the importance of selecting breathable cotton yarn to the technicalities of the crotch gusset and the comfort of a ribbed waistband, you now possess the knowledge to build a summer wardrobe that is uniquely yours.
We explored how to take accurate measurements and how to finish your work with professional edges and drawstrings. This project is more than just a craft; it is an exercise in sustainable fashion and personal expression.


