Amigurumi Pumpkin Witch Doll - Pattern

If you love cats and crocheting, then the AmiCats Tabby Cat amigurumi crochet pattern is the perfect project for you. This adorable, lifelike cat amigurumi brings together detailed design, creativity, and the charm of a handcrafted item. Whether you’re a seasoned crocheter or just starting your amigurumi journey, this pattern is sure to delight both the maker and the recipient.
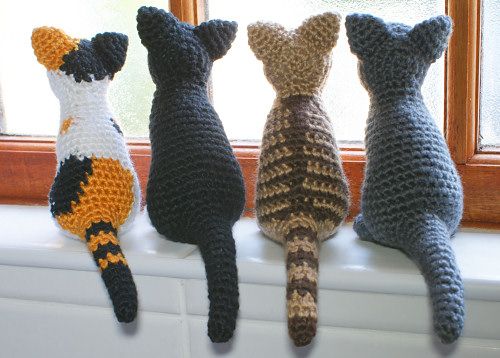
The AmiCats Tabby Cat amigurumi crochet pattern is designed to resemble a real tabby cat with its unique striping and realistic posture. It’s not just a toy—it’s a collectible, a display piece, and for many, a way to memorialize a beloved pet. With the right yarn and a bit of patience, you can create a stunning, three-dimensional crochet cat that looks almost real.
In this article, we’ll explore everything you need to know about working with the AmiCats Tabby Cat amigurumi crochet pattern, including required materials, step-by-step tips, customization ideas, and answers to frequently asked questions. Let’s dive into the world of feline-inspired crochet!
To begin your AmiCats Tabby Cat amigurumi crochet pattern, you’ll first need to gather the correct materials and understand the techniques involved. While the project is moderately detailed, it’s completely doable with some focus and careful attention to the pattern.
Start by selecting the right yarn. Most crocheters use DK (double knitting) or sport-weight yarn for a clean and detailed look. Acrylic yarn works well for durability, while cotton gives your cat a smooth texture. For a realistic finish, choose variegated yarn or manually alternate colors to mimic tabby stripes.
You’ll also need an appropriately sized crochet hook—typically between 2.25 mm and 3.5 mm. A smaller hook helps maintain tight stitches, which is important for preventing stuffing from showing through. Always make a test swatch to check your tension before starting.
Other materials include fiberfill stuffing, stitch markers, a yarn needle, scissors, and safety eyes (or embroidery thread for hand-sewn features). If you want a poseable cat, consider using pipe cleaners or craft wire for the limbs and tail.
The AmiCats Tabby Cat amigurumi crochet pattern is usually worked in separate pieces—head, body, legs, tail, and ears—that are later sewn together. This allows for greater control over shape and positioning.
Before you begin stitching, take time to read the entire pattern. Understanding the sequence and any special instructions will prevent surprises during the process. This is especially important when working with color changes for tabby markings.
Building your AmiCats Tabby Cat amigurumi crochet pattern involves a methodical process of crocheting, shaping, and assembling the parts. With patience, you’ll see your feline friend come to life, one section at a time.
Start with the head, which sets the tone for the expression and personality of your tabby cat. Work in the round, using single crochet stitches and increases to shape a round form. Most patterns include color change rows to simulate facial stripes. Don’t forget to add the safety eyes before closing the head.
Next is the body, which typically has an oval or cylindrical shape. Use stitch markers to keep track of rounds, and remember to stuff the body gradually as you go. The stuffing should be firm but not too tight, so the shape remains natural.
The legs and paws are often crocheted as separate pieces, sometimes with small details like paw pads or joint shaping. For added realism, lightly stuff the legs and sew them in a sitting or standing position, depending on the final pose you want.
Crocheting the tail is a fun detail that adds personality. Depending on the pattern, it might be curved, straight, or curled. A wired tail can be posed, which gives your tabby a more lifelike appearance.
The ears are small but important features. They are usually worked flat or in small rounds and sewn onto the head symmetrically. Slightly shaping the ears inward with sewing techniques gives a more expressive face.
Finally, sew all the parts together with a yarn needle. Take your time during assembly, ensuring the symmetry and placement match the desired posture. Use pins to position pieces before stitching to avoid mistakes.
One of the joys of working with the AmiCats Tabby Cat amigurumi crochet pattern is the ability to make it truly unique. You can personalize your creation to match a real-life cat or simply explore different color palettes and textures.
If you’re crocheting a model of your own pet, try matching the fur color and pattern. Tabby cats come in a variety of styles: classic swirls, mackerel stripes, spotted, and ticked. Use stripes in black, grey, orange, or brown depending on the look you’re aiming for.
You can also customize the eyes and facial expression. Safety eyes come in multiple sizes and colors, or you can embroider them for a softer look. Changing the placement of the eyes, eyebrows, and mouth can add different moods—from curious to sleepy or even playful.
Add accessories like a tiny crochet collar, a fish toy, or a name tag. These extra details can make your project more special, especially if it’s a gift or a pet memorial.
Texture is another fun area to explore. Try mixing fluffy or brushed yarns with regular yarn for a more realistic fur look. Brushing the finished piece gently with a wire pet brush can also add a fuzzy effect.
If you’re experienced, consider enlarging or shrinking the pattern to create a family of cats in various sizes. This could be a fun display or even part of a themed crochet collection.
Lastly, you can use your finished cat as more than a decoration—turn it into a keychain, bag charm, or plush toy by adjusting the size and adding attachments.
The AmiCats Tabby Cat amigurumi crochet pattern can be a detailed and intricate project, but with the right approach, it becomes an enjoyable and fulfilling experience. These practical tips will help you along the way.
Keep your tension tight and even throughout. Loose stitches can make the stuffing visible, while uneven tension can distort the shape. Practice a few swatches if needed before starting the actual pattern.
Use stitch markers religiously, especially when working in rounds. They help prevent confusion about where a round starts and stops, which is crucial when increasing or decreasing.
Take your time with color changes. Switching yarn colors for tabby markings needs to be clean. Secure the yarn ends neatly inside the body and avoid carrying strands across the back of the work if it adds bulk.
Don’t rush the assembly process. The way parts are sewn together can make or break the overall look. Always pin limbs and features in place first to visualize the final structure before committing to sewing.
Invest in quality stuffing material. Fiberfill that’s too soft might not hold shape well, while overstuffing can stretch the stitches. A good rule is to add stuffing gradually and mold it with your hands as you go.
Finally, take breaks. A detailed project like this requires patience and focus. Regular breaks will help avoid hand strain and ensure you return with a fresh perspective to catch small mistakes early.
Q1: Is this pattern beginner-friendly?
The AmiCats Tabby Cat amigurumi crochet pattern is best suited for intermediate crocheters. Beginners can try it with patience and basic amigurumi knowledge.
Q2: How long does it take to complete the project?
Depending on experience, the pattern may take between 6–12 hours. Some people like to spread it across several days to avoid fatigue.
Q3: Can I use any type of yarn?
Yes, but DK or sport-weight yarn gives the best detail. You can also use cotton for structure or variegated yarn for realistic tabby fur.
Q4: Is it necessary to use wire for structure?
Not necessary, but wire adds poseability. If making a toy for a child, skip the wire and keep it soft for safety.
Q5: How do I wash my amigurumi cat?
Hand-wash gently in cold water if needed. Avoid machine washing, especially if the piece has safety eyes or wire inside.
Q6: Can I sell items made from this pattern?
Check the designer’s licensing. Many patterns allow you to sell finished products as long as you credit the designer and don’t share the pattern.
The AmiCats Tabby Cat amigurumi crochet pattern is more than just a cute project—it’s a meaningful and detailed crochet adventure. From gathering the right materials to the final stitch, each step offers creativity and satisfaction. With customization options and lifelike results, this pattern is a favorite among cat lovers and amigurumi fans alike.
We’ve explored how to get started, tips for stitching and assembling, personalization ideas, and frequently asked questions to help guide your process. Whether you’re making a keeps
ake, a gift, or simply expanding your skills, this pattern is a rewarding journey.
We’d love to hear from you! Share your thoughts, experiences, or suggestions in the comments. What color was your tabby cat? Did you add any unique accessories? Let us know how your AmiCats turned out!