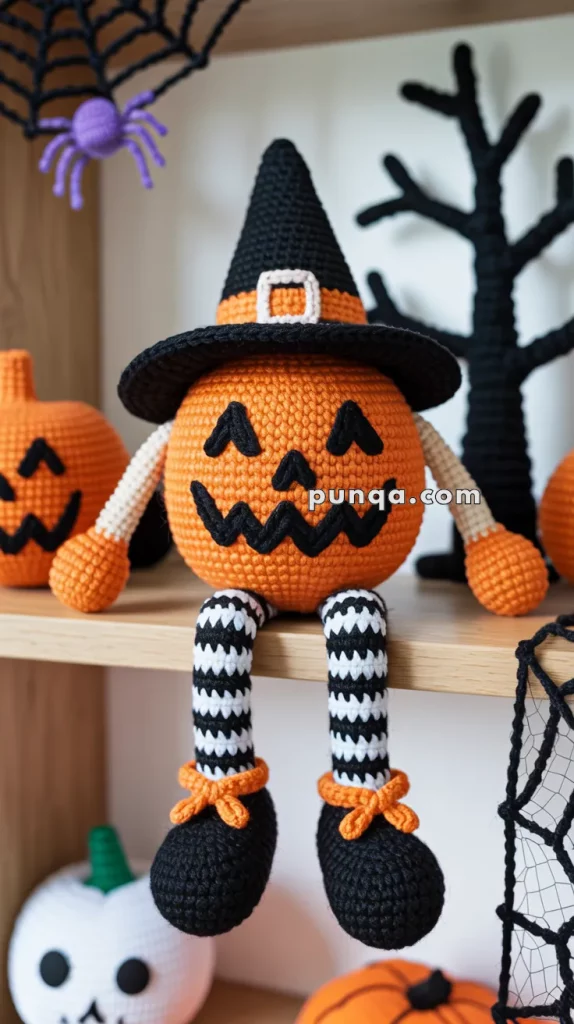
Amigurumi Pumpkin Witch Doll - Pattern

Amigurumi the bunny carros crochet is a delightful and charming way to create an adorable crocheted bunny holding a carrot, a popular figure in the world of amigurumi.
Whether you’re a seasoned crochet expert or just starting out, following a clear pattern to make a bunny figure with a carrot can be both enjoyable and rewarding.
This guide will walk you through everything you need to know to successfully complete the project, including detailed instructions, tips, and a comprehensive FAQ.

Image From Pinterest
Crocheting amigurumi animals has become an enjoyable hobby for many around the world. These cute, small creations are not only fun to make, but they also serve as thoughtful handmade gifts. The bunny design, especially with a carrot, is a popular choice, evoking both warmth and charm. In this article, we will cover step-by-step instructions for crocheting a bunny holding a carrot, and we’ll make sure the pattern is easy to follow, whether you’re a beginner or a more experienced crocheter.
The key to creating a perfect amigurumi bunny is to carefully follow the steps, use the right materials, and ensure each stitch is consistent. We’ll also highlight the importance of understanding the carros crochet concept and how it applies to creating not just the bunny, but also the accessories like the carrot, which adds that extra flair to the project. Let’s dive right into the details of this fun, creative project.
Before you begin your Amigurumi the bunny carros crochet project, it’s important to gather all the materials you need. Having everything ready will ensure a smoother crochet experience.
Yarn Selection: Choose yarn in colors suitable for both the bunny and the carrot. Typically, a soft yarn in white or gray is ideal for the bunny’s body, while orange yarn is perfect for the carrot. Additionally, you can choose green yarn for the carrot’s leaves.
Crochet Hook: A 3mm or 4mm hook works best for this pattern. The hook size you choose should correspond to the thickness of your yarn to achieve the right texture.
Stuffing: Use polyester fiberfill or any other soft stuffing material to give the bunny and the carrot shape and stability.
Safety Eyes: If you want your bunny to have eyes, safety eyes are a great option. They give your creation a professional finish. Alternatively, you can embroider eyes for a more customized look.
Tapestry Needle: A needle for sewing the various parts of your amigurumi creation, such as attaching the arms, legs, ears, and the carrot.
Once you have all these materials at hand, you’re ready to begin. Let’s move on to the next step of the Amigurumi the bunny carros crochet pattern!
The bunny’s head and body are the core components of this crochet pattern. The process of making these parts involves basic amigurumi techniques like the magic ring, increases, and decreases. Let’s break it down step by step.
Making the Head: Start by creating a magic ring and working 6 single crochets (sc) into the ring. Gradually increase the stitches to create the round shape of the bunny’s head. Make sure to add stuffing as you go to ensure the head keeps its shape. You’ll work in rounds until you’ve created a sturdy head structure.
Making the Body: The body is created similarly to the head, but it is slightly larger. After creating the magic ring and working the initial rounds, you’ll continue adding increases to shape the body. The body will need to be stuffed as well, ensuring it holds its shape and stands up when you finish.
Attaching the Head to the Body: Once both the head and body are complete, it’s time to sew them together. Use a tapestry needle and yarn to securely attach the head to the body, making sure they align well. This will ensure your bunny’s proportions are perfect.
By following these simple instructions, you’ll create the foundation for your Amigurumi the bunny carros crochet creation. The next step will involve creating the bunny’s arms, legs, and other details.
To make your bunny complete, you’ll need to crochet the arms, legs, and ears. These smaller parts add personality and charm to your creation. Here’s how to make each part.
Arms: To make the arms, start with a magic ring and crochet in rounds. The arms are typically smaller than the legs and only need a few rounds. After completing the rounds, lightly stuff the arms and sew them onto the body of the bunny. Be sure to position them symmetrically.
Legs: The legs are slightly longer and larger than the arms, so you’ll work more rounds for the legs. After crocheting the legs, stuff them and sew them onto the body. Make sure they are positioned in a way that allows the bunny to stand or sit comfortably.
Ears: The ears are an essential feature of the bunny. To make them, start with a magic ring and crochet several rounds. Once the ears are shaped, attach them securely to the top of the bunny’s head. You can make the ears longer or shorter depending on the style you prefer for your Amigurumi the bunny carros crochet.
With the arms, legs, and ears attached, your bunny will start to take shape and come to life. Next up, we’ll focus on making the carrot accessory, which is a key part of this pattern!
No bunny is complete without a delicious carrot! Let’s look at how to crochet the carrot to make your Amigurumi the bunny carros crochet truly special.
Start with the Body of the Carrot: Begin by making a magic ring and crocheting several rounds with orange yarn. Gradually increase the stitches to form the carrot shape, making it slightly wider at the base and narrowing towards the top. As you crochet, stuff the carrot lightly to give it a firm but soft texture.
Carrot Leaves: The leaves of the carrot add a natural look to your creation. Using green yarn, crochet small leaves by chaining and then working back in single crochet stitches. Attach 3-4 leaves to the top of the carrot, ensuring they’re evenly spaced.
Attaching the Carrot to the Bunny: Once you’ve completed the carrot, carefully place it in one of the bunny’s hands and sew it securely. The bunny can be positioned in various ways, either sitting or standing, to hold the carrot. Make sure the carrot is well-attached and positioned in a natural way.
Now that the carrot is complete, you’ve added a beautiful and fun accessory to your Amigurumi the bunny carros crochet project!
1. What type of yarn should I use for making amigurumi? The best yarn for amigurumi is a medium-weight yarn, often labeled as “worsted weight.” You want yarn that is soft and smooth for better stitch definition, such as acrylic or cotton yarn.
2. How do I attach safety eyes to my bunny? To attach safety eyes, simply push the prongs of the safety eyes through the head of the bunny and secure them with the washers provided. Be sure to position them evenly for a balanced look.
3. Can I adjust the size of the bunny? Yes, you can adjust the size by using thicker or thinner yarn and a corresponding hook size. Larger yarn and a bigger hook will result in a bigger bunny, while thinner yarn and a smaller hook will create a more delicate version.
4. How do I ensure my amigurumi doesn’t lose its shape? Make sure to stuff your amigurumi tightly as you crochet. Adding a good amount of stuffing ensures that your creation holds its shape. Also, always use a yarn that is not too loose, as this can affect the overall structure.
5. Can I crochet other vegetables for the bunny to hold? Absolutely! Feel free to create other accessories like a cabbage, mushroom, or even a little basket for your bunny. The possibilities are endless!
In this article, we’ve explored the fun and creative process of making Amigurumi the bunny carros crochet. From gathering your materials and crocheting the head and body to adding the arms, legs, ears, and carrot, we’ve covered all the essential steps. With these detailed instructions, you’re well on your way to creating an adorable crochet bunny.
If you found this article helpful, we’d love to hear your feedback. Please leave a sincere opinion and any suggestions for improvement in the comments below. Happy crocheting!
