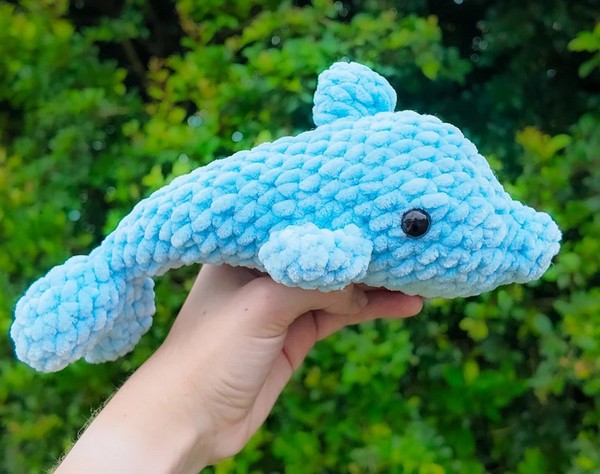
Creating a Crochet Dolphin Amigurumi is a fun and rewarding project for any crocheter, whether you’re a beginner or an experienced crafter.
Dolphins are graceful and playful creatures, and turning them into an adorable amigurumi is sure to be a delightful project.
In this guide, we’ll walk you through step-by-step instructions to create your very own dolphin amigurumi that’s perfect for gifting or adding to your collection. Let’s dive right in!

Image From Pinterest
Amigurumi is the art of crocheting small, stuffed animals, dolls, or characters, often made in the round. This Japanese craft has gained a global following thanks to its versatility and charm. A Crochet Dolphin Amigurumi can be created using basic crochet stitches, making it an accessible project for both beginners and seasoned crocheters. Plus, the adorable finished result is sure to bring a smile to anyone who sees it.
OTHER CROCHET PATTERNS HERE!
Whether you want to create a cute gift for a friend, decorate a child’s room, or simply enjoy a relaxing crochet project, this dolphin amigurumi will meet all your crafting needs. We’ll break down the materials you need, the basic techniques involved, and then take you through the steps to bring your little dolphin to life.
1. Materials Needed
Before you begin crocheting your Crochet Dolphin Amigurumi, gather all the necessary materials. Having everything ready will help the process go smoothly. Here’s a list of what you’ll need:
- Yarn: For this project, choose a medium-weight yarn (worsted weight) in shades of blue, gray, or any color you’d like for your dolphin. A lighter color, such as baby blue or gray, will resemble a real dolphin’s appearance, but feel free to get creative with your color choices.
- Crochet Hook: The recommended hook size for this project is typically between 3.5mm and 4mm, depending on the yarn you choose. Ensure that your crochet hook size is compatible with the thickness of the yarn you’ve selected.
- Safety Eyes: These eyes provide a cute and professional finish to your dolphin’s face. Safety eyes typically come in sizes such as 6mm or 9mm, and they’re easy to attach to the amigurumi once the face is complete.
- Stuffing: You’ll need a soft fiberfill or polyester stuffing to fill your dolphin. Stuffing is essential to give your dolphin its shape, but make sure not to overstuff it, as you want to maintain flexibility.
- Yarn Needle: You’ll use a yarn needle to sew the various parts of the dolphin together and weave in loose ends.
- Scissors: A good pair of sharp scissors will help you trim yarn neatly when finishing your dolphin.
With all these materials ready, you’re all set to start creating your very own dolphin amigurumi.
2. Basic Crochet Techniques
Before we dive into the step-by-step instructions for making your Crochet Dolphin Amigurumi, it’s important to be familiar with some basic crochet techniques. These techniques will be used throughout the project, so let’s review them:
- Magic Ring: A magic ring is the perfect way to start crocheting in the round. It creates a tight, adjustable loop, preventing a gap in the center of your piece. To make a magic ring, wrap the yarn around your fingers, insert the hook into the ring, and crochet into it.
- Single Crochet (SC): The single crochet stitch is the foundation of most amigurumi projects. It’s a tight stitch that creates a dense fabric, ideal for stuffing. You’ll work in a spiral, so you don’t need to join each round, unless specified.
- Increase and Decrease: As you shape your dolphin, you’ll use increases and decreases. To increase, crochet two stitches into the same stitch. To decrease, crochet two stitches together. These techniques allow you to form the different parts of the dolphin’s body, like the head, body, and tail.
- Joining Pieces: Once you’ve crocheted all the parts, you’ll need to join them. Use a yarn needle to stitch the head, body, fins, and tail together securely.
- Stuffing: As you go along, stuff your dolphin lightly with fiberfill. Be careful not to overstuff, as the shape should remain flexible. You can adjust the amount of stuffing based on the look and feel of your dolphin.
Now that you’re familiar with the techniques, let’s move on to the instructions for making your Crochet Dolphin Amigurumi.
3. Step-by-Step Instructions
Follow these step-by-step instructions to crochet your dolphin amigurumi. We’ll start with the head and work our way to the tail.
Head:
- Start with a magic ring, and work 6 single crochets into the ring. (6)
- Increase in each stitch around to make 12 single crochets. (12)
- Work one single crochet in the next stitch, then increase in the next stitch. Repeat around. (18)
- Work one single crochet in the next two stitches, then increase in the next stitch. Repeat around. (24)
- Continue working even (no increases or decreases) for several rounds, until the head reaches the desired size.
- Stuff the head lightly with fiberfill.
- Continue decreasing by working one single crochet in the next two stitches, then crocheting two stitches together. Repeat around until the hole is closed.
- Attach safety eyes and embroider a small mouth.
Body:
- Start with a magic ring, and work 6 single crochets into the ring. (6)
- Increase in each stitch around to make 12 single crochets. (12)
- Increase every other stitch until the body reaches the desired width.
- Work even for several rounds, then start decreasing to form the tail section.
- Stuff the body lightly with fiberfill.
- Attach the head to the body using a yarn needle, making sure the pieces are aligned properly.
Fins:
- Ch 6, then work 5 single crochets in the second chain from the hook.
- Work 5 single crochets in each stitch to form a small fin.
- Attach the fins to the sides of the dolphin’s body.
- Repeat for the second fin and attach it symmetrically on the other side.
Tail:
- Start with a magic ring, and work 6 single crochets into the ring. (6)
- Increase by working 2 single crochets into each stitch, until you achieve the desired tail width.
- Work evenly until the tail reaches the desired length.
- Attach the tail to the back of the dolphin’s body.
Once you have assembled the pieces, your Crochet Dolphin Amigurumi will be complete!
4. Customization Tips
Now that you’ve finished your dolphin amigurumi, consider customizing it to make it your own. Here are some ideas to enhance your dolphin:
- Color Variations: Change the color of the body, fins, or tail to create a unique dolphin. You could even make a rainbow-colored dolphin or one with sparkly yarn!
- Different Fin Shapes: Try experimenting with different fin shapes. You could make them larger or smaller, or change the shape slightly for a different look.
- Add a Smile: If you’d like a more expressive dolphin, add a smile with embroidery or even small felt pieces.
- Dolphin Accessories: Get creative with accessories like a tiny scarf or a cute bow tied around the dolphin’s neck for extra personality.
- Bigger or Smaller Size: Adjust the size of your dolphin by using a thicker or thinner yarn, or by adding more or fewer rows to the body and head.
- Use Different Techniques: If you’re feeling adventurous, try adding surface crochet or other textured techniques to create different effects in your dolphin’s body or fins.
FAQ
1. Can I use different yarn for this pattern? Yes! You can use any type of yarn you like, but medium-weight (worsted weight) yarn works best for creating a sturdy yet soft dolphin.
2. How do I attach safety eyes? To attach safety eyes, insert the eye through the head of your dolphin and secure it with the back fastener. Make sure to place them symmetrically and at a comfortable distance.
3. Can I adjust the size of the dolphin? Yes, you can adjust the size of your dolphin by using thicker or thinner yarn or adjusting the number of stitches and rows.
4. Can I add other features like gills or fins? Absolutely! You can customize your dolphin with extra features like small gills, additional fins, or even a blowhole for a more realistic look.
5. How do I make the dolphin stand up? If you want your dolphin to stand up, you can add a small weighted object (such as a beanbag or some rice in a small pouch) inside the body to help balance it.
6. Is this pattern beginner-friendly? Yes! This pattern is perfect for beginners who are familiar with basic crochet stitches. The instructions are easy to follow, and you can customize your dolphin as you go.
PATTERN HERE
Conclusion
In this article, we’ve provided you with a step-by-step guide to creating your own Crochet Dolphin Amigurumi. From gathering your materials to learning the basic techniques, you now have all the tools to create a charming little dolphin. Don’t be afraid to experiment with colors and features to make your dolphin truly unique. We hope you enjoyed this fun project! Please feel free to share your feedback, suggestions, and any improvements you made to the pattern. Happy crocheting!

