Crocheting a Crochet Easter Chicken Amigurumi is a perfect project for spring!
Whether you’re preparing for the Easter holiday or simply want to create a fun, festive decoration, this cute little chicken will add a lot of personality to your crochet collection.
Amigurumi, the Japanese art of crocheting small stuffed animals or objects, allows you to make colorful and adorable creations, and the Easter Chicken is no exception.
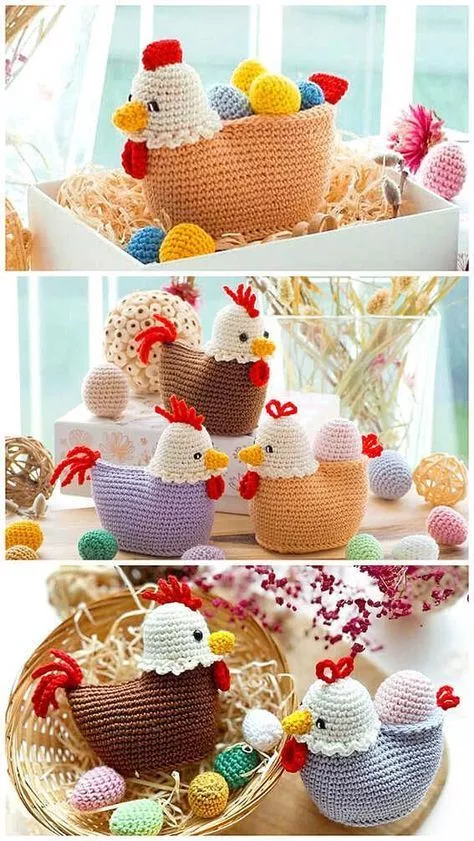
Image From Pinterest
Creating a crochet chicken for Easter not only provides you with a charming gift but also a lovely decoration for your home. This guide will walk you through everything you need to know to crochet your very own Easter Chicken Amigurumi, from gathering materials to adding those perfect finishing touches.
OTHER CROCHET PATTERNS HERE!
Let’s get started with this step-by-step guide, and soon you’ll have your own cheerful little chicken to brighten up your Easter celebrations!
1. Materials Needed
Before diving into the pattern, let’s gather all the necessary materials. Having your supplies ready will make the crocheting process go much smoother. Here’s what you’ll need for your Crochet Easter Chicken Amigurumi:
- Yarn: Choose a soft, medium-weight (worsted weight) yarn in yellow for the chicken’s body. You’ll also need small amounts of yarn in colors like orange for the beak and feet, red for the comb, and any other color you might want for additional features, such as accessories or decorative touches.
- Crochet Hook: For most amigurumi projects, a 3.5mm to 4mm hook is ideal. The hook size should match the yarn weight for tight stitches that can hold stuffing.
- Safety Eyes: For this project, safety eyes of around 6mm will work well for the chicken’s face. These are easy to attach and give the chicken a professional, finished look.
- Polyester Fiberfill: This is used to stuff the chicken, giving it a soft, plush feel. It also helps to maintain the shape of your amigurumi.
- Yarn Needle: A yarn needle is necessary for attaching the various pieces together, such as the beak, feet, and comb. It’s also useful for weaving in loose yarn ends as you finish up your project.
- Scissors: You’ll need a sharp pair of scissors to cut yarn and trim any excess threads.
With all the materials gathered, you’re ready to begin your crochet Easter Chicken project!
2. Basic Crochet Techniques
Before jumping into the pattern, it’s important to understand the basic crochet techniques that you’ll use throughout the project. These techniques are essential for making your Easter Chicken Amigurumi look polished and well-crafted:
- Magic Ring: The magic ring is a common starting technique for amigurumi. It allows you to work in a circle without leaving a hole in the center. To make a magic ring, wrap the yarn around your fingers, insert the hook, and crochet into the loop.
- Single Crochet (SC): The single crochet stitch is the basic stitch for amigurumi. It creates a tight and dense fabric that holds stuffing well. To make a single crochet, insert the hook into a stitch, yarn over, and pull through both loops on the hook.
- Increase and Decrease: As you shape your chicken, you’ll use increases and decreases. To increase, crochet two single crochets into one stitch. To decrease, crochet two single crochets together to reduce the number of stitches in a round.
- Working in a Spiral: Amigurumi is typically crocheted in continuous rounds, which means you don’t join each round with a slip stitch. Use a stitch marker to mark the start of each new round.
- Attaching Pieces: Once you’ve crocheted all the pieces, you’ll use a yarn needle to attach them together. It’s important to sew the pieces securely so that they don’t shift or come undone.
Now that you’re familiar with the basic techniques, you’re ready to move forward with the step-by-step instructions!
3. Step-by-Step Instructions
Let’s break down the process of creating your Easter Chicken Amigurumi into manageable steps. We’ll start with the head, move to the body, and then finish with the accessories.
Head:
- Start with a magic ring, and crochet 6 single crochets into the ring. (6)
- Increase in each stitch around to make 12 single crochets. (12)
- Work one single crochet in the next stitch, then increase in the next stitch. Repeat around. (18)
- Work one single crochet in the next two stitches, then increase in the next stitch. Repeat around. (24)
- Continue working evenly (no increases or decreases) until the head reaches your desired size.
- Stuff the head lightly with fiberfill.
- Begin decreasing by crocheting one single crochet in the next two stitches, then crocheting two stitches together. Repeat around, until the hole is closed.
- Attach the safety eyes to the head, making sure they are placed symmetrically. Embroider a small mouth if desired.
Body:
- Start with a magic ring, and crochet 6 single crochets into the ring. (6)
- Increase in each stitch around to make 12 single crochets. (12)
- Work one single crochet in the next stitch, then increase in the next stitch. Repeat around. (18)
- Continue working evenly until the body is the desired size.
- Begin decreasing as you reach the bottom of the body, and work until the body is closed.
- Stuff the body lightly with polyester fiberfill.
- Attach the head securely to the body.
Beak:
- Start with a small chain of 4 stitches.
- Turn, and work one single crochet in each chain across. (3)
- Fold the piece in half and sew it together to form a triangle shape for the beak.
- Attach the beak to the face, centered below the eyes.
Comb (Top of the Head):
- Ch 5.
- Turn, and work one single crochet in the second chain from the hook, followed by one single crochet in each chain.
- Repeat the process for about 3-4 rows to create the comb shape.
- Attach the comb to the top of the head, sewing it securely.
Feet (Make 2):
- Ch 5.
- Turn, and work one single crochet in each chain.
- Fold the piece in half to form a “V” shape, then crochet along the edges to form the feet.
- Stuff the feet lightly with fiberfill.
- Attach the feet to the bottom of the body.
Wings (Make 2):
- Start with a magic ring, and crochet 6 single crochets into the ring. (6)
- Increase in each stitch around to make 12 single crochets. (12)
- Work one single crochet in the next two stitches, then increase in the next stitch. Repeat around. (18)
- Continue until you have a small oval shape.
- Attach the wings to each side of the body.
4. Customization Tips
Once you’ve completed the basic crochet Easter Chicken Amigurumi, you can customize it further to add your unique style. Here are a few ways to personalize your little chicken:
- Change the Yarn Colors: Use pastel yarns like pink, lavender, or light blue to create a soft, spring-inspired chicken. You could also make a more vibrant version with multi-colored feathers.
- Add Accessories: You can crochet small accessories like a tiny scarf, bowtie, or Easter egg for your chicken to hold. This will make the amigurumi even more festive and fun.
- Use Felt for Details: If you prefer, you can use felt to make a more delicate comb, beak, and feet. This adds a different texture and makes your chicken look even more unique.
- Create a Larger Version: If you want a bigger Easter chicken, just use thicker yarn and a larger crochet hook. You can also adjust the number of rounds for a larger body or head.
- Make a Family of Chickens: Crochet several chickens in different sizes or colors to make an entire Easter-themed flock. It’s a great idea for gifts or as a family of Easter decorations.
- Embroider Additional Features: If you prefer a less 3D look, consider embroidering the eyes, beak, and comb instead of using safety eyes and crocheting the beak.
FAQ
1. Can I use different yarn for this project? Yes! You can use any yarn you like, but be sure to choose yarn that’s not too thick. Medium-weight yarn (worsted weight) works best for amigurumi.
2. Can I make the Easter chicken bigger or smaller? Yes! Adjust the yarn thickness and crochet hook size to create a larger or smaller chicken, and change the stitch count as needed.
3. How do I attach the comb, beak, and feet? Use a yarn needle to sew the comb, beak, and feet securely to the chicken’s head and body. Be sure to stitch them carefully so they don’t shift.
4. How long does it take to crochet the Easter chicken? The time required varies based on experience, but it typically takes between 3 to 5 hours to complete the entire project.
5. Can I make the chicken more colorful? Definitely! You can add colorful yarn for a variety of effects, or even make a rainbow chicken by changing yarn colors for each body section.
PATTERN HERE
Conclusion
And there you have it—your very own Crochet Easter Chicken Amigurumi! Whether you plan to use it as a cute decoration, a gift, or a fun craft project for the holiday, this little chicken is sure to add a smile to anyone’s face. We hope this step-by-step guide has helped you create the perfect Easter chicken. Don’t forget to share your creations and feel free to add your own creative twist to the design! We’d love to hear your suggestions and see how your Easter chicken turned out. Happy crocheting!


