Amigurumi Pumpkin Witch Doll - Pattern

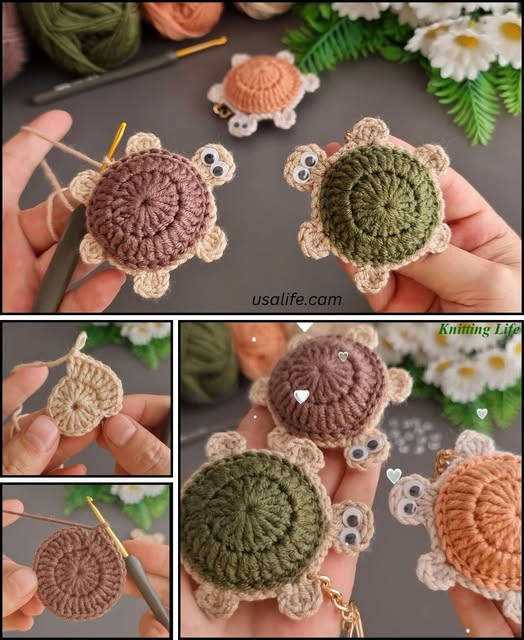
Crochet turtle making for beginners – Pattern is a fun, relaxing, and creative project that introduces newcomers to the beautiful world of amigurumi. If you’ve ever wanted to craft something adorable and handmade, making a crochet turtle is the perfect place to start. With basic tools, a bit of yarn, and the right step-by-step instructions, anyone can learn how to create a soft and charming turtle plushie.
Whether you’re crocheting for fun, making a gift, or starting a new hobby, this guide will walk you through the essentials of crochet turtle making for beginners. You’ll learn about the tools you need, how to read a pattern, and how to master each stitch that brings your turtle to life. The process is not only beginner-friendly but also rewarding, as you see your tiny turtle take shape from simple materials.
In this article, we will guide you with a crochet turtle pattern specifically designed for beginners, using simple terms and easy-to-follow instructions. With a little patience and creativity, you’ll have your own handmade turtle in no time. Let’s dive into this exciting journey of crochet turtle making for beginners – pattern and start stitching your new favorite plushie!
Before starting your crochet turtle making for beginners – pattern, it’s essential to gather the right materials. Using the correct yarn and tools ensures that your turtle turns out soft, firm, and easy to shape, especially for first-time crafters.
First, choose medium-weight yarn, also known as worsted weight (category 4). This type of yarn is ideal for beginners because it’s easy to handle and provides clear stitch definition. Opt for cotton or acrylic blends, which are soft and durable for stuffed animals.
You’ll also need a crochet hook suitable for your yarn weight. Most beginners start with a 4.0mm to 5.0mm hook, depending on your tension. A smaller hook creates tighter stitches, which is great for amigurumi to avoid stuffing gaps.
Don’t forget to gather safety eyes or buttons for the turtle’s eyes. If the turtle is meant for young children, you can embroider the eyes with black yarn to avoid any choking hazards. A yarn needle will also be needed for sewing the pieces together.
Stuffing is another key material. Use polyester fiberfill for a lightweight and fluffy interior. It allows your turtle to hold its shape without becoming too heavy or stiff.
Consider having stitch markers handy. These are small plastic clips or rings that help keep track of your rounds, which is especially useful when working in continuous spirals.
Lastly, prepare a pair of scissors, and make sure you have a flat and well-lit surface to work on. Keeping your workspace organized and clutter-free will help you focus and avoid missing any steps in the pattern.
To get started with your crochet turtle making for beginners – pattern, you need to understand a few fundamental crochet stitches. These form the foundation of most amigurumi projects.
The most common stitch used in turtle patterns is the single crochet (sc). It’s simple, compact, and creates a tight fabric ideal for stuffed toys. Practicing this stitch will improve your control and consistency.
Another important technique is the magic ring (or magic circle). This method allows you to start crocheting in the round without leaving a hole in the center of your turtle’s head or shell. It may take a few tries to master, but it’s essential for neat and professional-looking results.
Increasing (inc) and decreasing (dec) are two techniques used to shape your turtle. Increasing means adding more stitches in the same space, helping expand the body. Decreasing involves combining stitches to make the piece narrower, perfect for shaping the limbs or tail.
Crocheting in the round is also essential. Unlike flat crochet, where you work in rows, amigurumi patterns are usually worked in spirals. This technique helps build a 3D shape, which is perfect for creating your turtle’s round body.
You may also encounter slip stitch (sl st) and chain stitch (ch) in your pattern. These are used to finish rounds cleanly or create small transitions between parts of the turtle.
As a beginner, don’t rush through learning these stitches. Take your time practicing each one before jumping into the full pattern. Remember, crochet turtle making for beginners – pattern is a journey, and mastering the basics will give you confidence in all your future projects.
Now that you understand the tools and stitches, it’s time to start your very first crochet turtle making for beginners – pattern. This step-by-step guide will walk you through each part of the turtle, from head to tail.
Start with the head. Use your green yarn and magic ring to create a tight circle. Work in rounds using single crochets, increasing to make the head wider, then decreasing to shape the back. This will form a cute, rounded turtle face.
Next, crochet the body (shell). For this, you’ll switch to a different color (like brown or tan). Start with a magic ring and gradually increase until you form a flat circle. Then add a few rounds without increasing to build depth, and finally decrease to close the shell. Make a top and bottom piece for the shell and sew them together after stuffing.
Make the limbs. You’ll crochet four legs using short rounds. Each leg is a small tube, simple and quick to create. Fill them lightly with stuffing before attaching them to the body. Don’t forget to make a tiny tail as well!
Attach the head and limbs. Use a yarn needle to securely sew each part to the shell. Make sure they’re positioned evenly so your turtle can sit upright. This is where stitch markers and symmetry come in handy.
Add the eyes and face. Use safety eyes or black yarn to create expressive turtle eyes. You can also embroider a smile for extra charm. Facial features give your turtle personality, so have fun with it!
Finish and secure. Check all seams and stitches to ensure everything is tight and secure. Weave in loose ends with your needle, and your turtle is complete! Celebrate your success—you’ve finished your first crochet turtle making for beginners – pattern!
Learning crochet turtle making for beginners – pattern is just the beginning of your crochet journey. Here are some helpful tips to grow your skills and enjoy the process.
Practice consistently. Like any craft, the more you crochet, the better you’ll become. Set aside a few minutes each day to practice your stitches, and you’ll see improvement quickly.
Watch tutorials. Visual learners benefit greatly from video tutorials. Many experienced crocheters share full turtle-making videos online that you can follow along with.
Join a crochet community. Whether it’s a Facebook group, a Reddit forum, or a local crafting club, connecting with others helps you stay motivated. You can ask questions, share your turtles, and learn from fellow enthusiasts.
Experiment with colors and sizes. Once you’re confident, try using different yarns or adjusting the pattern size. This helps you understand how materials affect your final product.
Keep a pattern journal. Write down patterns you’ve tried, what worked well, and what didn’t. This creates a helpful reference as you tackle more complex projects.
Don’t fear mistakes. Everyone makes them! The important part is learning from them. Frogging (unraveling your work) is common in crochet, so don’t get discouraged—every stitch teaches you something.
Q1: How long does it take to crochet a turtle for beginners?
Most beginners can complete a simple crochet turtle in 3 to 6 hours, depending on experience and pace. Break it into small sessions to avoid fatigue.
Q2: What size crochet hook should I use for a turtle pattern?
A 4.0mm or 4.5mm hook is ideal for worsted weight yarn. Smaller hooks (3.0mm) make tighter stitches, which is better for amigurumi but slightly harder for beginners.
Q3: Can I use any yarn for crochet turtle making?
Yes, but worsted weight yarn (medium #4) in cotton or acrylic is best. Thicker yarns create larger turtles, while thinner yarns are harder to work with.
Q4: Is this pattern safe for kids?
Yes, just avoid using safety eyes if the turtle is for children under 3. Instead, embroider the eyes with yarn or thread to ensure safety.
Q5: Do I need to know advanced stitches for this project?
Not at all! This crochet turtle making for beginners – pattern uses only basic stitches like single crochet, increases, and decreases.
Q6: Where can I find more beginner crochet patterns?
Many websites, YouTube channels, and crafting blogs offer free amigurumi patterns. Try searching for “easy amigurumi turtle pattern” or joining a crochet Facebook group.
Crochet turtle making for beginners – pattern is a joyful and accessible project for anyone new to crochet. By following this guide, you’ve learned how to gather materials, master basic stitches, and create your very own adorable turtle from scratch. With practice and patience, your skills will only grow, opening the door to endless handmade creations.
love to hear from you! Share your experience with this pattern and leave a sincere opinion in the comments. Did the guide help you? What would you like to see in future tutorials? Your suggestions help improve our content for the crochet community!
