
Bird-shaped Pincushion - Pattern

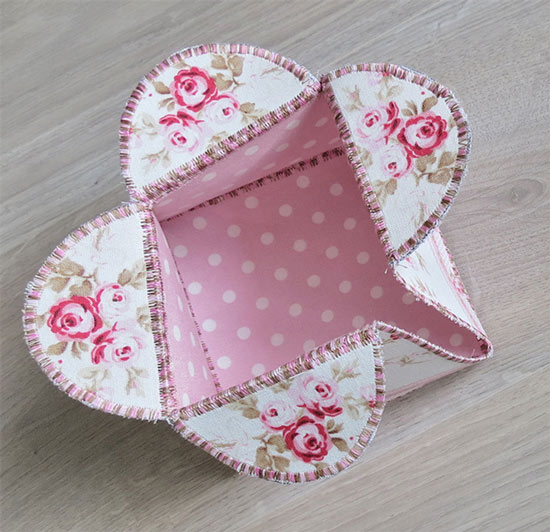
A Fabric Flower Box – Pattern is more than just a simple sewing project; it is a versatile and charming way to organize your home while adding a touch of handmade elegance. Whether you are looking to brighten up a windowsill or create a unique gift set, mastering this specific fabric container design allows you to blend functionality with personal style. By selecting the right textiles and following a structured stitching guide, anyone from a beginner to an advanced crafter can produce a professional-looking decorative storage bin that mimics the delicate aesthetic of a flower garden.
Understanding the intricacies of a Fabric Flower Box – Pattern requires a bit of patience and an eye for detail, especially when it comes to choosing complementary fabrics. The beauty of this project lies in its structural integrity, which is achieved through the use of heavyweight interfacing or stiffening materials. When you start your journey into DIY home decor, having a reliable sewing template ensures that your corners are sharp and your box maintains its shape even when filled with items. This article will walk you through every essential step to ensure your handcrafted box turns out perfectly every time.
To successfully execute a Fabric Flower Box – Pattern, you must focus on the harmony between the outer shell fabric and the inner lining. This project is an excellent way to use up fabric scraps or showcase high-quality cotton prints. Because the design focuses on a “blooming” effect—where the sides often fold out or feature decorative petals—precision in seam allowance is vital. As we dive into the technical aspects of this sewing tutorial, remember that the quality of your notions and your attention to the cutting layout will define the final durability and visual appeal of your fabric organizer.
When embarking on a Fabric Flower Box – Pattern, the selection of your base fabric is the most critical decision you will make. You want a material that is sturdy enough to stand upright, such as canvas, denim, or a thick upholstery cotton. If you choose a lighter quilting cotton, you must pair it with a strong fusible fleece to provide the necessary support.
The interfacing selection acts as the skeleton of your project, giving the Fabric Flower Box – Pattern its signature crisp edges. Without proper reinforcement, the “petals” or sides of your box may sag, losing the floral silhouette that makes this design so special. I recommend using a double-sided fusible stiffener for the most professional results in textile crafting.
Don’t forget the importance of your sewing thread and needle size; a heavy fabric requires a 90/14 or 100/16 needle to prevent breakage. Using a high-quality polyester thread ensures that the tension remains consistent throughout the construction process. This prevents the seams from puckering, which is essential for a clean, high-end handmade aesthetic.
Measuring tools are your best friends when following a Fabric Flower Box – Pattern precisely. A rotary cutter, self-healing mat, and a clear acrylic ruler allow for the exact geometric cuts needed to form the box’s base. Even a fraction of an inch off can result in a lopsided storage unit, so take your time during the fabric preparation phase.
The inner lining offers a chance to play with color theory and contrast. While the exterior of your Fabric Flower Box – Pattern might be a subtle neutral, the interior can pop with vibrant floral patterns or geometric shapes. This “surprise” element is a hallmark of high-quality bespoke sewing and adds a layer of depth to your finished home accessory.
Finally, consider the embellishments that will finish your box. Whether you add satin ribbons, fabric buttons, or intricate embroidery stitches, these details elevate the Fabric Flower Box – Pattern from a simple utility item to a piece of art. Gathering all these sewing supplies beforehand will streamline your workflow and make the creative process much more enjoyable.
The first physical step in realizing your Fabric Flower Box – Pattern is the fabric marking process. Using a tailor’s chalk or a heat-erasable pen, transfer the dimensions from your pattern template onto the wrong side of the fabric. Accuracy here ensures that all four sides of the fabric cube meet perfectly at the mitered corners.
Once marked, cutting your fabric panels should be done with a steady hand. If you are making a set of boxes, stack your textile layers carefully to ensure uniformity across all pieces. This consistency is what separates a beginner sewing project from a professional-level craft, particularly when following a complex Fabric Flower Box – Pattern.
After cutting the fabric, you must apply the fusible interfacing. Align the glue side of the stiffener with the wrong side of your main fabric, then use a steam iron to bond them together. This step is non-negotiable for a Fabric Flower Box – Pattern because it provides the “body” required for the box to hold its shape independently.
Next, prepare your lining pieces in the same manner, though these usually do not require the same level of stiffening. If your Fabric Flower Box – Pattern includes exterior pockets or decorative “petals,” cut those now and finish their edges with a zigzag stitch or a serger to prevent fraying. Organization during this phase prevents mistakes during the assembly line.
Pinning or using wonder clips is essential before you head to the sewing machine. Because the layers of a Fabric Flower Box – Pattern can become quite thick—especially with the added interfacing—clips often work better than pins. They hold the heavyweight materials securely without bending or leaving permanent holes in your delicate fabrics.
The final part of preparation involves checking your sewing machine settings. Ensure your stitch length is set slightly longer (around 3.0mm to 3.5mm) to accommodate the thickness of the Fabric Flower Box – Pattern layers. Testing on a fabric scrap first will help you calibrate the thread tension, ensuring a smooth and even topstitch later on.
The actual assembly of the Fabric Flower Box – Pattern begins by sewing the side seams of the outer panels. Use a consistent 1/4 inch seam allowance to maintain the intended dimensions of the sewing pattern. Backstitching at the start and end of every seam is vital to ensure the structural integrity of your fabric vessel.
To create the “flower” look, the top edges of the box are often folded over or shaped into curves. When following a Fabric Flower Box – Pattern, you might encounter curved seams; clipping into the seam allowance (without cutting the thread) allows the fabric to lay flat when turned right-side out. This technique is a staple in advanced garment construction applied to home decor.
Assembling the base is often the most challenging part of a Fabric Flower Box – Pattern. You must match the bottom panel corners with the side seams perfectly. I recommend “pinning the centers” first and working your way to the corners to avoid fabric shifting. This ensures your DIY storage box sits level on flat surfaces.
The lining is sewn almost identically to the outer shell, but you must leave a 3-4 inch turning gap at the bottom. This opening allows you to pull the entire Fabric Flower Box – Pattern through once the lining and outer shell are joined at the top. It’s a bit like magic, seeing the raw edges disappear inside the finished product.
Joining the lining to the outer shell at the top rim requires careful alignment of the side seams. Once you’ve stitched all the way around the top circumference of your Fabric Flower Box – Pattern, trim the excess bulk from the corners. This produces sharp, crisp points that define the geometric shape of the handmade container.
After turning the box right-side out through the gap, the final step is topstitching the upper edge. This not only closes the seam but also provides a decorative finish that screams “professional quality.” A well-executed topstitch on a Fabric Flower Box – Pattern acts as a frame, highlighting the fabric choice and the unique floral design.
Customization is where your Fabric Flower Box – Pattern truly comes to life. You can add fabric handles made from matching scrap fabric or even use leather straps for a modern, industrial look. Adding hardware like rivets or grommets can turn a soft fabric bin into a durable organizing solution for any room.
If you want a more “organic” flower look, consider using fabric manipulation techniques like pleating or gathering. By gathering the top edge of your Fabric Flower Box – Pattern, you create a ruffled effect that looks like a blooming peony. These creative sewing variations allow you to produce multiple boxes that all look distinctly different.
For those interested in quilting, you can quilt the side panels before assembly. Adding a diamond quilt pattern or free-motion embroidery to your Fabric Flower Box – Pattern adds texture and a luxury feel. This is a great way to practice quilting skills on a smaller, manageable scale before tackling a full-sized patchwork quilt.
Protection is also a factor if the box will be used in a kitchen or bathroom. Applying a fabric protector spray helps the Fabric Flower Box – Pattern resist stains and moisture. Since these are washable fabric items, ensure that all your components (including the interfacing) are laundry-safe before you begin the sewing process.
Labeling your boxes can also add a functional touch. You can sew a small chalkboard fabric patch or a clear vinyl pocket onto the side of the Fabric Flower Box – Pattern. This makes it the perfect nursery organizer or craft room storage where visibility of the contents is key for staying organized.
Finally, take a moment to press your project one last time. A good final press with plenty of steam sets the seams and gives the Fabric Flower Box – Pattern its permanent shape. This step is often skipped by beginners, but it is the secret ingredient to making your handmade items look like they were bought from a high-end home boutique.
What is the best fabric for a Fabric Flower Box – Pattern?
The best fabrics are heavyweight cottons, canvas, or duck cloth. These provide the necessary stiffness. If you want to use lighter fabrics like calico, you must reinforce them with heavy-duty interfacing to ensure the box doesn’t collapse.
Can I wash my Fabric Flower Box once it’s finished?
Yes, provided you used washable interfacing and pre-shrunk fabrics. It is usually best to hand wash or use a delicate cycle and air dry to maintain the structural shape of the Fabric Flower Box – Pattern.
How do I make the box stand up straight?
The secret is in the interfacing. Products like Peltex or Decovil are specifically designed for bag making and box construction. They are very stiff and will keep your Fabric Flower Box – Pattern upright even when empty.
Is this project suitable for a beginner?
Absolutely! While it looks complex, a Fabric Flower Box – Pattern is mostly composed of straight lines. As long as you can sew a straight seam and follow measuring instructions, you can complete this DIY project in an afternoon.
How much fabric do I need for a standard-sized box?
Generally, half a yard (0.5 meters) of both the main fabric and the lining is enough for a medium-sized Fabric Flower Box – Pattern. This also leaves enough room for coordinating accessories or handles.
Do I need a special sewing machine for this?
A standard domestic sewing machine can handle this project. However, because you will be sewing through multiple layers of thick fabric and interfacing, using a walking foot and a sharp denim needle is highly recommended.
In this guide, we have explored the comprehensive journey of creating a Fabric Flower Box – Pattern, from the initial material selection to the final decorative touches. We learned that the foundation of a great fabric box lies in the combination of sturdy textiles and high-quality fusible interfacing. By following a structured cutting and sewing process, you can transform simple fabric scraps into a beautiful, functional home organization tool that reflects your personal creativity and stitching skills.
The versatility of the Fabric Flower Box – Pattern makes it an ideal project for anyone looking to improve their sewing techniques while producing something genuinely useful. Whether you use it as a planter cover, a desk organizer, or a gift basket, the skills you’ve practiced here—like mitered corners, lining assembly, and topstitching—will serve you well in all your future crafting endeavors.We hope this tutorial inspires you to sit down at your sewing machine and start creating. Please leave your sincere opinion in the comments below and share your suggestions for future patterns or variations you would like to see.


