
American-style placemat with a fruit theme - Pattern

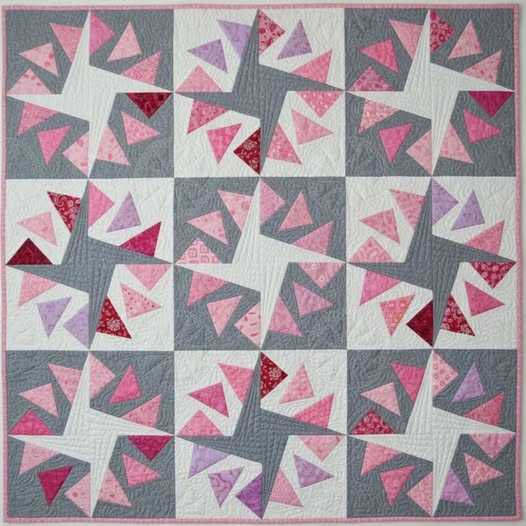
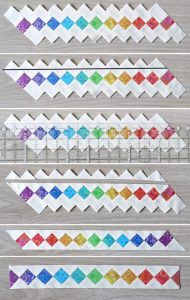
The Quilt Circle Geese Patchwork – Pattern is one of the most visually striking designs in the world of quilting, combining the sharp, geometric precision of traditional “Flying Geese” with the soft, flowing elegance of a circular layout. This unique approach to quilting transforms a classic staple into a modern masterpiece that draws the eye toward a central focal point, creating a sense of movement and rhythm. Whether you are a seasoned quilter looking for a challenge or a passionate beginner eager to master new techniques, understanding how to construct a Quilt Circle Geese Patchwork – Pattern will elevate your craft and allow you to produce breathtaking home decor pieces.
Mastering the Quilt Circle Geese Patchwork – Pattern requires a blend of accurate cutting, thoughtful color selection, and a bit of patience with curved piecing. The beauty of this design lies in its versatility; it can look incredibly traditional when made with reproduction fabrics or strikingly contemporary when executed with bold solids or minimalist prints. By repeating the triangular “geese” units in a rounded formation, the Quilt Circle Geese Patchwork – Pattern mimics the appearance of a compass or a sunburst, making it an ideal choice for center medallions or wall hangings that require a high-impact aesthetic.
In the following guide, we will dive deep into the technicalities and the creative joys of working with the Quilt Circle Geese Patchwork – Pattern. We will explore the essential tools you need, the step-by-step logic of the construction, and the professional tips that ensure your points stay sharp even as they rotate around a curve. This article is designed to provide a comprehensive look at the Quilt Circle Geese Patchwork – Pattern, ensuring that your next sewing project is not only successful but also a deeply rewarding artistic journey that showcases your skill and dedication to the art of quilting.
The Quilt Circle Geese Patchwork – Pattern is essentially a variation of the “Flying Geese” block, which is a fundamental element in quilting consisting of one large triangle (the goose) and two smaller triangles (the sky). In this specific version, these units are tapered or arranged in a circular arc rather than a straight line. This creates a “Circular Flying Geese” effect that is highly prized for its complexity and beauty.
To successfully execute a Quilt Circle Geese Patchwork – Pattern, you must understand the geometry of a circle. Unlike standard blocks, these units are often foundation paper pieced to ensure that every “goose” is identical in size and angle. This precision is vital because even a tiny fraction of an inch of error can cause the circle to warp or fail to lie flat when finished.
The Quilt Circle Geese Patchwork – Pattern relies heavily on high contrast. To make the circular motion “pop,” quilters usually choose a “goose” color that stands out significantly from the “sky” or background color. This contrast emphasizes the directional flow of the triangles, making the circular motion appear more dynamic and fluid across the surface of the quilt.
When you look at a Quilt Circle Geese Patchwork – Pattern, you are seeing a celebration of symmetry. The pattern is usually divided into quadrants or segments. Most quilters find it easier to sew these individual wedges first and then join them together to form the full circle. This modular approach makes the large-scale project much more manageable for home sewing machines.
Another key aspect of the Quilt Circle Geese Patchwork – Pattern is the use of specialized rulers or templates. Because the triangles are forming a curve, the sides of the triangles are not always perfect 45-degree angles. Using a dedicated template ensures that the math is already done for you, allowing you to focus on the sewing and fabric selection.
Finally, the Quilt Circle Geese Patchwork – Pattern is an excellent way to practice “fussy cutting.” If you have a fabric with a specific motif, you can center it within the geese or in the very center of the circle. This adds a layer of personalization and detail that makes your quilt a one-of-a-kind piece of textile art that tells a story.
To start your journey with the Quilt Circle Geese Patchwork – Pattern, you need high-quality 100% cotton fabric. Cotton is preferred because it holds a crease well and doesn’t slip as much as synthetic blends. Since there are many seams meeting at the center of the circle, using a thin but durable thread is also crucial to prevent excessive bulk in your patchwork.
A sharp rotary cutter and a self-healing mat are non-negotiable for the Quilt Circle Geese Patchwork – Pattern. Precise cutting is the foundation of any good quilt, but it is especially important here. You will also need a fine-point fabric marker or a tailor’s pencil to mark your seam allowances and pivot points, ensuring that your “geese” points are never cut off during assembly.
Foundation Paper Piecing (FPP) paper is highly recommended for the Quilt Circle Geese Patchwork – Pattern. FPP allows you to sew directly onto a paper template, which acts as a guide for every single seam. This technique is the best way to achieve those razor-sharp points that make the circular geese look so professional and intricate.
You will also need a variety of acrylic rulers. While a standard rectangular ruler is useful, a circular ruler or a “Dresden Plate” template can be very helpful for the Quilt Circle Geese Patchwork – Pattern. These tools help in squaring up the segments and ensuring that the outer edge of your circle is a perfect 360-degree round shape.
Ironing is perhaps the most underrated step in creating a Quilt Circle Geese Patchwork – Pattern. A good steam iron and a wool pressing mat will help you flatten your seams as you go. “Pressing as you go” is a golden rule in quilting; it prevents the fabric from stretching and keeps the circular shape from becoming distorted or “wavy.”
Lastly, don’t forget your sewing machine needles. For the Quilt Circle Geese Patchwork – Pattern, a size 70/10 or 80/12 Microtex needle is ideal, especially if you are using paper piecing. The sharp point of the needle pierces the paper easily and creates small holes that make the paper easier to tear away once the block is completed.
The first step in assembling the Quilt Circle Geese Patchwork – Pattern is preparing your templates. If you are using paper piecing, print out your segments and organize your fabric scraps. It is a good idea to label each fabric piece with a number that corresponds to the section on your pattern to avoid confusion during the sewing process.
Next, you will begin sewing the first “goose.” In a Quilt Circle Geese Patchwork – Pattern, you usually start from the inside of the wedge and work your way out. Place your background fabric and your goose fabric right sides together, sew along the line, and then fold back and press. This repetitive process builds the “flight” of geese within the arc.
Once you have completed several wedges, it is time for “trimming.” In the Quilt Circle Geese Patchwork – Pattern, trimming is vital. You must leave exactly a quarter-inch seam allowance around each wedge. If your seam allowance is too wide, the circle will be too large; if it is too small, the pieces won’t meet correctly in the middle.
Joining the wedges is where the Quilt Circle Geese Patchwork – Pattern truly comes to life. Pin the wedges carefully, matching the intersection points of the triangles. It is often helpful to use “fork pins” or to pin at the exact point where the seams meet to ensure that the geese align perfectly from one wedge to the next.
After the circle is fully assembled, you will likely have a raw edge on the outside and a small hole or a dense intersection in the center. Many quilters choose to finish the Quilt Circle Geese Patchwork – Pattern by appliqueing the entire circle onto a larger background square. This hides the raw edges and provides a stable base for the intricate patchwork.
The final stage of construction involves removing the foundation paper. Be gentle during this process so you don’t pull on the stitches. Once the paper is gone, give your Quilt Circle Geese Patchwork – Pattern one final, heavy press with plenty of steam. This sets the stitches and ensures the block is perfectly flat and ready for the quilting stage.
Color theory plays a massive role in the success of a Quilt Circle Geese Patchwork – Pattern. You can create a “gradient” effect by using different shades of the same color for each goose, moving from dark in the center to light on the edges. This gives the pattern a glowing effect that adds depth and dimension to the finished quilt.
Don’t be afraid to mix textures in your Quilt Circle Geese Patchwork – Pattern. While cotton is the standard, incorporating a bit of linen or even a subtle metallic print can add a sophisticated touch. Just be sure that the fabrics have a similar weight so they don’t pull against each other and cause the circle to warp.
The “sky” (background) of your Quilt Circle Geese Patchwork – Pattern doesn’t have to be a single solid color. Using a “low volume” print—a fabric that is mostly white or cream with a very small, subtle pattern—can add visual interest without distracting from the main design. This keeps the focus on the circular geese while adding a modern, scrappy feel.
You can also experiment with the size of the geese. In some versions of the Quilt Circle Geese Patchwork – Pattern, the triangles get larger as they move toward the outer edge of the circle. This mimics the perspective of things moving toward the viewer and creates a powerful 3D effect that is very popular in modern art quilts.
Quilting (the actual stitching through the three layers) is another way to enhance the Quilt Circle Geese Patchwork – Pattern. Following the lines of the geese with straight-line quilting can emphasize the geometry, while “echo quilting” around the circle can create the illusion of ripples in a pond, further enhancing the circular theme.
Finally, consider the center of your Quilt Circle Geese Patchwork – Pattern. If your points don’t meet perfectly in the middle (which is common!), you can cover the center with a circular applique piece or a decorative button. This “cheater’s tip” actually adds a lovely decorative element and makes the project much less stressful for those new to the pattern.
1. Is the Quilt Circle Geese Patchwork – Pattern suitable for beginners? While it is more advanced than a basic square quilt, a beginner can certainly achieve it using the Foundation Paper Piecing (FPP) method. FPP takes the guesswork out of the geometry, making it accessible to anyone with basic sewing machine skills and a lot of patience.
2. How do I make sure my circle lies flat? The key to a flat Quilt Circle Geese Patchwork – Pattern is accurate seam allowances and frequent pressing. If your circle starts to “cup” (bowl shape) or “wave,” it usually means your seam allowances are inconsistent. Always use a 1/4 inch foot on your sewing machine.
3. Can I make this pattern without paper piecing? Yes, you can use acrylic templates and traditional piecing, but it is much more difficult. The Quilt Circle Geese Patchwork – Pattern involves many bias edges (stretchy edges), and paper piecing stabilizes these edges, preventing the fabric from distorting as you sew.
4. What is the best size for a Circle Geese block? Most patterns for the Quilt Circle Geese Patchwork – Pattern range from 12 inches to 24 inches. A 12-inch block is great for a pillow or a bag, while a 24-inch block makes a stunning center for a medallion quilt.
5. How much fabric do I need? This depends on the size, but because of the many small pieces, the Quilt Circle Geese Patchwork – Pattern is a fantastic “scrap buster.” You generally need about 1 yard of background fabric and a variety of fat quarters or scraps for the geese themselves.
6. How do I quilt the finished top? For a Quilt Circle Geese Patchwork – Pattern, “stitching in the ditch” (sewing in the seams) is a great way to hide your quilting. Alternatively, free-motion quilting in the background areas can make the circular geese stand out even more.
In this article, we have explored the intricate and beautiful world of the Quilt Circle Geese Patchwork – Pattern. From understanding the basic geometry and history of the “Flying Geese” design to selecting the right materials and mastering the step-by-step construction, it is clear that this pattern is a rewarding challenge for any quilter. We discussed the importance of precision, the benefits of foundation paper piecing, and how to use color and texture to make your project truly unique. By following these techniques, you can transform simple triangles into a rotating masterpiece of textile art.
We hope this guide inspires you to start your own Quilt Circle Geese Patchwork – Pattern project. Whether you use it as a standalone wall hanging or as the heart of a large quilt, the results are sure to be impressive. Please leave your sincere opinion and any suggestions for future patterns you would like to see explained! Your feedback helps us create better content for the quilting community.


